
by Kanimozhi BV | Jan 31, 2025 | Garden, Exterior
Railway sleepers are an excellent choice for creating a durable and stylish garden border. Their rustic charm, affordability, and ease of installation make them popular among DIY gardeners and landscapers.
Whether you want to define flower beds, create a pathway edge, or frame your lawn, sleepers offer a practical and visually appealing solution.
In this guide, I will walk you through the step-by-step process on how to lay railway sleepers as a border, including the tools and materials needed, installation techniques, and maintenance tips.
Why Use Railway Sleepers for Garden Edging?
Railway sleepers have become a go-to option for garden edging due to their versatility and durability. Here are some key benefits:
- Sturdy and Long-Lasting: Timber sleepers, especially hardwood ones, can last for decades with proper treatment.
- Aesthetic Appeal: Their natural wood finish complements both modern and traditional garden designs.
- Cost-Effective: Compared to stone or brick edging, sleepers are relatively affordable and easy to install.
- DIY Friendly: They require minimal groundwork and can be laid by homeowners with basic tools.

New vs. Reclaimed Railway Sleepers
| Feature |
New Railway Sleepers |
Reclaimed Railway Sleepers |
| Condition |
Fresh, untreated |
Aged, often treated with creosote |
| Appearance |
Smooth, uniform |
Weathered, rustic look |
| Durability |
Longer lifespan if treated properly |
May have some wear but still durable |
| Cost |
More expensive |
Generally cheaper |
| Suitability |
Ideal for formal gardens |
Great for rustic, natural designs |
New sleepers offer a cleaner look and longer lifespan, while reclaimed sleepers provide character and sustainability. The choice depends on your garden’s style and budget.
Before starting your project, gather the necessary materials and tools.
Materials:
- Railway sleepers (hardwood or softwood)
- Gravel or sand for bedding
- Long timber screws, rebar, or stakes for securing
- Wood preservative (if using untreated sleepers)
- Saw (for cutting sleepers to size)
- Drill and screws
- Spirit level
- Shovel and rake
- Rubber mallet (to position sleepers)
Having the right tools ensures a smoother installation process and a professional-looking result.
Step-by-Step Guide: How to Lay Railway Sleepers as a Border?
Step 1: Plan and Mark the Border Area
- Determine the layout of your sleeper border and mark the area using string or chalk.
- Decide whether you want the sleepers laid flat, stacked, or upright.
- Measure the sleepers to ensure they fit the space.
Step 2: Prepare the Ground
- Dig a shallow trench where the sleepers will sit, approximately 5-10 cm deep.
- Remove any weeds or debris from the area.
- Ensure the base is level using a spirit level to prevent uneven edging.
- Add a layer of gravel or sand for stability and drainage.
Step 3: Position the Sleepers
- Lay the sleepers in the trench according to your planned design.
- If placing them flat, ensure they sit evenly along the border.
- For stacked sleepers, arrange the first layer securely before adding additional layers.

Step 4: Secure the Sleepers in Place
- Option 1: Wooden Stakes – Drive stakes behind the sleepers and screw them in place.
- Option 2: Rebar or Metal Rods – Drill holes and hammer rods through the sleepers into the ground for added stability.
- Option 3: Timber Screws – If stacking, use long screws to join the layers together.
Step 5: Finishing Touches
- Apply a wood preservative to prevent rotting and extend the lifespan of the sleepers.
- Fill any gaps with gravel, soil, or plants to integrate the edging with the garden.
- Check the alignment one last time and make necessary adjustments.
Maintenance Tips for Railway Sleeper Borders
To ensure your railway sleeper border remains in good condition, follow these maintenance practices:
- Prevent Rotting: Use a wood preservative, especially on the ends that touch the soil.
- Check Stability: Inspect sleepers periodically and secure any that become loose.
- Clean and Treat: Wash off dirt and apply a sealant to protect the wood from weather damage.
- Improve Drainage: Ensure water does not pool around the sleepers, as excess moisture can speed up decay.
Creative Garden Edging Ideas with Railway Sleepers
Railway sleepers can be used in various ways beyond simple garden borders. Here are some inspiring ideas:
- Raised Flower Beds: Stack sleepers to create elevated garden beds for flowers or vegetables.
- Pathway Edging: Use sleepers to line a gravel or stone pathway, giving it a structured look.
- Layered Steps: Create steps on sloped gardens using sleepers for a natural transition between levels.
- Combination Borders: Mix railway sleepers with gravel, bricks, or metal edging for a unique design.

Conclusion
Laying railway sleepers as a garden border is a simple yet effective way to enhance your outdoor space. By following the right installation steps and using quality materials, you can create a long-lasting, attractive edging that defines your garden beautifully.
Whether you prefer a rustic reclaimed look or a polished new sleeper design, this DIY project adds character and structure to your garden and learn about few best garden edging sleepers and how to lay them.
If you’re planning to install railway sleeper borders, take your time to prepare the ground properly, secure the sleepers well, and maintain them regularly for the best results.
Frequently Asked Questions (FAQs)
1. Can I lay railway sleepers directly on soil?
Yes, but using a gravel or sand base improves stability and drainage, preventing rot over time.
2. Do I need to treat railway sleepers before installation?
If using new untreated sleepers, apply a wood preservative to protect against moisture and pests. Reclaimed sleepers may already have treatment but should be checked for any hazardous chemicals.
3. How long do railway sleepers last in the garden?
With proper treatment and maintenance, railway sleepers can last 15-30 years, depending on wood type and environmental conditions.
4. Should I use hardwood or softwood sleepers?
Hardwood sleepers (oak or tropical hardwood) are more durable but expensive. Softwood sleepers (pine or spruce) are budget-friendly but require regular treatment to prevent decay.
5. Can I use reclaimed railway sleepers for borders?
Yes, but ensure they are free from harmful chemicals like creosote, which can be hazardous for plants and pets.

by Kanimozhi BV | Jan 30, 2025 | Garden, Exterior, Pest Control
Need tips on how to deter foxes? If you’ve noticed foxes roaming around your garden, digging up flower beds, or rummaging through bins, you’re not alone. Foxes are common visitors to UK gardens, especially in urban and suburban areas.
While they are fascinating creatures, their presence can become a nuisance—damaging plants, making a mess, and even disturbing pets.
I’ve dealt with fox problems in my own garden, so I know how frustrating it can be. The good news is that there are effective and humane ways to deter foxes without harming them.
In this guide, I’ll cover why foxes enter gardens, how to stop them, how to deter foxes & the best deterrent methods to keep your outdoor space fox-free.
Why Are Foxes Coming into Your Garden?
What Attracts Foxes to Gardens?
Foxes are opportunistic animals, and if they’re frequently visiting your garden, they’ve likely found something appealing. Common attractants include:
- Food sources: Leftover pet food, unsecured rubbish bins, compost heaps, or bird feeders.
- Sheltered spots: Overgrown areas, garden sheds, and wood piles provide safe resting or breeding areas.
- Small animals or birds: Foxes prey on rodents, insects, and even unattended chickens or rabbits.
Do Foxes Dig Holes in Gardens?
Yes, foxes are known to dig holes in lawns and flower beds. They do this for a few reasons:
- Hunting for grubs and worms beneath the soil.
- Burying food for later retrieval.
- Marking their territory by scratching up soil.
If you’ve spotted small, shallow holes with scattered soil, it’s likely fox activity.

How to Deter Foxes? – Best Prevention Methods
1. Secure Your Garden to Keep Foxes Out
A well-secured garden is the best way to prevent foxes from entering. Here’s how:
- Install fox-proof fencing: A 6ft fence with a 45-degree outward overhang makes it harder for foxes to climb over.
- Bury fencing at least 30cm underground to prevent foxes from digging underneath.
- Block entry points under sheds, decks, and fences using wire mesh or wooden panels.
2. Remove Food Sources That Attract Foxes
Foxes won’t stay where there’s no food. Take these steps to eliminate attractants:
- Secure your bins with lockable lids and avoid leaving food waste exposed.
- Remove uneaten pet food from outdoor areas, especially overnight.
- Avoid feeding birds on the ground—use hanging bird feeders instead.
3. Use Natural & DIY Fox Deterrents
Foxes dislike strong smells and certain textures. Here are some natural deterrents to try:
- Cayenne pepper, garlic, or vinegar: Sprinkle these in areas where foxes frequent.
- Predator urine (e.g., lion or wolf urine granules): Available in garden centres, this can make foxes believe a predator is nearby.
- Citrus peels (lemons, oranges, or grapefruits): Foxes dislike the strong citrus scent.
4. Install Motion-Activated Fox Repellents
Foxes are skittish animals and can be scared away by motion-activated devices such as:
| Device |
How It Works |
| Ultrasonic Repellents |
Emits high-frequency sounds that deter foxes. |
| Motion-Activated Sprinklers |
Sprays water when a fox is detected. |
| Security Lights |
Sudden light startles foxes at night. |
5. Make Your Garden Uncomfortable for Foxes
Foxes prefer soft soil and hidden areas. Making your garden less inviting can help:
- Lay down spiky plants or bramble cuttings near fences and entry points.
- Use rough gravel in flower beds to discourage digging.
- Keep your garden tidy—trim overgrown bushes and clear cluttered spaces.

How to Stop Foxes Digging in Your Garden?
Why Do Foxes Dig in Lawns & Flower Beds?
Foxes dig in gardens for:
- Hunting insects, worms, and small rodents.
- Burying food for later.
- Creating small dens or marking their territory.
How to Prevent Foxes from Digging?
If foxes are constantly digging in your garden, try these solutions:
- Cover flower beds with netting or mesh.
- Sprinkle natural repellents (like chilli powder or vinegar) over affected areas.
- Use strong-smelling fertilisers, such as blood meal, to deter foxes.
- Apply a non-toxic fox repellent spray to discourage digging.
Are Foxes Dangerous? Understanding Risks & Misconceptions
Do Foxes Attack Pets or Humans?
Foxes are generally not dangerous to humans. However, they may pose a risk to small pets like:
- Rabbits, guinea pigs, and chickens (if left unsecured).
- Small cats or kittens (rare cases).
To keep your pets safe:
- Keep small animals in secure hutches or coops.
- Avoid leaving pet food outside overnight.
- Supervise small pets if foxes are common in your area.
Are Foxes Noisy? How to Reduce Fox Screaming at Night?
Foxes are known for their loud screaming sounds, especially during mating season (January–March). To reduce nighttime disturbances:
- Limit food sources so foxes are less likely to visit.
- Use motion-activated repellents to keep them away at night.
- Ensure fences are secure to prevent foxes from entering.

Legal & Ethical Considerations for Fox Deterrence in the UK
Is It Legal to Trap or Relocate Foxes?
In the UK, it is illegal to trap and release foxes elsewhere. Foxes are territorial, and relocating them can cause distress or death. Instead, focus on humane deterrent methods.
Should You Call Pest Control for Foxes?
In most cases, pest control is unnecessary. However, if a fox is injured or behaving aggressively, contact:
- The RSPCA or local wildlife rescue.
- A humane fox management service that follows UK regulations.
Common Mistakes to Avoid When Trying to Deter Foxes
- Using poison or harmful chemicals – This is illegal and dangerous to other wildlife.
- Ignoring entry points – Foxes will return if they find a way in.
- Leaving food sources available – Unsecured bins and pet food encourage fox visits.
- Inconsistent deterrents – Foxes are persistent; you need to apply multiple methods consistently.
Conclusion – Keeping Your Garden Fox-Free
Foxes are a natural part of the UK’s wildlife, but if they’re causing problems in your garden, humane deterrent methods can help keep them away.
- Secure your garden with proper fencing.
- Remove food sources like pet food and rubbish.
- Use natural repellents such as citrus, vinegar, and garlic.
- Install motion-activated deterrents to scare foxes away.
By following these steps on how to deter foxes, you can enjoy a peaceful, fox-free garden without harming these fascinating creatures.
Related Article: How to Stop Squirrels Digging Up Lawn? – Best Ways to Deter & Get Rid of

by Kanimozhi BV | Jan 30, 2025 | Garden, Exterior, Pest Control
If you’ve ever woken up to find small, messy holes scattered across your lawn, chances are, squirrels are the culprits. These little creatures may look cute, but their digging habits can be frustrating, leaving behind damaged turf, uprooted plants, and ruined flower beds.
As someone who has dealt with persistent squirrel activity in my garden, I know how annoying it can be. Fortunately, there are effective, humane ways on how to stop squirrels digging up lawn without harming them. In this guide, I’ll explain why squirrels dig holes, how to prevent them, and the best deterrents to keep your garden safe.
Why Are Squirrels Digging Up Your Lawn?
What Attracts Squirrels to Your Lawn?
Squirrels are resourceful creatures, and if they’re frequently visiting your garden, there’s usually a reason. The most common reasons include:
- Burying food: Squirrels stash acorns, nuts, and seeds in the soil for winter.
- Hunting for insects: They dig up lawns looking for grubs, worms, and insects.
- Soft soil: Loose, freshly watered soil is easy for them to dig into.
- Unprotected bulbs: Squirrels love to dig up and eat certain flower bulbs, such as tulips.
How Do You Know If Squirrels Are the Problem?
Before jumping to solutions, it’s important to confirm that squirrels are responsible for the damage. Look for these telltale signs:
- Small, shallow holes scattered throughout the lawn.
- Missing flower bulbs or uprooted plants.
- Soil or mulch pushed aside in garden beds.
- Squirrels seen frequently digging or foraging in your garden.
If you notice these signs, it’s time to take action.

How to Stop Squirrels Digging Up Lawn – Effective Prevention Methods
1. Use Natural Squirrel Deterrents
One of the easiest ways to keep squirrels away is by using natural repellents. Some scents and tastes are highly unpleasant to them:
- Cayenne pepper, chilli powder, or garlic: Sprinkle these spices around your lawn to deter squirrels.
- Predator urine: Fox or wolf urine granules can trick squirrels into thinking a predator is nearby.
- DIY repellent spray: Mix water with vinegar, peppermint oil, or onion water and spray affected areas.
2. Protect Your Lawn with Physical Barriers
If squirrels continue to dig, placing barriers can make your lawn less inviting:
| Barrier Type |
How It Works |
| Wire mesh or chicken wire |
Place under the soil to stop squirrels from digging. |
| Mulch and gravel |
Creates a rough surface that squirrels dislike. |
| Netting or row covers |
Protects freshly seeded areas and flower beds. |
3. Remove Attractants from Your Garden
The less inviting your garden is, the less likely squirrels will return. Here’s what you can do:
- Use squirrel-proof bird feeders to stop them from stealing bird food.
- Rake up fallen nuts, seeds, and fruits to remove food sources.
- Trim trees and branches to reduce access points.
4. Use Motion-Activated Devices to Scare Squirrels
Squirrels are easily startled, so using motion-triggered deterrents can be highly effective:
- Ultrasonic repellents emit high-frequency sounds that squirrels dislike.
- Motion-activated sprinklers startle at squirrels with a sudden bursts of water.
- Flashlights or reflective objects (such as CDs or aluminium foil) can deter them.
5. Train Pets to Keep Squirrels Away
If you have a dog or cat, they can help keep squirrels at bay. Encourage them to roam the garden, as their presence alone can be an effective deterrent.
How to Stop Squirrels from Digging Up Plants and Pots
Squirrels don’t just dig in lawns; they also target potted plants and flower beds.
Protecting Flower Beds & Pots from Squirrels
- Place mesh covers over plant beds to block digging.
- Scatter coffee grounds or citrus peels—squirrels hate the smell.
- Use blood meal fertiliser—not only does it enrich the soil, but it also repels squirrels.
Keeping Bulbs Safe from Squirrels
Squirrels love certain bulbs, but you can keep them safe by:
- Planting bulbs deeper and covering them with gravel or mesh.
- Soaking bulbs in repellent solutions before planting.
- Choosing bulbs that squirrels dislike, such as daffodils and alliums.

Humane Ways to Deter & Relocate Squirrels
Can You Legally Remove Squirrels in the UK?
In the UK, grey squirrels are considered an invasive species, and it’s illegal to release them once captured. However, red squirrels are protected. Before attempting any removal methods, check local wildlife laws.
Should You Use Squirrel Repellent Products?
There are many commercial squirrel repellents available, but not all are safe for pets and other wildlife. Instead, opt for:
- Non-toxic sprays with natural ingredients.
- Pepper-based granules to keep them away from specific areas.

Common Mistakes to Avoid When Trying to Deter Squirrels
If you’re struggling to keep squirrels away, you might be making one of these common mistakes:
- Using toxic chemicals or illegal traps—this can harm wildlife and is not a humane solution.
- Leaving food sources available—birdseed, fallen nuts, and unprotected bulbs will keep attracting them.
- Being inconsistent with deterrents—squirrels are persistent, so it’s important to use multiple methods consistently.
Conclusion – Keep Your Lawn Squirrel-Free!
Squirrels can be a nuisance, but with the right strategies, you can protect your lawn and garden from their digging habits.
- Use natural deterrents like spices and predator scents.
- Install physical barriers such as wire mesh and netting.
- Eliminate food sources and maintain a tidy garden.
- Scare squirrels away with motion-activated devices.
- Protect plants and bulbs using mesh, coffee grounds, and repellent sprays.
By following these humane, effective methods on how to stop squirrels digging up lawn, you can enjoy a beautiful, squirrel-free garden without causing harm to these playful creatures.
Related Article: What Keeps Rats Away Naturally? & Best 10 DIY Ideas
What’s Next?
Have you tried any of these methods? Share your experience in the comments.

by Kanimozhi BV | Jan 29, 2025 | Garden, DIY Ideas, Exterior
Starting a raised garden bed doesn’t have to be expensive. In fact, with a little creativity and some upcycling, I can build one for next to nothing! Raised garden beds offer a fantastic way to grow vegetables, flowers, and herbs while keeping my garden tidy and easy to manage.
In this guide, I’ll explore 6 of the best inexpensive raised garden bed ideas using budget-friendly or even free materials. I’ll also walk through step-by-step building instructions, where to find cheap supplies, and how to fill the bed without breaking the bank.
Let’s get started!
What Are the Benefits of Raised Garden Beds?
Before diving into the ideas, here’s why raised beds are such a great investment:
- Better Soil Quality – I can control the soil mix for healthier plants.
- Improved Drainage – Perfect for wet UK weather, preventing waterlogging.
- Easier to Maintain – Less bending down, making gardening more accessible.
- Pest & Weed Control – Reduces weed growth and keeps slugs at bay.
- Ideal for Small Spaces – Perfect for urban gardens, patios, or balconies.
6 Best Inexpensive Raised Garden Bed Ideas
Here are my top DIY cheap solutions for building raised beds on a budget:
1. DIY Pallet Raised Garden Beds
Pallets are one of the cheapest ways to make raised beds in the UK because they are often free or low-cost.
Where to Find Free Pallets?
- Local garden centres or nurseries.
- Construction sites (with permission).
- Online marketplaces like Freecycle or Facebook Marketplace.
How to Build a Pallet Raised Bed:
- Find a sturdy pallet – avoid those treated with chemicals.
- Disassemble the pallet (if needed) using a crowbar.
- Arrange the planks into a rectangular frame and secure them with nails.
- Line the inside with cardboard to prevent weeds from growing through.
- Fill with compost and soil, and start planting!
Tip: Stain or paint the wood to extend its lifespan.

2. Repurposed Wooden Crates or Old Furniture
Using old wooden crates, dresser drawers, or bookshelves is another zero-cost way to create raised beds.
Where to Get Free Crates or Furniture?
- Supermarkets and fruit markets often discard wooden crates.
- Charity shops sometimes have cheap or free damaged furniture.
- Skip diving (responsibly) can be a great way to find old drawers.
How to Turn a Dresser into a Raised Bed?
- Remove the drawers and arrange them at different levels.
- Drill drainage holes in the bottom.
- Line them with landscape fabric or plastic to hold soil in place.
- Fill with soil and start growing vegetables!
Tip: Stack multiple crates for a tiered raised bed effect.

3. Brick, Stone, or Concrete Block Raised Beds
If I have leftover bricks, stones, or concrete blocks, I can use them to build a raised bed without spending a penny!
Where to Find Cheap Bricks?
- Reclamation yards or demolition sites.
- Websites like Gumtree or Freecycle.
- Local building projects with leftover materials.
How to Build a Brick Raised Bed?
- Choose a level site for the bed.
- Lay bricks in a rectangle, stacking them two to three rows high.
- Fill the structure with compost and soil.
- Optional: Use mortar to secure the bricks.
Tip: No mortar? No problem! Dry-stacked bricks work just as well.

4. No-Build Raised Beds with Logs or Straw Bales
Logs and straw bales can be used as instant raised beds – no tools required!
Logs: Ideal for rustic gardens and can be found for free in woodlands or through tree surgeons.
Straw Bales: Cheaper than wood and can compost into the soil after a season.
How to Use Straw Bales?
- Arrange the bales in a rectangle.
- Fill the centre with compost.
- Start planting directly into the bale!
Tip: Straw bales last for about one growing season, making them a temporary but eco-friendly option.

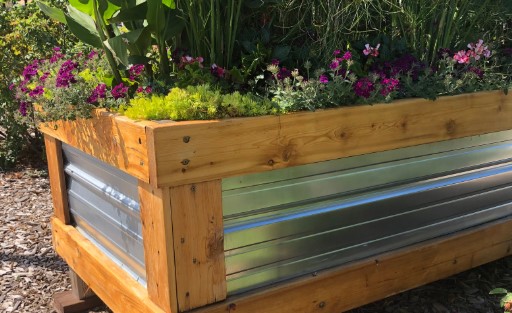
I can use corrugated metal roofing sheets or scrap metal to build a long-lasting raised bed.
- Resistant to rot, unlike wood.
- Keeps soil warm, extending the growing season.
- Looks modern and stylish in urban gardens.
- Cut metal sheets to size and secure them with wooden corner posts.
- Reinforce the edges with screws or zip ties.
- Line with cardboard or weed fabric before adding soil.
Tip: Use rust-proof paint to prevent corrosion.
6. Fabric Grow Bags & Large Containers
If I don’t have space for a traditional raised bed, grow bags and large containers are an easy alternative.
Best Budget Options:
- Heavy-duty fabric grow bags (£5–£10 each).
- Plastic storage bins with drainage holes.
- Recycled bathtubs or sinks.
Tip: Elevate containers on bricks to improve drainage.
What Is the Cheapest Way to Make Raised Beds in the UK?
- DIY is cheaper than store-bought options, which often cost £50 or more per bed.
- Where to find free or low-cost materials?
- Recycled wood, bricks, or pallets from Freecycle, Gumtree, or local skips.
- Free soil and compost from local council composting schemes.
- Budgeting for essential supplies:
- Second-hand nails, screws, and wood treatments can often be found at charity shops or car boot sales.
How to Build a DIY Raised Garden Bed – Step by Step
Choosing the Best Location & Size
- Select a sunny, well-drained area.
- Ensure the bed is wide enough to reach across but not too big to maintain.
Gathering Materials on a Budget
- Use upcycled wood, bricks, metal sheets, or crates.
- Line the base with cardboard or newspaper for weed prevention.
Assembling Your Raised Garden Bed
- Stack materials securely.
- Reinforce wooden or metal beds with corner supports.

How to Fill a Raised Garden Bed Cheaply?
Layering Method for Budget Soil
| Layer |
Material |
Why It’s Useful |
| Bottom |
Twigs, branches |
Improves drainage |
| Middle |
Grass clippings, leaves |
Adds organic matter |
| Top |
Compost & soil mix |
Provides nutrients |
Where to Find Free or Affordable Soil and Compost?
- Local council composting schemes often provide free compost.
- DIY composting using kitchen scraps and garden waste.
Creative Landscaping Ideas for Cheap Raised Beds
- Vertical gardening using stacked crates or trellises.
- Painting and decorating wooden or metal beds for a stylish look.

Cheap Raised Beds – Maintenance & Cost-Saving Tips
How to Extend the Lifespan of Your Raised Bed?
- Treat wood with linseed oil or a natural wood preservative.
- Line wooden beds with plastic to prevent rot.
- Use rust-proof paint for metal beds.
Budget-Friendly Gardening Hacks
- Grow self-seeding plants like lettuce and basil.
- Use homemade compost and natural fertilizers to save money.
Conclusion
Building an inexpensive raised garden bed on a budget is completely achievable with a little creativity. Whether using pallets, crates, bricks, logs, metal, or grow bags, there’s an option for every gardener.
By sourcing free or low-cost materials and following simple DIY techniques as mentioned in inexpensive raised garden bed ideas, anyone can create a productive and beautiful raised garden bed without spending a fortune.
Now is the perfect time to start a DIY garden project and enjoy the benefits of homegrown vegetables and flowers.
Related Article: Top 10 Websites To Buy Ex-Display Garden Furniture Clearance In UK

by Kanimozhi BV | Jan 27, 2025 | Loft, Interior
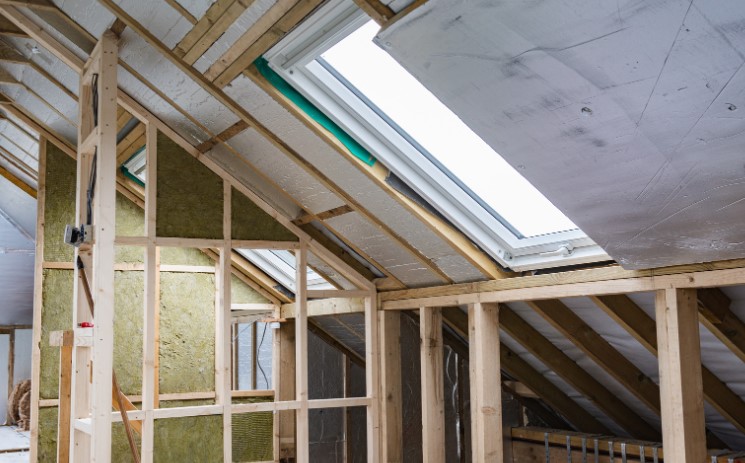
Loft insulation plays a critical role in maintaining a home’s energy efficiency, reducing heat loss, and cutting down energy bills. In the UK, adhering to loft insulation thickness regulations is not just about comfort—it’s about compliance with building standards.
In this guide, I’ll walk you through everything you need to know, from regulations and how thick should loft insulation be to material requirements and the benefits of proper insulation thickness.
What Are Loft Insulation Thickness Regulations in the UK?
Why Are There Regulations for Loft Insulation Thickness?
The UK government has established insulation thickness regulations as part of its efforts to improve energy efficiency in buildings. Proper insulation reduces heat loss, minimizes energy consumption, and helps the country move closer to its carbon reduction goals.
These regulations ensure that all homes meet specific thermal performance standards, making them cost-effective and environmentally friendly.

What are the Current Loft Insulation Standards in the UK?
The current standard for loft insulation thickness in the UK is 270mm for blanket-style materials such as fibreglass or mineral wool. This ensures the loft meets the required U-value (a measure of thermal performance), which is approximately 0.16 W/m²K in new builds.
For retrofitting older homes, achieving the same thickness is recommended but can vary depending on space and material type.
What are Types of Loft Insulation and Their Thickness Requirements?
Blanket Insulation (e.g., Fibreglass and Mineral Wool)
- Recommended Thickness: 270mm.
- Best For: Easy-to-install option for standard loft spaces.
- Fibreglass and mineral wool are popular for their affordability, ease of installation, and excellent thermal resistance.
Loose-Fill Insulation
- Thickness: Approximately 250-300mm, depending on the material (e.g., cellulose or recycled products).
- Best For: Lofts with irregular or hard-to-reach areas.
- Loose-fill materials offer flexibility but may settle over time, requiring regular checks.
Rigid Foam Boards
- Required Thickness: Typically 100-150mm due to higher thermal performance (better R-value per inch).
- Best For: Spaces with limited headroom or specific structural needs.
- Commonly used in areas where a thinner layer is necessary without sacrificing insulation quality.
Reflective Foil Insulation
- Thickness: Varies and is often combined with other materials.
- Best For: Retaining heat in specific scenarios, such as cold climates or under roof tiles.
| Insulation Type |
Recommended Thickness |
Best Use Case |
| Fibreglass/Mineral Wool |
270mm |
Standard lofts |
| Loose-Fill Insulation |
250-300mm |
Irregular loft spaces |
| Rigid Foam Boards |
100-150mm |
Low headroom areas |
| Reflective Foil |
Varies |
Supplementary heat retention |
How Thick Should Loft Insulation Be?
Minimum Thickness Based on Material Types
For most UK homes, 270mm of fibreglass or mineral wool is the gold standard. However, some materials, like rigid foam boards, can achieve the same thermal resistance with thinner layers (100-150mm).
When retrofitting an older home, check existing insulation. If it’s less than 100mm thick, upgrading to meet current standards is strongly recommended.
Thickness for Retrofitting vs. New Builds
New builds must comply with the 270mm standard to pass building inspections. In older homes, retrofitting might require adjustments depending on the space and structural limitations. Adding insulation layers is often an effective solution.
How Does Insulation Thickness Impact Energy Efficiency?
Thermal Resistance (R-value) and Heat Loss Prevention
The thicker the insulation, the better its R-value—a measure of its ability to resist heat flow. Properly insulated lofts can reduce heat loss by up to 25%, significantly lowering energy consumption and utility bills.
The Cost vs. Savings Debate
While thicker insulation may involve higher upfront costs, it pays off in energy savings over time. Homeowners can save up to £250 annually on energy bills by upgrading to the recommended insulation thickness. Additionally, government grants are available to offset costs.

What Happens If Loft Insulation Isn’t Thick Enough?
Consequences of Non-Compliance with Regulations
- Reduced Efficiency: Insufficient insulation allows more heat to escape, increasing energy bills.
- Inspection Issues: New builds and renovations may fail to meet building regulations.
- Environmental Impact: Increased carbon footprint due to higher energy usage.
Addressing Insufficient Insulation in Older Homes
Retrofitting is the solution for older properties with outdated or thin insulation. Adding layers of blanket insulation or switching to high-performance rigid boards can bring your home up to code.
Final Thoughts
Proper loft insulation is crucial for meeting UK building regulations, reducing energy bills, and contributing to a greener future. If your current insulation falls short of the 270mm standard, upgrading is a worthwhile investment. With numerous materials to choose from and government grants available, there’s no better time to ensure your home stays warm and energy-efficient.
Related Article: How to Stop Condensation in Loft?
Frequently Asked Questions (FAQs)
1. What is the recommended loft insulation thickness in the UK?
The recommended thickness is 270mm for fibreglass or mineral wool insulation.
2. Can I use a thinner insulation material and still comply?
Yes, rigid foam boards can meet regulations with a thickness of 100-150mm, thanks to their higher thermal efficiency.
3. Are there grants or financial support for upgrading insulation?
Yes, schemes like the Energy Company Obligation (ECO) provide financial aid for insulation upgrades.
