by Kanimozhi BV | Apr 6, 2026 | Home & Living
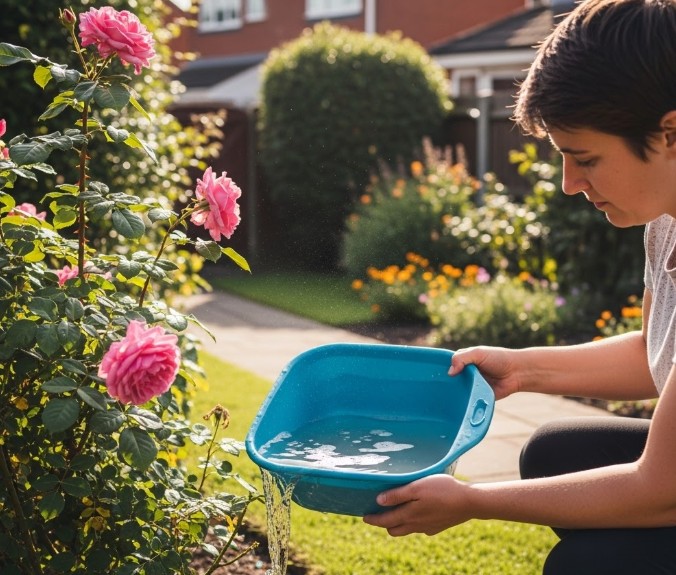
Can you use washing up water to water plants? I’ve spent years hauling plastic bowls from my kitchen sink to my parched hydrangea borders during UK hosepipe bans—here is the manual-free way I save my garden without spending a penny on extra utilities.
When the summer heat hits and the water companies start sending those warning texts, your washing-up bowl becomes your garden’s best friend, provided you know the expert “golden rules” of grey water usage.
The Short Answer:
Yes, you can use washing up water to water plants including established shrubs, fruit trees, and most hardy ornamentals. To ensure garden safety, follow these four criteria:
- Use Eco-Friendly Soap: Choose plant-based detergents (like Ecover or Method).
- Target the Base: Always pour water directly onto the soil, never the leaves.
- Avoid Acid-Lovers: Do not use on blueberries, azaleas, or rhododendrons.
- Use Fresh: Apply the water to your garden within 24 hours of collection.
Is It Safe To Use Washing Up Liquid On All Plants?
One of the most common questions I get from budget-conscious gardeners is whether the soap itself will kill their prize-winning roses. In short: no, but the type of soap matters immensely.
Most modern UK washing-up liquids are highly diluted by the time they reach your garden, but “Information Gain” research suggests that certain ingredients can still be problematic over time.

Why Does The Type Of Detergent Matter? Traditional detergents like standard Fairy Liquid contain sodium (salt) to help with the cleaning process. While a small amount won’t hurt, consistent use can lead to “sodium toxicity” in the soil. If you are planning to make this a permanent habit, switching to eco-friendly brands is a game-changer. These are typically plant-based and lack the harsh phosphates and boron found in some heavy-duty cleaners.
Safe Watering Reference Table
| Plant Type |
Safe for Grey Water? |
Recommended Frequency |
| Established Shrubs (Roses, Buddleia) |
Yes |
Every other watering |
| Ornamental Flowers (Geraniums) |
Yes |
Regularly |
| Leafy Greens (Lettuce, Spinach) |
Caution |
Use at base only |
| Acid-Lovers (Blueberries, Camellias) |
No |
Never |
| Fruit Trees (Apple, Pear) |
Yes |
Regularly |
| Root Veg (Carrots, Potatoes) |
Caution |
Use at base only |
What Are The Risks Of Using Dishwater In The Garden?
While it’s a brilliant way to save money, you can’t just throw soapy water around blindly.
Can Soapy Water Damage Your Soil Structure? In many parts of the UK, particularly the South East, we deal with heavy clay soil. Soap acts as a surfactant, which can actually help water penetrate dry, “hydrophobic” soil initially.
However, long-term use of high-sodium dishwater can cause clay particles to disperse, leading to a “capped” soil surface that prevents air and water from reaching roots.
The “Leaf Scorch” Risk I have seen many beginners make the mistake of splashing soapy water over the foliage. Under the UK sun, those soap bubbles can act like tiny magnifying glasses, leading to leaf scorch. Always aim your pour at the base of the plant, never the leaves.
Can You Use Washing Up Water On Vegetable Patches?
This is where you need to be most careful. I always tell my readers: “If you’re going to eat it, be picky about what you feed it.”
Is It Dangerous To Water Edible Crops With Grey Water? Using dishwater on fruit trees (apples, plums, cherries) is perfectly safe because the fruit is high up and far from the soil. However, for “low-contact” crops like lettuce or strawberries, there is a small risk of bacterial contamination from food particles in the water.

Pro-Tip 1: The “Rinse Rule” For Home-Grown Produce If you must use grey water on your veg patch, only use it on crops that will be thoroughly peeled or cooked (like potatoes) or ensure you use a dedicated “mains water rinse” 48 hours before harvesting to clear any residual salts.
How To Collect And Store Washing Up Water Correctly?
Efficiency is key, but safety comes first. I never recommend leaving a bowl of grey water sitting in the sun for days.
Why Should You Never Store Grey Water For More Than 24 Hours? Grey water is a breeding ground for bacteria. In the warmth of a UK summer, a bowl of water containing food scraps and grease can develop Legionella or Salmonella surprisingly quickly. My rule is simple: Collect it, cool it, and use it within 24 hours.
Pro-Tip 2: The Sieve Method For Clean Soil Keep a cheap, fine-mesh sieve specifically for the garden. When you’re ready to take your bowl outside, pour it through the sieve into your watering can. This catches “fatty build-up” (bits of pasta, grease, or sauce) that would otherwise rot on top of your soil and attract pests like slugs or even rats.
Which Plants Should You Avoid Watering With Dishwater?
Not every plant enjoys a soapy bath. Some of our UK garden favourites are particularly sensitive.
Which UK Garden Favorites Hate Alkaline Grey Water? Most washing-up liquids are slightly alkaline. This is bad news for “Ericaceous” plants. If you have Blueberries, Camellias, Azaleas, or Rhododendrons, keep the dishwater far away.
They require acidic soil, and the salts in grey water will quickly cause their leaves to turn yellow (chlorosis). I also avoid using grey water on very young seedlings, as their delicate root systems can’t handle the salt concentration.

Expert Tips For Long-Term Success
To keep your garden thriving through a drought, you need a strategy.
Pro-Tip 3: The “Mains Water Rotation” Strategy To prevent a build-up of salts (which can make the soil toxic over months), never use grey water exclusively. I recommend a “2:1 Rotation”—two waterings with grey water followed by one thorough soaking with fresh rainwater or mains water. This “flushes” the soil and keeps the pH balanced.
The Statistics: Why Water Recycling Matters The average UK household uses about 140 litres of water per person, per day. By recycling just your daily washing-up water, you can save upwards of 2,000 litres of water over a single summer. For a budget gardener, that’s a significant saving on a metered bill.
Conclusion: Sustainable Gardening On A Budget
Using washing-up water isn’t just a “drought hack”; it’s a sustainable habit that aligns with modern eco-friendly gardening.
By choosing the right soaps, avoiding sensitive plants, and using the “Sieve Method,” you can keep your garden lush and green without breaking the bank or the environment. It is the most effective way to answer the common dilemma: can you use washing up water to water plants?
What are the FAQ About Can You Use Washing Up Water To Water Plants?
1. Can I Use Water From The Dishwasher?
No. I strongly advise against this. Dishwasher detergents are much more caustic and contain higher levels of salts and bleaching agents than manual washing-up liquids. They can be genuinely toxic to soil life.
2. Does Washing Up Liquid Kill Aphids?
While many gardeners use a dilute soapy spray to tackle aphids, the water in your washing-up bowl is usually too diluted (and potentially too greasy) to be an effective pest controller. Stick to a dedicated soap-spray recipe for pests.
3. Is It Legal To Use Grey Water During A UK Hosepipe Ban?
Yes! Hosepipe bans restrict the use of mains water through a hose. Carrying a bucket or bowl of recycled “grey water” is completely legal and a great way to stay within the rules while keeping your plants alive.
4. Will My Vegetables Taste Like Soap?
If you water at the base and wash your produce before eating, you won’t taste a thing. The plants filter the water through their root systems; they don’t “inhale” the soap bubbles into the fruit.
This guide was written to help UK gardeners navigate water restrictions safely. For more budget gardening tips, check our latest seasonal guides on hellomag.co.uk.
Home Diagnostics and Technical Standards Specialist at Hello Mag. She provides high-level Expertise in appliance mechanics and scientific pest management, ensuring every guide follows strict safety protocols and manufacturer standards. As a leading Authority on technical home specs, Kanimozhi audits complex data to provide homeowners with the most accurate, verified, and reliable diagnostic solutions available.
by Kanimozhi BV | Mar 31, 2026 | Pest Control
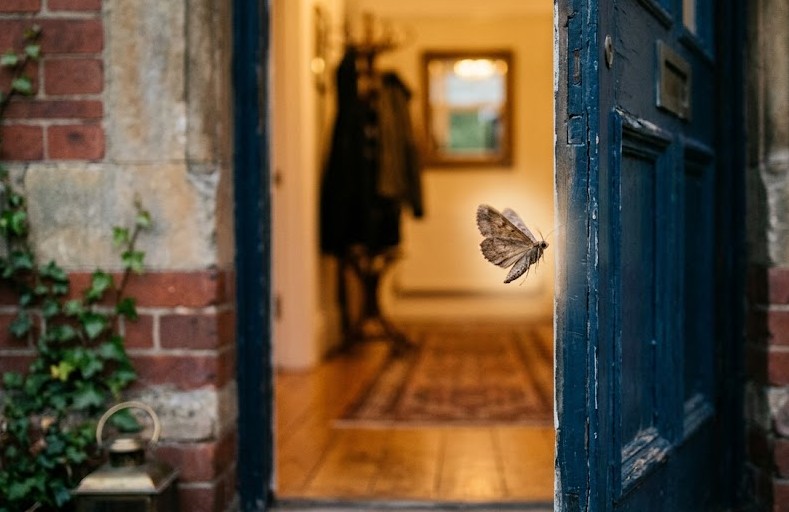
Why do I have small moths in my house? I’ve spent years helping homeowners reclaim their wardrobes from the tiny, fluttering terrors we call moths, and if there is one thing I’ve learned, it’s that they don’t care how clean your house is—they only care how tasty your carpets are.
I remember the first time I found a hole in my favourite cashmere jumper; I felt personally attacked, wondering, “Why do I suddenly have moths in my house when I’ve changed nothing?”
🦋 Why do I have small moths?
Small moths typically enter UK homes through open windows, chimneys, or by hitchhiking on second-hand clothing and vintage furniture.
They stay to feed on:
- Natural Fibers: Wool, silk, hair, or feathers (keratin).
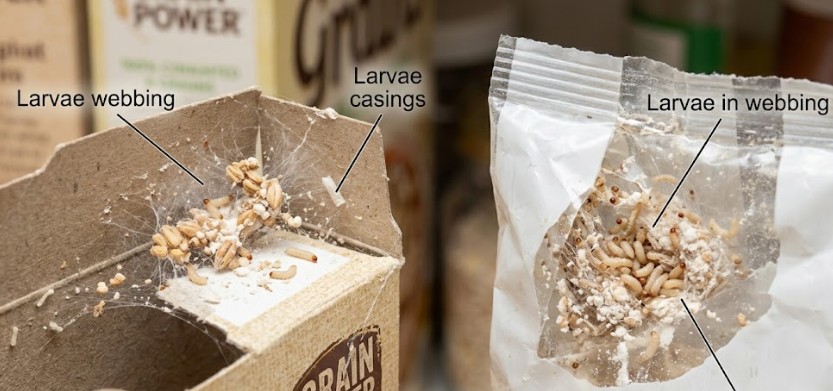
- Dry Pantry Goods: Flour, grains, and cereals.
While they can be present year-round, sightings often peak during “moth season” (April to October) when warmer temperatures cause a rapid explosion in their population.
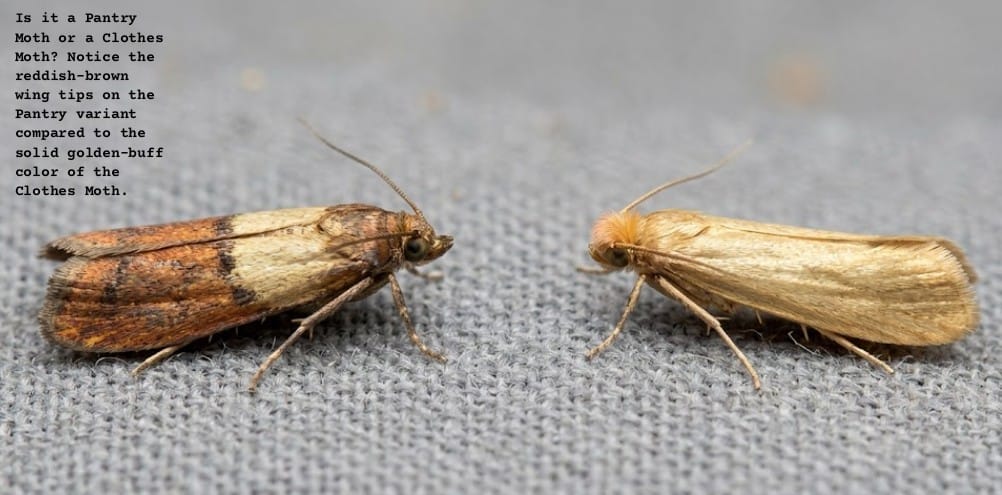
Comparing The Culprits: Clothes Moths vs. Pantry Moths
Before you start throwing away your knitwear, you need to know what you are fighting. Not all small moths are the same, and the solution for one won’t work for the other.
| Feature |
Common Clothes Moth (Tineola bisselliella) |
Indian Meal Moth (Pantry Moth) |
| Appearance |
Pale gold/straw-coloured wings |
Reddish-brown with a pale band |
| Size |
Small (5mm – 8mm) |
Slightly larger (8mm – 10mm) |
| Primary Food |
Wool, Silk, Hair, Leather, Feathers |
Flour, Grains, Dried Fruit, Pet Food |
| Location Found |
Wardrobes, Under Sofas, Dark Corners |
Kitchen Cupboards, Pantries, Bird Seed |
| Larvae Appearance |
Tiny creamy caterpillars with brown heads |
Larger “maggot-like” worms with webbing |
Why Do I Suddenly Have Moths In My House Out Of Nowhere?
It feels like an overnight invasion, doesn’t it? One day your home is peaceful, the next, three tiny brown triangles are zig-zagging across your TV screen. In my experience, “sudden” moth appearances are rarely random.
Usually, this happens due to a seasonal temperature spike. In the UK, we often see a “spring surge.” As soon as we turn the central heating down and the outside temperature hits 15°C, dormant larvae pupate and emerge as flying adults simultaneously.
Another common reason for a sudden influx is a hidden bird’s nest. If you have a chimney that hasn’t been swept or a nest under the eaves, moths thrive on the feathers and debris. When the birds fly the coop, the moths migrate downward into your living room looking for their next meal.
Kani’s Tip #1: The “Charity Shop Quaratine” I adore a vintage find, but second-hand items are the #1 way moths “hitchhike” into modern homes. Never, ever put a thrifted wool blazer or silk scarf directly into your wardrobe. Seal it in a bag and pop it in the freezer for 48 hours first. This kills the microscopic eggs that even a dry cleaner might miss.
Identifying The Species: Why Do I Have Small Moths In My House?
While there are thousands of moth species in the UK, only a handful want to live with you.
- The Common Clothes Moth: These are the golden-haired villains of the textile world. They hate light and will scuttle away if you move a rug.
- The Case-Bearing Clothes Moth: These are fascinating but frustrating. The larvae build a little “case” around themselves made of the fiber they are eating. If you see what looks like a grain of rice crawling up your wall, that’s them.
- The White-Shouldered House Moth: These are less destructive to clothes but love to eat the “dust” in the corners of your rooms—which is actually mostly composed of human hair and skin cells.
- The Brown House Moth: Often found in skirting boards and kitchen corners, these are a common nuisance in older UK properties. If you suspect these are your primary guests, you can read our specific how to get rid of brown house moths guide for deep-dive eradication steps.
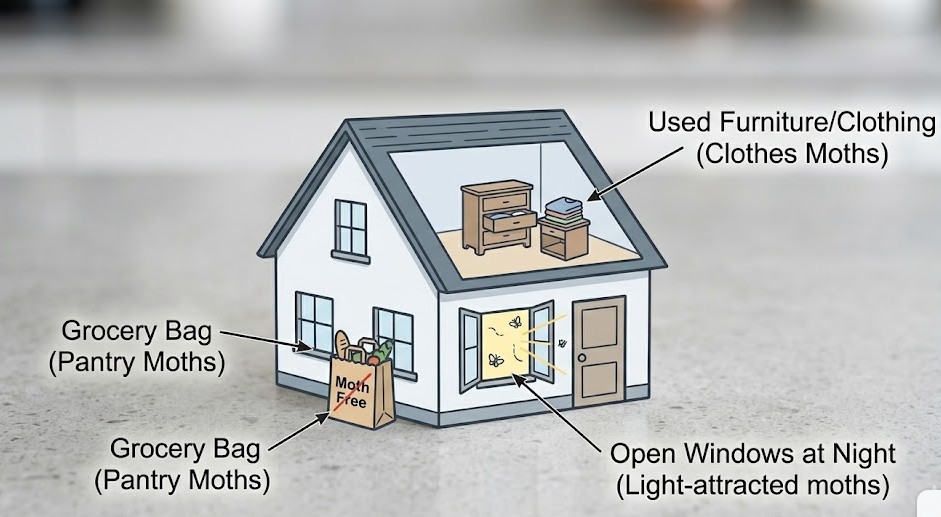
How Do Moths Actually Get Into A Sealed UK Property?
You might think your double-glazing keeps you safe, but moths are opportunistic.
- Under The Door: They are small enough to crawl under gaps in front doors, especially if you have a porch light that attracts them at night.
- Through The Chimney: Many older UK homes have open fireplaces. Moths living in soot and old nests will simply fly down the flue.
- On Your Pets: I’ve found that moths often “ride” in on long-haired dogs. The moth isn’t interested in the dog, but it uses the fur as a temporary transport.
- The “Vintage” Trap: As I mentioned, that beautiful 1950s rug you bought at the car boot sale could be carrying hundreds of “invisible” eggs.
Why Are They Attracted To My Specific Belongings?
It isn’t actually the adult moths that eat your clothes; they don’t even have mouths! It’s the larvae (the caterpillars). They need keratin, a structural protein found in animal fibres.
However, there is a “flavour” element involved. Larvae prefer “dirty” natural fibres. If a jumper has traces of sweat, skin oil, or a tiny food spill (like milk or juice), the moths will target that spot first because it provides the extra nutrients they need to grow.
Kani’s Tip #2: The “Sweaty Collar” Rule Before storing your winter woollens away for the summer, wash them—even if you only wore them once. Moths are much less likely to attack a clean cashmere jumper than one that has a faint scent of perfume or skin oils. Cleanliness is your best organic deterrent.
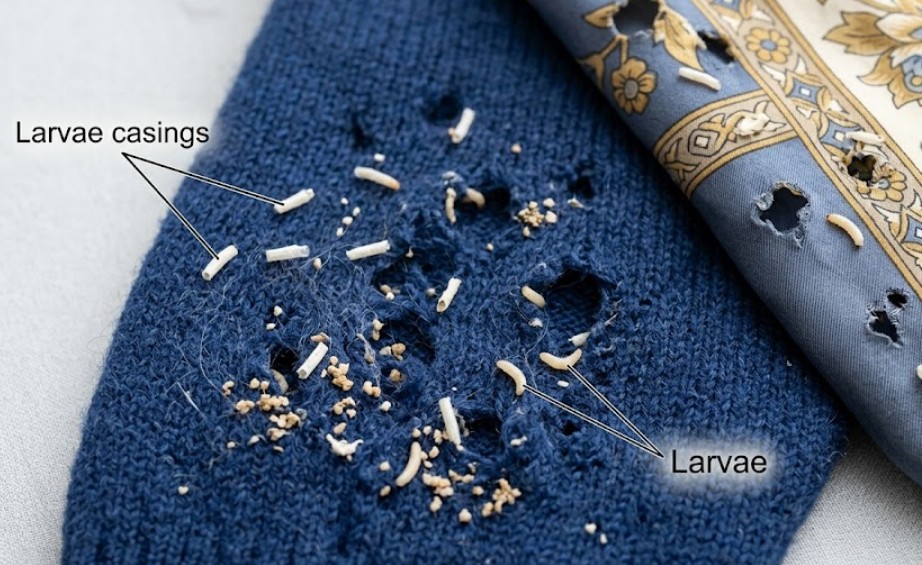
What Are The Telltale Signs Of A Hidden Moth Infestation?
If you see a moth flying, the damage is likely already done. You need to look for the “silent” signs:
- “Grazing” on Carpets: Look in the dark corners under your sofa or behind the radiator. If the pile of the carpet looks “shaved” or thin, moths have been feasting.
- Silken Tubes: Small, spider-web-like threads in the corners of your wardrobe or inside your drawers.
- Granular “Dust”: This is often mistaken for sand, but it is actually “frass”—the waste left behind by moth larvae.
- Irregular Holes: Unlike a snag, moth holes are usually clustered together and have ragged edges.
How Can I Get Rid Of Small Moths Permanently?
Getting rid of moths requires a “Search and Destroy” mission. You cannot simply spray a bit of lavender and hope for the best.
- Step 1: Identify the Source. Empty every cupboard. You are looking for the “epicentre” where the larvae are thickest.
- Step 2: Deep Vacuuming. Use the crevice tool to get into the gaps of the floorboards and the edges of the room. This is where the eggs hide. Empty the vacuum outside immediately.
- Step 3: The Heat/Cold Treatment. Wash everything at 60°C if the fabric allows. For delicate silks and woollens, freeze them for 48-72 hours.
- Step 4: Pheromone Traps. These won’t stop an infestation, but they are great for “monitoring.” If the trap stays empty, you’re winning. If it fills up, you still have a hidden source.
Kani’s Tip #3: The “Hidden Baseboard” Hack Most people stop cleaning at the carpet edge. But case-bearing moths love to hide their pupae behind the skirting boards. If you have a persistent problem, take a hairdryer to the gaps in your skirting boards on high heat. The blast of heat can kill eggs and larvae tucked deep where a vacuum can’t reach.
Final Verdict: Don’t Panic, Just Clean
Finding moths in your home doesn’t mean you are a “dirty” person; it means you have a home filled with high-quality natural materials that moths find delicious. By identifying the type of moth, finding the source, and using my “Kani’s Tips” for quarantine and deep cleaning, you can protect your home.
The key is consistency. Check those dark corners once a month, and never let a second-hand item enter your inner sanctum without a stint in the freezer! why do i have small moths in my house
FAQ About Small Moths In The House
1. Do small moths bite humans?
No. Neither the adults nor the larvae have the anatomy to bite humans. Their only “bite” is reserved for your expensive knitwear and carpets.
2. Can they eat through plastic bags?
Standard thin bin liners? Yes, larvae can sometimes chew through them if they smell food inside. It is much better to use heavy-duty Ziploc bags or airtight plastic “tubs” for long-term storage.
3. Will vinegar kill moth eggs?
Yes, a solution of white vinegar and water is excellent for wiping down wardrobes. The acidity kills the eggs on contact and removes the pheromone trails that attract other moths.
4. Why do I have moths in my bedroom but not my kitchen?
This indicates you have Clothes Moths. They are looking for your bedding, pillows (if they contain feathers), and clothes. If they were in the kitchen, they would likely be Pantry Moths looking for your oats and flour.
Home Diagnostics and Technical Standards Specialist at Hello Mag. She provides high-level Expertise in appliance mechanics and scientific pest management, ensuring every guide follows strict safety protocols and manufacturer standards. As a leading Authority on technical home specs, Kanimozhi audits complex data to provide homeowners with the most accurate, verified, and reliable diagnostic solutions available.
by Kanimozhi BV | Mar 28, 2026 | Bathroom, DIY Ideas, Pest Control
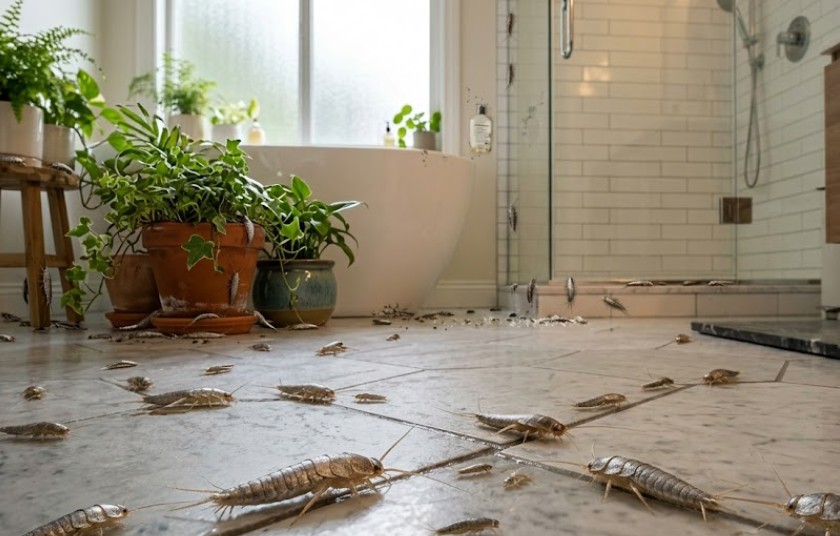
If you are wondering how to get rid of silverfish in bathroom spaces that feel damp and outdated, you aren’t alone. I’ve seen many Indesit and Beko-filled bathrooms in the UK plagued by those shimmering, darting nuisances—here is the manual-free way I fix silverfish infestations in record time without calling expensive contractors.
The Short Answer: Natural Ways on Remove Silverfish In Bathroom
To eliminate silverfish, you must drop your bathroom’s relative humidity below 50% using a dehumidifier and seal skirting board gaps with decorator’s caulk. For an immediate kill, sprinkle food-grade Diatomaceous Earth in dry corners and use “Jar Traps” overnight to monitor progress.
At-A-Glance: UK Silverfish Solution Comparison
| Method |
Effort Level |
Best For… |
Expected Results |
| Dehumidifier |
Low |
Long-term prevention |
Stops breeding in 48 hours |
| Diatomaceous Earth |
Medium |
Active infestations |
Kills on contact (mechanical) |
| Essential Oils |
Low |
Mild deterrent |
Temporary scent barrier |
| Professional Sprays |
High |
Large infestations |
Residual kill for 4–6 weeks |
Why Do Silverfish Love Your Bathroom More Than Any Other Room?
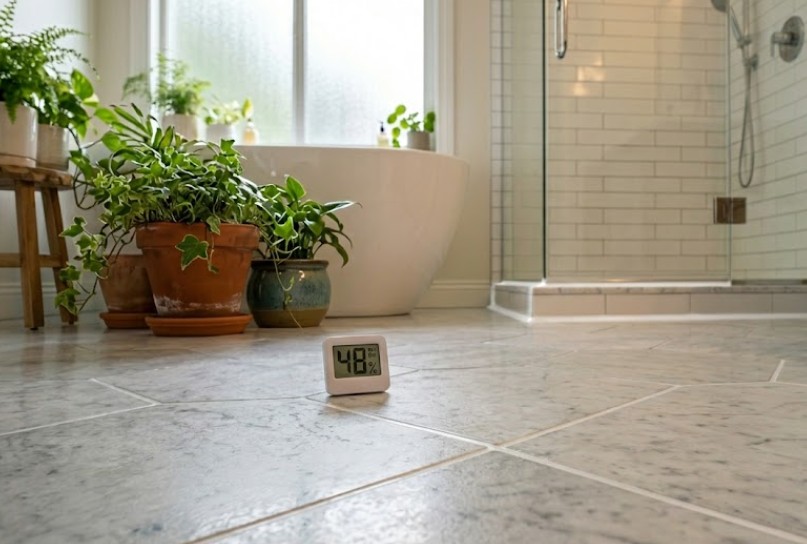
In the UK, our older housing stock often suffers from “steamy bathroom syndrome.” Silverfish (Lepisma saccharina) are prehistoric survivors that require two things: high humidity (above 75%) and starchy food.
Your bathroom is a buffet. They aren’t just there for the water; they are eating the starch in your wallpaper paste, the cellulose in your toilet roll, and even the microscopic scales of skin trapped in your bath mat. If you have a damp internal wall or a leaky “P-trap” under the sink, you’ve essentially built them a five-star hotel.
How Can You Tell If You Have A Genuine Silverfish Infestation?
Spotting one silverfish is common, but how do you know if they’ve moved in permanently? Look for these three specific UK-centric signs:
- Yellow Staining: They leave faint, yellowish smudges on synthetic bath mats or light-coloured skirting boards.
- Pepper-like Droppings: Look for tiny black specks (smaller than a grain of salt) in the back of your vanity unit.
- The “Night-Light” Test: Enter your bathroom at 3 AM and flick the light on. If you see more than three darting toward the skirting boards, you have a colony.
How To Get Rid Of Silverfish In Bathroom?
What Are The Most Effective Natural Ways To Get Rid Of Silverfish?
If you prefer to avoid harsh chemicals near your towels and toothbrushes, natural repellents can be surprisingly effective—if used correctly.
- Lavender & Cedarwood: I recommend dabbing pure lavender oil onto cotton pads and placing them inside your bathroom cabinet. Silverfish have sensitive receptors that find these scents overwhelming.
- The Cucumber Hack: Surprisingly, silverfish despise the scent of cucumber skin. Placing fresh peels near known entry points can act as a temporary barrier, though you must replace them daily to avoid mould.
Which Professional-Grade Treatments Actually Work In The UK?
When natural methods fail, you need the “big guns” available at British hardware stores like B&Q or Homebase.
- Diatomaceous Earth (DE): This is a non-toxic powder made of fossilised algae. It works by physically cutting the silverfish’s exoskeleton, causing them to dehydrate. Pro-Tip: Ensure it stays dry; if DE gets wet from shower steam, it loses its effectiveness.
- Pyrethroid Sprays: Look for sprays containing Permethrin or Cypermethrin. These provide a “residual” barrier on skirting boards that keeps killing for weeks.
How Can You Stop Silverfish From Coming Back To Your Bathroom?
Prevention is 90% of the battle. Follow these three golden rules:
- The Dehumidifier Rule: Buy a small hygrometer (they cost about £5 on Amazon). If your bathroom stays above 60% humidity for hours after a shower, you need a dehumidifier or a more powerful extractor fan.
- Seal the “Highways”: Use a tube of white silicone or decorator’s caulk to seal the gap between your floor tiles and the skirting board. This is their primary transport network.
- Clear the Clutter: Stop storing spare toilet rolls in open baskets on the floor. Move them to a sealed plastic tub or a high shelf.
Pro-Tip 1: The “Jar Trap” Method You Haven’t Tried
Wrap a glass jam jar in masking tape (to give them grip) and put a small piece of starchy white bread at the bottom. Leave it in a dark corner overnight. The silverfish will climb in for the bread but won’t be able to climb back up the smooth glass interior. It’s the best way to “audit” your progress.
Pro-Tip 2: The Wallpaper Paste Secret
If you have lifting wallpaper in your bathroom, you are feeding them. Silverfish love the starch-based glue used in traditional UK wallpaper. Use a “border adhesive” or a PVA-based glue to seal down any loose edges immediately to remove their favourite food source.
Pro-Tip 3: The “Night-Time Audit” Strategy
Every Saturday night for three weeks, do a “sweep” of the bathroom floor. Note where they are emerging from. If they are always coming from under the bathtub panel, you likely have a slow, hidden leak that is keeping the floorboards damp.
What are the FAQ About How To Get Rid Of Silverfish In Bathroom?
1. Are silverfish harmful to humans or pets?
No, they don’t bite or carry diseases. However, their shed scales can trigger allergies in some people, and they can be a food source for spiders, potentially inviting more “scary” pests into your home.
2. How long does it take to clear an infestation?
If you fix the humidity issues immediately, you will see a massive reduction in 7–10 days. Total eradication usually takes about 3–4 weeks of consistent trapping and cleaning.
3. Does bleach kill silverfish?
Bleach kills on contact, but pouring it down the drain is useless. Silverfish don’t live in the pipes; they live around them. Using bleach as a floor cleaner can help remove the “scent trails” they leave behind, but it won’t solve the nesting issue.
4. Can silverfish travel between flats in the UK?
Yes. In many UK apartment blocks, silverfish travel through shared ducting, pipework, and wall cavities. If your neighbour has an infestation, they may migrate to your bathroom in search of moisture. Sealing your entry points is crucial in communal buildings.
5. Do silverfish eat towels and clothing?
They won’t usually eat a thick cotton towel, but they are attracted to the laundry basket. They love the sizing (finishing agents) used in new clothes and the organic residues left on damp, used towels. Never leave damp laundry on the bathroom floor.
Once you implement these expert humidity controls and sealing techniques, you will finally know exactly how to get rid of silverfish in bathroom settings for good.
Home Diagnostics and Technical Standards Specialist at Hello Mag. She provides high-level Expertise in appliance mechanics and scientific pest management, ensuring every guide follows strict safety protocols and manufacturer standards. As a leading Authority on technical home specs, Kanimozhi audits complex data to provide homeowners with the most accurate, verified, and reliable diagnostic solutions available.

by Kanimozhi BV | Mar 25, 2026 | Bathroom, Interior
I’ve seen many homeowners walk into a B&Q showroom expecting a “one-price-fits-all” installation fee, only to be surprised by the technical complexities that arise during the home survey—here is the expert, manual-free way I calculate and answer how much do b&q charge to fit a bathroom in 2026.
Quick Answer: B&Q Bathroom Installation Costs 2026
| Project Type |
B&Q Labour (Est.) |
Typical Duration |
| Cloakroom / En-suite |
£2,000 – £2,800 |
5–7 Days |
| Standard Family Bathroom |
£2,800 – £4,500 |
8–12 Days |
| Large / Premium Bathroom |
£4,500 – £6,500+ |
12–18 Days |
The Verdict: In 2026, B&Q labour typically costs £2,200 to £4,800. While you pay a 20–30% premium over independent fitters, you gain a 2-year workmanship guarantee and 0% finance options.
*Note: Excludes suite materials, waste removal (£200–£350), and structural repairs.
B&Q Bathroom Fitting Cost Breakdown (Estimated 2026)
Based on current 2026 market data for B&Q “Approved Installers,” the above table provides a breakdown of what you should budget for labour. Please note that these figures exclude the cost of the bathroom suite, tiles, and flooring materials.
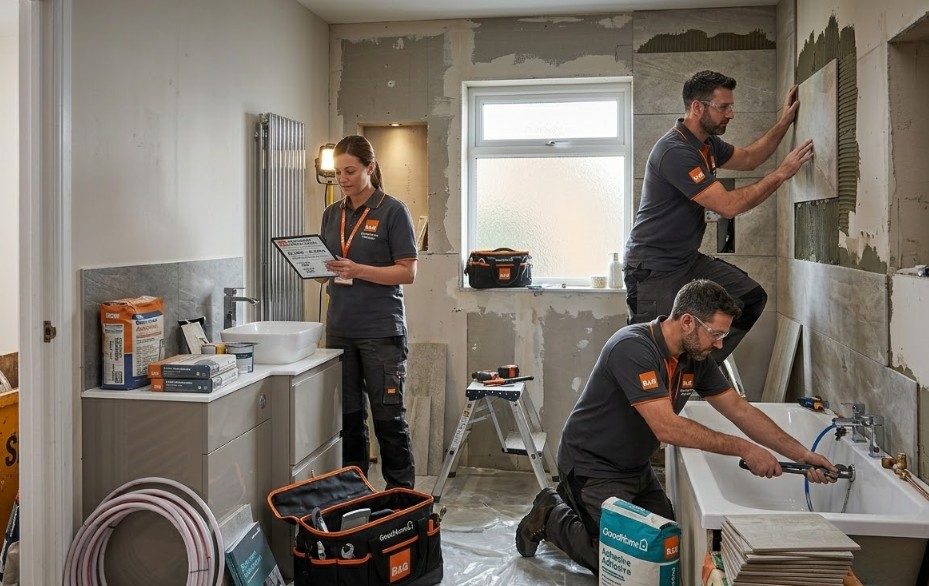
How Does the B&Q Bathroom Installation Process Work?
B&Q uses an “Approved Installer” model. These aren’t B&Q employees; they are local tradespeople vetted for DBS compliance, asbestos awareness (UKATA), and £2m+ public liability insurance.
- The Design Appointment: You meet a consultant to create a 3D plan using “GoodHome” products.
- The £50 Survey Fee: An installer visits your home to check pipework and subfloors.
- Pro-Tip: If you decide not to use B&Q for fitting, you don’t get this £50 back, but you do keep the technical survey notes. This is a very cheap way to get a professional “technical audit” of your plumbing before hiring an independent plumber.
- The Fixed Quote: Unlike many local plumbers who give “ballpark” estimates, B&Q provides a formal, itemized quote that remains fixed unless the scope of work changes.
What Factors Influence the Final B&Q Fitting Quote?
- Tiling Patterns: 2026 trends like “KitKat” tiles or herringbone layouts require 25% more labour time. B&Q installers will charge a premium for these over standard brick-bond patterns.
- Electrical Compliance: Installing an LED mirror or a new extractor fan requires a Part P certified electrician. B&Q handles the coordination, but you pay a premium for that management.
- Subfloor Integrity: If your old bath has been leaking for years, the installer may find rot. Replacing floor joists is never part of a “standard” quote and will be added as a variation.
What is Included in the B&Q Installation Service?
The biggest draw for B&Q is the 2-Year Workmanship Guarantee. If a joint leaks or a tile pops in 18 months, you call a corporate helpline rather than chasing a local plumber who might not answer his phone.
However, a major “content gap” in most reviews is the Waste Removal. B&Q frequently excludes the cost of a skip or professional waste clearance from their base labour quote. They partner with AnyJunk or LoveJunk, but you should budget an additional £200–£350 for a waste service.
Additional Costs to Consider (The “Invisible” Budget Killers)
- Water Pressure Upgrades: If you’re moving from a gravity-fed system to a high-pressure rainfall shower, you may need a pump or a megaflo cylinder (£600–£1,500).
- Surface Preparation: Skimming walls with fresh plaster after “rip-out” is often an extra charge (£250–£500).
- The “Bits and Bobs”: Grout, adhesive, silicone, and copper piping are rarely included in the showroom price of the “suite.” Budget an extra £150 for these consumables.
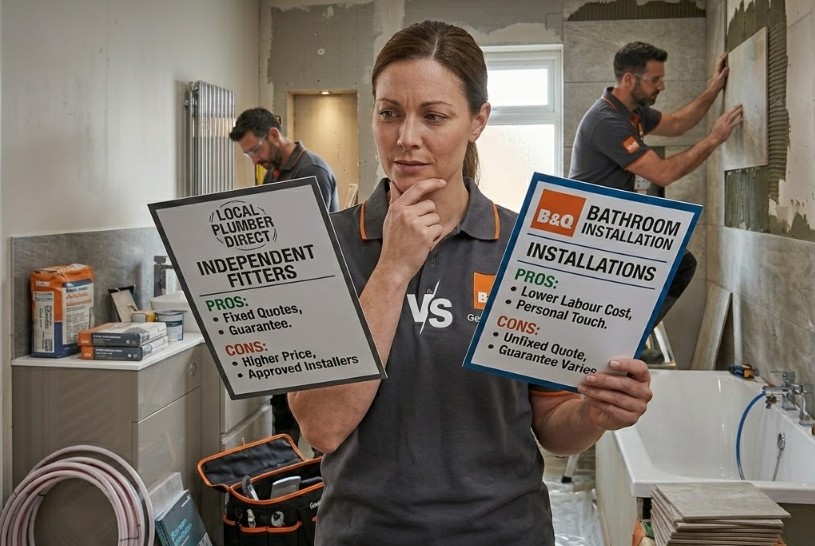
B&Q vs. Independent Fitters: The 2026 Expert Opinion
Expert Opinion: From a value-for-money perspective, my expert advice for 2026 is simple: B&Q is a “Peace of Mind” premium. If you use B&Q, you are paying roughly 20–30% more than a local tradesperson. Why? Because you are paying for B&Q to be the “middleman” who handles the scheduling, vetting, and insurance.
The 2026 “Logistics” Warning: My research shows a rise in 2026 complaints regarding “split deliveries” where the bath arrives but the taps are back-ordered for 3 weeks. My Advice: Do not allow the “rip-out” to begin until you have personally verified every box in your garage is present and correct.
- Choose B&Q if: You want a 0% finance package (Interest-free for up to 5 years on spends over £15,000) and a corporate guarantee.
- Choose an Independent if: You want to save £1,000+ and want a more “bespoke” finish that includes brands B&Q doesn’t stock.
How Can You Save Money on a B&Q Bathroom Installation?
- The “Dry Fit” Loophole: Purchase your products from B&Q during their seasonal sales (usually Easter or Boxing Day) to get the product warranty, but hire a local Vetted Installer for the labour.
- B&Q Club Card: This doesn’t discount the installation, but the spend on a full bathroom will often trigger “Money Off” vouchers (often £15% off when spending £200+) that can be used for your finishing touches like towels or mirrors.
Final Verdict: Should You Choose B&Q?
B&Q remains the strongest option for homeowners who want a stress-free, insured experience with clear payment plans.
However, for property developers or those on a tight budget, the “Installation Management Fee” baked into their quotes makes them significantly more expensive than hiring a local pro directly.
FAQ About “How Much Do B&Q Charge to Fit a Bathroom”
1. How long does a B&Q bathroom fitting usually take?
In 2026, expect 10 working days for a standard refit of bathroom. Complex tiling or layout changes can push this to 15 days.
2. Can I use my own fitter with B&Q products?
Yes. You can buy the materials “Supply Only.” B&Q’s 10-year product warranties still apply even if they don’t fit them.
3. Does B&Q offer finance on the installation costs?
Yes, B&Q’s FlexiPlan allows you to fund the entire project—furniture and installation—with various repayment terms.
4. What happens if the B&Q installer makes a mistake?
You are covered by the 2-year guarantee. You must log the claim via their online “Guarantee Claim Form” with photos of the defect.
Home Diagnostics and Technical Standards Specialist at Hello Mag. She provides high-level Expertise in appliance mechanics and scientific pest management, ensuring every guide follows strict safety protocols and manufacturer standards. As a leading Authority on technical home specs, Kanimozhi audits complex data to provide homeowners with the most accurate, verified, and reliable diagnostic solutions available.
by Kanimozhi BV | Mar 18, 2026 | Pest Control
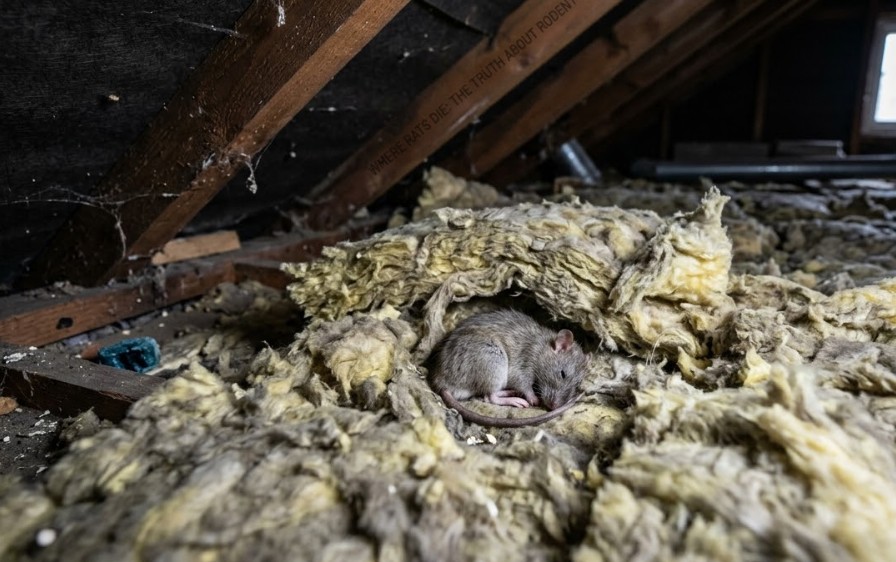
Where Do Rats Die After Eating Poison?
Rats typically die within their primary nesting sites—usually loft insulation, wall cavities, or under floorboards.
Contrary to the common UK myth, they do not leave the house to find water; instead, they become lethargic and retreat to the most secluded, warm part of your home during their final hours.
Pro Tip: Look for blowflies on windows to locate hidden carcasses.
I’ve spent years clearing out UK lofts and pulling up floorboards, and I’ve seen countless homeowners make the same mistake: they put down bait and assume the rats will simply “trot outside to find water” and die in the garden.
Unfortunately, that is rarely the case. If you’ve just put down poison, you need to know exactly where those rodents are heading so you don’t end up with a lingering stench behind your skirting boards.
Where Do Rats Die After Eating Poison? (The Hidden Reality)
In my professional experience, the locations where rats die are dictated by instinct. When a rat feels the effects of a rodenticide, its primary drive isn’t thirst—it’s safety.
Why Do Rats Seek Out Water After Ingesting Bait?
There is a persistent myth in the UK that rat poison is designed to make rats thirsty so they leave the house.
While second-generation anticoagulants (SGARs) can cause a rat to feel dehydrated due to internal bleeding, they rarely have the strength to make a trek to the nearest pond.
I have found that most rats stay within 10 to 20 feet of their primary nesting site once the poison takes hold.
Do Rats Return To Their Nests To Die?
Absolutely. A rat’s nest is its sanctuary. As they become weaker and lose coordination, they crawl deep into the softest, warmest areas they can find.
In a typical UK semi-detached or terraced home, this means the thick layers of glass mineral wool insulation in your loft.
Which Specific Locations In A UK Home Are The Most Common “Death Zones”?
Based on my call-outs across the country, here is a breakdown of where I actually find carcasses compared to where homeowners expect them to be:
| Potential Location |
Homeowner Expectation |
Professional Reality (Frequency) |
| Garden / Outdoors |
High (The “Water Myth”) |
Very Low (< 10%) |
| Loft Insulation |
Medium |
Extremely High (> 60%) |
| Wall Cavities |
Low |
High (20%) |
| Under Floorboards |
Medium |
Moderate (10%) |
| Behind Kitchen Appliances |
Medium |
Low (Usually just for feeding) |
How Long Does It Take For Rat Poison To Work In The UK?
It’s important to understand that modern poisons are “delayed action.” This is by design. If a rat died immediately after eating bait, the rest of the colony would see the body and avoid the food—a phenomenon we call “bait shyness.”
What Are The Stages Of Rodenticide Poisoning?
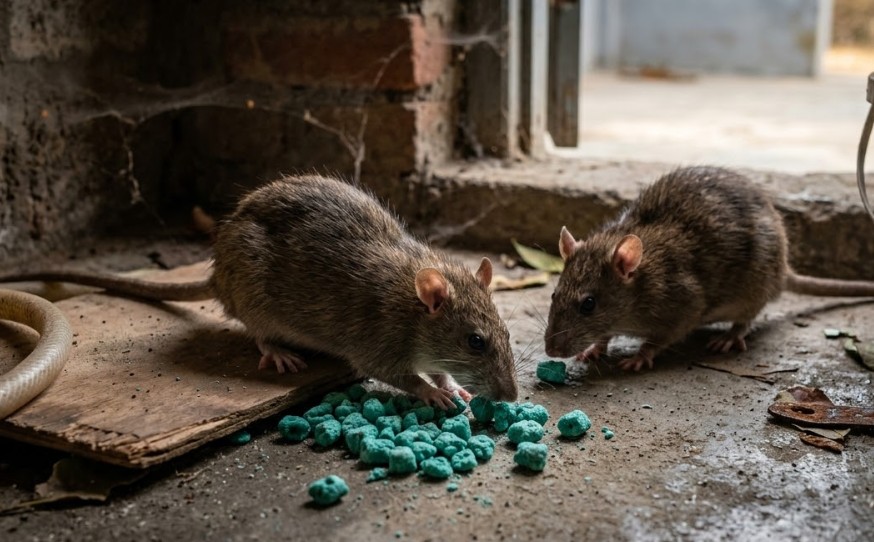
- Ingestion: The rat consumes the bait (usually a wax block or pasta bait).
- Lethargy (Days 2-4): The anticoagulant begins to stop blood clotting. The rat becomes sluggish and stops foraging.
- Hiding (Days 4-7): The rat retreats to its nest. It feels cold and weak.
- Death: The rat passes away peacefully in its sleep, usually deep within a structure.
In the UK, we primarily use anticoagulants like Bromadiolone or Difenacoum. These require multiple feeds or a specific dosage to work over several days. This ensures the entire “mischief” (the name for a group of rats) continues to eat the bait until it’s too late for all of them.
How Can I Find A Dead Rat In My House Before It Smells?
If you don’t find the rat within 24–48 hours of it dying, the UK’s damp climate will quickly turn that carcass into a significant odour problem.
What Are The Top 3 Signs A Rat Has Died Behind Your Walls?
- The “Sickly Sweet” Scent: A distinct smell of rotting cabbage mixed with chemicals.
- Blowflies: If you suddenly see large, slow-moving flies on your windows, a carcass is nearby.
- Staining: On rare occasions, if a rat dies on a ceiling, you may see a dark, greasy spot appear on the plaster.
Pro-Tip #1: The “Fly Trapping” Method If you can smell a rat but can’t see it, watch the flies. Blowflies have an incredible sense of smell. They will congregate on the specific patch of wall or floorboard closest to the carcass. I often use a piece of blue painter’s tape to mark where the most flies land—9 times out of 10, that’s where I need to cut the hole.
Pro-Tip #2: The Thermal Imaging Hack For DIYers who want to be precise, you can now rent thermal imaging cameras or buy “FLIR” attachments for your smartphone. Because a decomposing body undergoes a chemical reaction that generates a tiny amount of heat (or conversely, creates a “cold spot” if it’s been dead a while), you can often see the heat signature of the rat through the plasterboard without having to guess.
What Should I Do If A Rat Dies In An Inaccessible Area?
Sometimes, they die in a spot you simply cannot reach without structural damage.
How Do I Neutralise The Smell Of A Decaying Rodent?
In the UK, I always recommend Neutradol Gel Orbs or Activated Charcoal bags. Do not use standard air fresheners; they just mix with the smell of death to create a “floral rot” scent that is arguably worse.
Hang charcoal bags in the loft or near the cavity where the smell is strongest to “pull” the odour out of the air.

Is It Dangerous To Leave A Dead Rat In The Wall Cavity?
While the smell is the main issue, a dead rat can attract carpet beetles and flies. However, it isn’t just the carcass you should worry about; lingering bacteria from waste can be a major health hazard.
Many clients ask me is dried rat urine dangerous, and the answer is a firm yes—it can carry Hantavirus and other pathogens long after the rat has passed. Once the body has completely desiccated (dried out), which takes about 3 to 4 weeks in a dry UK house, the smell will vanish, but the area remains contaminated.
How To Safely Dispose Of A Poisoned Rat In The UK
Disposal isn’t just about hygiene; it’s about protecting the UK’s local wildlife, such as owls and red kites, from secondary poisoning.
What Are The UK Legal Requirements For Carcass Disposal?
Under the Campaign for Responsible Rodenticide Use (CRRU) guidelines, you should not simply toss a poisoned rat into your garden bin.
Most local councils in the UK advise “double bagging” and placing them in the general waste (black bin), though some require you to take them to a local household waste recycling centre that accepts “small animal carcasses.”
Pro-Tip #3: The “Double-Bagging” Professional Protocol I always use thick, heavy-duty rubble bags. Place the rat in the first bag, squeeze out the air, and tie it tight. Then, spray the outside of that bag with a 10% bleach solution before placing it in the second bag. This kills any lingering pathogens like Leptospirosis (Weil’s Disease) and prevents foxes from tearing the bag open in your wheelie bin.
Conclusion: Moving From Poison To Prevention
Finding a dead rat after using poison is a “win,” but it’s a messy one. I always tell my clients that while poison handles the current population, it doesn’t stop the next one from moving in.
To prevent a repeat performance, you need to understand how rats get in your house so you can seal those entry points in your brickwork and around your pipes.
Once you have secured the perimeter, you can look into what keeps rats away naturally to maintain a rodent-free environment without relying solely on chemicals. Proofing your home means you never have to play “find the smell” again.
Expert Note: If you are struggling to locate a carcass or the smell is unbearable, I highly recommend contacting a BPCA (British Pest Control Association) certified professional. We have the telescopic cameras and industrial-grade deodorisers to solve the problem in hours rather than weeks.
What are the FAQ About Where Do Rats Die After Eating Poison?
1. Will my dog get sick if it finds a poisoned rat?
Yes, this is called “secondary poisoning.” If your pet eats a rat that has recently ingested anticoagulant bait, they can be affected. If you suspect your pet has found a carcass, take them to the vet immediately; the antidote is usually a simple course of Vitamin K.
2. Do rats really go outside to find water before dying?
No. While they may feel thirsty, they are usually too disoriented and weak to navigate out of the house. I have found more rats dead next to a leaky pipe under a sink than I have ever found in a garden.
3. How long will a dead rat smell for in a crawl space?
In a typical UK home, the smell lasts for 10 to 21 days. It is most intense between days 4 and 10. High humidity will make the smell stronger and last longer.
Home Diagnostics and Technical Standards Specialist at Hello Mag. She provides high-level Expertise in appliance mechanics and scientific pest management, ensuring every guide follows strict safety protocols and manufacturer standards. As a leading Authority on technical home specs, Kanimozhi audits complex data to provide homeowners with the most accurate, verified, and reliable diagnostic solutions available.
