
by Kanimozhi BV | Dec 22, 2024 | Washing Machine, Appliances
Encountering an F05 error on your Hotpoint washing machine can disrupt your daily routine. This guide is completely on Hotpoint Washing Machine F05 Error and clearly explains the meaning behind this error code, why it occurs, and the steps you can take to fix it.
Whether you’re dealing with a drainage issue or a locked door, the solutions below will get your machine back in working order.
What Is the F05 Error on a Hotpoint Washing Machine?
The F05 error code is specific to Hotpoint washing machines and indicates a failure in the drainage system.
This happens when the machine detects that water is not draining out during or after a wash cycle. As a result, the machine stops spinning to avoid flooding or further damage.
What are the Causes of the F05 error?
- Blockages in the drainage system: Debris, lint, or small objects clogging the pipes or pump.
- Malfunctioning components: Faulty drain pumps or pressure switches.
- System glitches: Software issues that misinterpret sensor readings.
Understanding these causes helps you address the problem systematically and avoid recurrence.
What Does Hotpoint Washing Machine F05 Mean?
The F05 error is essentially a signal for users to check the drainage system. It may also indicate a problem with the pressure switch, which monitors water levels inside the drum.
This switch ensures that the machine only continues cycles when water has drained appropriately.
What are the Signs accompanying the F05 error?
- Machine stops mid-cycle: The drum remains filled with water.
- Error code display: “F05” appears on the digital screen or control panel.
- Water not draining: Standing water is visible inside the drum.
Addressing this error promptly is essential to avoid worsening the issue, such as water spillage or damage to other components.
How to Reset a Hotpoint Washing Machine?
If troubleshooting doesn’t resolve the issue, resetting the machine might help. Follow these steps:
- Turn Off the Machine: Switch off the machine at the mains.
- Unplug the Appliance: Leave it unplugged for at least 30 minutes to reset the internal system.
- Restart the Machine: Plug it back in, turn it on, and select a quick wash cycle to check if the error is cleared.
Resetting clears minor glitches but doesn’t fix mechanical faults.

Hotpoint Washing Machine F05 Error: How Can I Fix?
To resolve the F05 error, follow these steps:
1. Turn Off and Unplug the Machine
- Always ensure your safety by disconnecting the machine from the power source before starting any checks.
2. Check the Waste Pipe
- Detach the waste pipe from the plumbing and place its end into a bucket.
- If water flows out freely, the external drainage may be blocked.
- If no water comes out, the blockage might be within the machine.
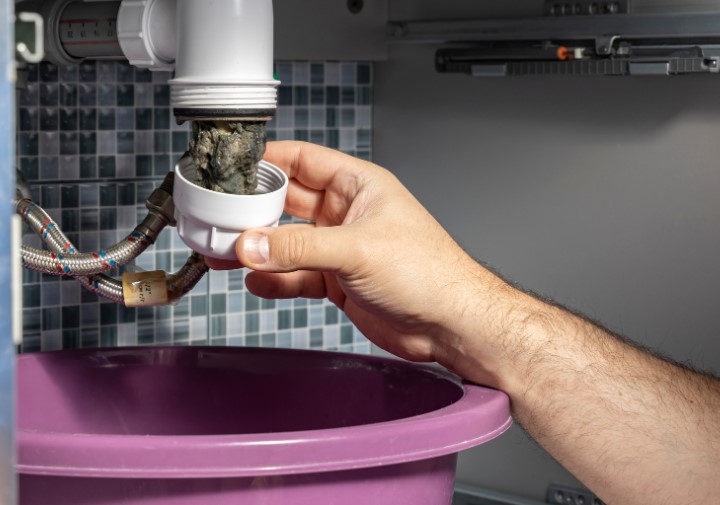
3. Inspect and Clean the Pump Filter
- Locate the pump filter at the bottom front of the machine behind a small panel.
- Place a towel and a container to catch any water.
- Unscrew the filter cap to allow trapped water to drain, then remove debris.
4. Examine the Drain Pump
- Listen for unusual noises during the drain cycle.
- If the pump appears faulty, contact a technician for replacement.
5. Inspect the Pressure Switch and Air Chamber
- These components detect water levels and may need cleaning or replacement. Professional help is recommended for this step.

How Do You Force Open a Hotpoint Washing Machine Door?
A locked washing machine door can occur when the F05 error is triggered. To force it open:
- Turn Off the Machine: Switch it off at the mains and unplug it.
- Drain Remaining Water: Use the drain hose or pump filter to remove water.
- Release the Door Lock Mechanism: Locate the manual door release mechanism near the pump filter. Pull it to unlock the door.
If the issue persists, consult the machine’s manual or a technician.
What are the Preventive Measures Of Hotpoint Washing Machine F05 Error?
To avoid encountering the F05 error in the future:
- Regularly clean the pump filter.
- Inspect clothing pockets for small objects like coins or tissues before washing.
- Avoid overloading the washing machine.
- Use the correct amount of detergent to prevent residue build-up.
If troubleshooting steps fail to resolve the F05 error, it’s time to call a professional. Persistent issues may involve more complex faults like:
- A malfunctioning drain pump.
- Pressure switch failure.
- Damaged wiring or control board issues.
A professional can quickly identify the root cause and prevent further damage to your washing machine.

By following this detailed guide, you can troubleshoot, fix, and even prevent the F05 error on your Hotpoint washing machine, ensuring its longevity and optimal performance.
Related Article: Hoover Washing Machine E20 Error: What Is & How To Fix It?
Frequently Asked Questions On Hotpoint Washing Machine F05
1. Can I continue using my washing machine with the F05 error code?
No, it’s best to address the F05 error promptly. Using the machine without resolving the issue can lead to water leakage or further damage.
2. How often should I clean the pump filter?
It’s recommended to clean the pump filter every three to four months, or more frequently if the machine is used heavily.
3. Why won’t my Hotpoint washing machine drain water?
A clogged pump filter, blocked waste pipe, or faulty drain pump could prevent proper drainage.
4. Is the F05 error common in Hotpoint washing machines?
Yes, the F05 error is a common issue indicating drainage problems, which can usually be resolved through basic troubleshooting.

by Kanimozhi BV | Dec 11, 2024 | Washing Machine, Appliances, DIY Ideas
Washing machines are one of the essential appliances in our daily lives, and when they display error codes, it can disrupt routines.
The Hoover washing machine E20 error is one of the most common issues users face. Understanding its causes and solutions is the first step toward fixing it effectively. Let’s dive into the details.
What Does the E20 Error Code Mean?
The E20 error code in Hoover washing machines indicates a drainage problem. This error usually appears when the appliance is unable to expel water during or after a wash cycle.
Common Causes Include:
- Blocked Filters: Dirt, lint, and other debris may clog the filter, restricting water flow.
- Clogged Drain Hose: A kinked or obstructed drain hose prevents proper drainage.
- Faulty Drain Pump: Malfunctions in the pump may impede water from being drained out.
Recognizing these causes can help you troubleshoot and resolve the issue efficiently.

How Can I Identify the Cause of the E20 Error?
To fix the E20 error, pinpointing the root cause is crucial. Here’s how to assess the problem:
Inspecting the Drain Hose
- Check the hose for kinks, twists, or clogs that might be obstructing water flow as this commonly occurs in kitchen sinks and the unclogging in kitchen sinks is necessary.
- Ensure the drain hose is installed at the correct height—between 60 cm and 1 meter—to avoid siphoning issues.
Examining the Pump Filter
- Locate the pump filter, usually at the bottom front panel of your washing machine.
- Carefully remove and clean the filter to eliminate trapped debris such as coins, buttons, or lint.
Assessing the Drain Pump
- Listen for unusual sounds during operation, which could indicate a malfunction.
- If the pump is visibly obstructed or damaged then it might need replacement.
How Do I Fix the E20 Error on My Hoover Washing Machine?
Follow this step-by-step guide to resolve the E20 error:
Safety First
- Always unplug the washing machine before inspecting or performing any repairs to avoid electrical hazards.
Cleaning the Pump Filter
- Open the filter access door at the base of the machine.
- Place a shallow tray or towel to catch any water spillage.
- Unscrew the filter, clean it thoroughly, and remove any debris.
Clearing the Drain Hose
- Disconnect the drain hose from the back of the machine.
- Run water through the hose to clear any blockages.
- Reattach it securely, ensuring there are no bends or kinks.
Resetting the Machine
- After performing maintenance, reset the washing machine by holding the start button for 5–10 seconds.
Preventative Measures to Avoid Future E20 Errors
Prevention is always better than cure. Adopting the following habits can minimize the likelihood of encountering the E20 error:
- Clean the Filter Regularly: Inspect and clean the pump filter every 2–3 months to prevent blockages.
- Maintain the Drain Hose: Periodically check the hose for kinks and clogs.
- Load the Machine Properly: Avoid overloading, as this can lead to poor drainage and mechanical stress.
- Use the Right Detergent: Choose detergents that are compatible with your machine to prevent buildup in the system.
If the above solutions don’t resolve the issue, it might be time to seek professional help. Consider contacting an expert if:
- The drain pump continues to malfunction even after cleaning.
- You notice persistent leaks or unusual noises during operation.
- The error reappears frequently despite following preventive measures.
Authorized Hoover service centers can provide specialized support to ensure your appliance is restored to optimal functionality.
Conclusion
The hoover washing machine E20 error can be inconvenient, but with the right knowledge, it’s manageable.
By understanding the causes and applying the solutions discussed above, you can fix the issue and prolong the lifespan of your appliance. Regular as well as proper maintenance and timely action are the only key to avoiding future problems.
FAQs On Hoover Washing Machine E20 Error
1. What is the most common cause of the E20 error in Hoover washing machines?
The most common cause is a blocked pump filter or a clogged drain hose, which prevents proper water drainage.
2. Can I fix the E20 error on my Hoover washing machine myself?
Yes, many E20 error causes, such as a blocked filter or hose, can be resolved with basic DIY steps. However, if the issue persists then seeking professional help is recommended.
3. How often should I clean the pump filter to prevent errors?
Cleaning the pump filter every 2–3 months is advisable to avoid blockages and ensure smooth operation.
4. Is the E20 error covered under the Hoover warranty?
This depends on the terms of your warranty. Typically, issues arising from user neglect, such as blockages, may not be covered.

by Kanimozhi BV | Nov 16, 2024 | Garden, Exterior
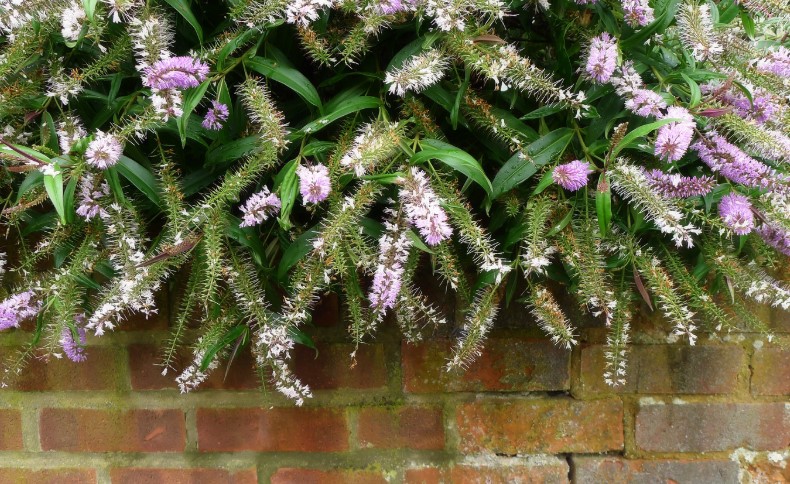
Hebe shrubs are a beloved choice for UK gardeners, prized for their evergreen foliage, vibrant flowers, and versatility.
Whether lining pathways, accenting borders, or growing as a standalone shrub, Hebe can bring year-round interest to your garden. However, to ensure hebe remains healthy and visually appealing, proper pruning is essential.
This guide on how and when to prune hebe will cover everything you need to know about pruning Hebe shrubs, including when and how to do it and the tools you’ll need.
What are Hebe Shrubs?
Hebe shrubs, native to New Zealand, have adapted well to the UK’s climate. These evergreen plants are celebrated for their compact growth habit, glossy foliage, and long-lasting flowers that appear in shades of purple, pink, and white.
They attract pollinators, making them an excellent choice for gardeners looking to support biodiversity.With over 90 species and hybrids, Hebe shrubs range from small, low-growing varieties perfect for ground cover to larger shrubs ideal for hedging.
The versatility of hebe makes them a popular choice for gardeners of all experience levels. However, without regular pruning, Hebe can become leggy or overgrown, reducing their overall appeal.
Why Pruning is Essential for Hebe?
Pruning isn’t just about keeping your garden tidy; it plays a crucial role in the health and longevity of your plants. Here’s why pruning Hebe is essential:
- Encourages Healthy Growth: By removing old or damaged branches, you stimulate the plant to produce fresh, vigorous shoots.
- Promotes Better Flowering: Regular pruning redirects the plant’s energy towards flowering, ensuring a vibrant display.
- Maintains Shape and Size: Without pruning, Hebe shrubs can grow unevenly or become too large for their intended space.
- Prevents Disease and Pests: Removing deadwood reduces the risk of fungal infections and pest infestations.
Pruning also allows you to rejuvenate older Hebe shrubs, keeping them looking fresh and vibrant for years to come.
When to Prune Hebe?
Timing your pruning correctly ensures the plant thrives and recovers well. For Hebe shrubs, pruning can be done at specific times of the year for the best results.
When is the Best Time To Prune Hebe?
- Late Summer (After Flowering): This is the most common time to prune Hebe. Once the flowers have faded, lightly trim the plant to maintain its shape and encourage new growth before winter.
- Early Spring: After the risk of frost has passed, remove any branches damaged by winter weather. This prepares the shrub for the growing season.
Also you might think do hebes die back in winter?
When To Hard Prune Hebe in the UK?
If your Hebe shrub has become overgrown or leggy, a hard prune may be necessary. In the UK, early spring is the ideal time for this.
Cut back old wood sparingly to rejuvenate the plant, but be cautious as Hebe shrubs may struggle to regenerate from aggressive pruning.

When Is The Time to Avoid Pruning Hebe?
Avoid pruning during late autumn or winter. During this time, plants are dormant, and pruning can leave them vulnerable to frost damage and slow recovery.
Having the right tools ensures clean cuts and prevents damage to your plants. Here’s what you’ll need:
| Tool |
Purpose |
Notes |
| Sharp Secateurs |
Cutting smaller branches |
Keep blades sharp and clean |
| Pruning Shears |
Trimming larger stems |
Use for thicker branches |
| Gloves |
Protecting hands |
Prevent scratches and cuts |
How to Prune Hebe? – A Step-by-Step Guide
Pruning Hebe can transform an overgrown or untidy shrub into a healthy, vibrant plant. Follow these steps carefully to achieve the best results:
Step 1: Inspect the Plant
Begin by examining your Hebe shrub. Look for:
- Dead branches: These are brown, brittle, and lifeless.
- Damaged branches: These may have cracks or breaks from wind or frost.
- Diseased branches: Signs of disease include discoloration, fungal growth, or a wilted appearance.
Remove these branches first, as they can drain the plant’s resources and spread issues to healthy parts.
Step 2: Deadhead Spent Flowers
Once the flowering season is over, you can remove faded blooms. Deadheading helps the plant conserve energy and encourages further flowering. To do this:
- Use sharp secateurs to cut just above a pair of healthy leaves.
- Avoid cutting too close to the stem to prevent damaging the growth buds.
This step keeps the plant tidy and prevents it from becoming too leggy.
Step 3: Lightly Trim for Shape
Shaping your Hebe involves:
- Trimming back up to one-third of the foliage. This ensures the plant maintains its natural, bushy form.
- Focusing on symmetry: Trim around the shrub evenly for a neat appearance.
Always make cuts at a slight angle to prevent water from pooling on the cut surface, which can cause rot.
Hard pruning is needed if your Hebe is overgrown, has become leggy, or has developed bare stems. Here’s how to do it:
- Identify older, woody stems at the base.
- Cut these back gradually over 2–3 years rather than all at once. This prevents shocking the plant.
- Avoid cutting into old wood (areas with no green growth) as Hebe may struggle to regenerate from this.
Hard pruning is best done in early spring to give the shrub time to recover and produce fresh growth.
Step 5: Clean Up and Dispose of Cuttings
Once you’ve finished pruning:
- Collect all pruned material. Diseased or pest-infested cuttings should be disposed of in a waste bin, not composted.
- Healthy branches can be composted or used as mulch in your garden.
Do You Prune Hebe After Flowering?
Yes, pruning after flowering is one of the best ways to keep your Hebe healthy and vibrant. Late summer is the ideal time for this task.
By removing spent flowers and lightly shaping the plant, you encourage new growth and prepare the shrub for the following season.

What are the Common Mistakes to Avoid While Pruning?
The following are the common mistakes that we make often, make sure you avoid them.
- Over-Pruning: Cutting back too much foliage can stress the plant and hinder regrowth.
- Pruning in Winter: Hebe shrubs are vulnerable to frost damage if pruned during cold months.
- Using Dull Tools: Ragged cuts from dull blades take longer to heal and increase the risk of disease.
What are the Aftercare Tips Post-Pruning?
Pruning is only the first step—proper aftercare ensures your Hebe thrives afterward:
- Watering: Water the plant thoroughly, especially during dry spells, to support recovery.
- Mulching: The technique of applying a layer of mulch around the base which will retain moisture content and regulate soil temperature.
- Monitoring: Keep an eye on the shrub for signs of stress or pests, addressing any issues promptly.
Conclusion
Pruning is an essential practice for maintaining the health, shape, and vibrancy of Hebe shrubs. By understanding when and how to prune, you can ensure your garden remains lush and beautiful.
Whether you’re deadheading flowers or performing a hard prune, these tips will help your Hebe thrive for years to come.
Frequently Asked Questions
1. Can Hebe be pruned in autumn?
It’s best to avoid pruning Hebe in autumn. Pruning during this time can leave the plant vulnerable to frost damage, as new growth may not have enough time to harden before winter.
2. What should I do if my Hebe isn’t flowering?
Check if the plant is overgrown or has old wood. Prune lightly after the next flowering season to encourage new growth, and ensure it’s receiving adequate sunlight and well-drained soil.
3. Is Hebe pruning necessary every year?
Light pruning is beneficial every year to maintain shape and encourage blooming. However, hard pruning is only needed for overgrown or leggy plants, and it can be done every few years.
4. Can I use the cuttings from Hebe pruning to propagate?
Yes, healthy Hebe cuttings can be used for propagation. Take semi-hardwood cuttings in late summer, plant them in a moist growing medium, and keep them in a sheltered spot until they root.
5. What is the difference between light pruning and hard pruning?
Light pruning involves trimming up to one-third of the plant, focusing on spent flowers and shaping. Hard pruning cuts back old wood to rejuvenate the plant, usually necessary only for overgrown or leggy shrubs.
6. Will pruning Hebe encourage more blooms?
Yes, regular pruning, particularly deadheading spent flowers, encourages the plant to produce more blooms in the next growing season.

by Kanimozhi BV | Nov 15, 2024 | Bathroom, Interior
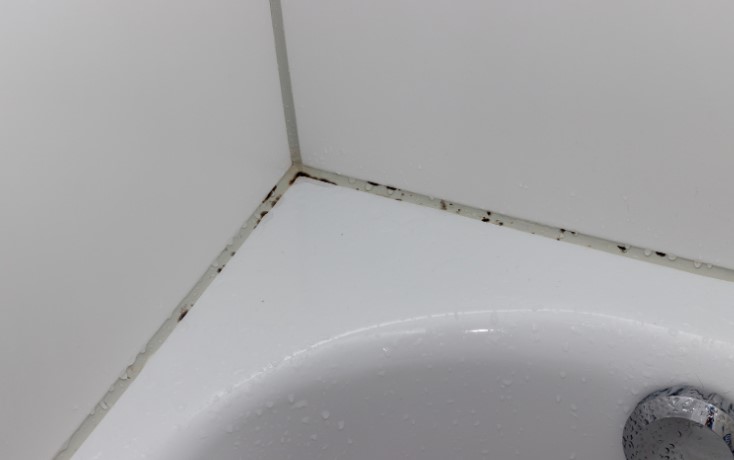
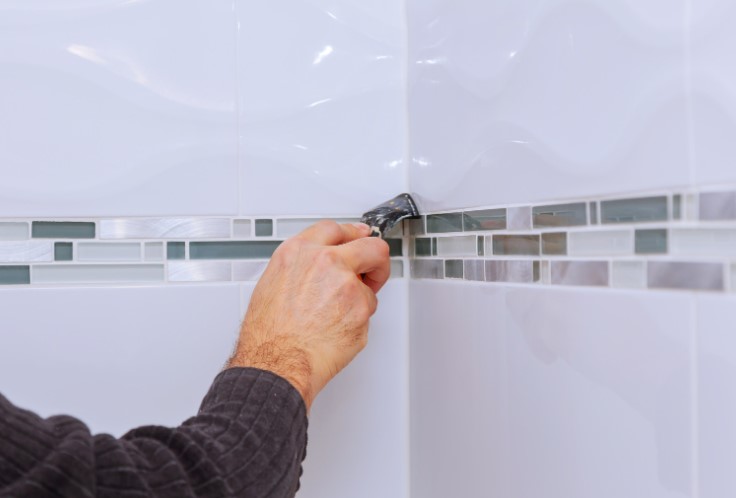
If you’ve noticed dark patches creeping along the silicone sealant in your bathroom or kitchen, you’re likely dealing with black mould. Black mould is not only unsightly, but it can also affect your health, particularly if you have respiratory sensitivities. When left unchecked, it can spread and become harder to remove.
In this guide, I’ll walk you through several effective ways on how to remove black mould from silicone sealant using household items and specialized cleaning products. I’ll also share some preventive tips to keep your sealant clean and mould-free in the future.
What Causes Black Mould on Silicone Sealant?
Black mould thrives on silicone sealant because it grows best in damp, poorly ventilated areas. Places like bathrooms and kitchens, where steam and water accumulate regularly, create the perfect breeding ground for mould.
Silicone sealant is often exposed to a combination of soap residue, grime, and moisture, which can easily lead to mould growth over time.
The root causes of black mould on silicone sealant include:
- Persistent Moisture: Humidity from showers or cooking keeps surfaces damp, providing mould with the water it needs to thrive.
- Poor Ventilation: Without proper airflow, dampness lingers, encouraging mould growth on surfaces like silicone.
- Soap and Grime Buildup: Soap scum and residue left on sealant feed mould, giving it the resources to grow.
Understanding these causes can help you choose the right cleaning method and preventative measures to tackle and reduce mould on silicone sealant.
What are the Necessary Supplies for Removing Black Mould from Silicone Sealant?
Before starting, it’s helpful to gather the right supplies. Here’s what I recommend for effective mould removal:
- White Vinegar: A natural mould killer that’s effective on light mould stains.
- Baking Soda: Works well as a scrub to lift stubborn mould and stains.
- Bleach: A strong disinfectant that kills mould spores and removes dark stains.
- Hydrogen Peroxide: An alternative to bleach that is effective on tough stains without harsh fumes.
- Tea Tree Oil: A natural antifungal with a pleasant scent that deters mould growth.
- Commercial Mould Remover Products: These are specially formulated for use on bathroom surfaces and can be particularly effective on stubborn mould.
Each of these items has different strengths, so choose based on what you’re comfortable with and what works best for your specific mould problem.
Top 5 Effective Ways on How To Remove Black Mould from Silicone Sealant
If you’re ready to get rid of black mould, here are five effective methods to try:
1. Bleach Solution Method
- Why It’s Effective: Bleach is a powerful disinfectant that kills mould spores and lifts dark stains effectively.
- How to Use It: Mix one part bleach with four parts water, apply it to the mouldy silicone, and let it sit for about 10-15 minutes. Afterward, rinse with water and dry. Be cautious with bleach, as it can irritate the skin and eyes, so wear gloves and ventilate the area.
2. White Vinegar and Baking Soda Paste
- Why It’s Effective: Vinegar’s acidity kills mould, and when combined with baking soda, it creates a paste that scrubs away mould stains.
- How to Use It: Spray vinegar onto the mouldy area and apply baking soda over it to form a paste. Let the solution stay for a few minutes, then scrub gently and rinse with water. This method is ideal for anyone who prefers avoiding harsh chemicals.
3. Hydrogen Peroxide Treatment
- Why It’s Effective: Hydrogen peroxide is a mild bleach and disinfectant, effective on stubborn mould without strong fumes.
- How to Use It: Apply hydrogen peroxide directly to the mouldy silicone, let it sit for 10-15 minutes, then rinse thoroughly. It works particularly well on old or tougher mould stains.
4. Tea Tree Oil Solution
- Why It’s Effective: Tea tree oil is a natural antifungal and antibacterial agent that kills mould and leaves a fresh scent.
- How to Use It: Mix a teaspoon of tea tree oil with one cup of water, spray it onto the mouldy area, and let it sit before scrubbing off. This solution is great for ongoing maintenance and minor mould problems.
5. Specialized Mould Remover Products
- Why It’s Effective: These products are specially formulated to tackle bathroom mould and mildew, making them very effective for hard-to-remove black mould.
- How to Use It: Follow the product instructions, which usually involve spraying the cleaner, letting it sit, and wiping or scrubbing the mould away. They’re especially useful for areas where mould returns frequently.
Preventing Black Mould on Silicone Sealant
Once you’ve removed the mould, prevention is key to keeping it from coming back.
- Maintain Ventilation: Open windows, use an exhaust fan, or consider a dehumidifier to reduce humidity in bathrooms and kitchens.
- Regular Cleaning: Wipe down silicone areas weekly with a mild cleaner to prevent soap residue and grime buildup. This helps keep mould at bay and keeps surfaces fresh.
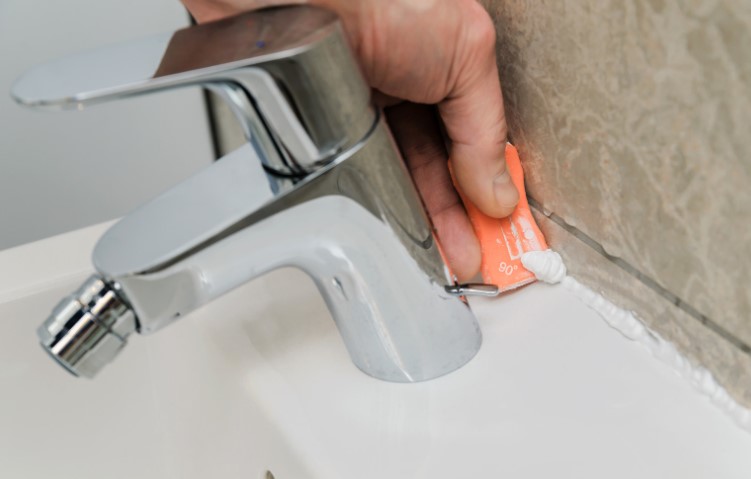
- Use Mould-Resistant Sealant: Consider applying a mould-resistant silicone sealant, particularly in high-moisture areas. Many new sealants have built-in mould inhibitors.
- Keep Surfaces Dry: After showers or cooking, take a minute to dry silicone surfaces with a towel or cloth. Removing excess moisture is one of the best ways to prevent mould growth.
Apply Preventive Solutions: For additional protection, you can spray a solution of water and vinegar on silicone areas weekly. This will help discourage mould growth naturally.
Conclusion
Getting rid of black mould on silicone sealant doesn’t have to be a daunting task. By using household solutions like bleach, vinegar, or even tea tree oil, you can effectively remove mould and restore your silicone to its clean, original state. Preventive measures like regular drying, cleaning, and using mould-resistant products will help keep mould from returning.
With a little maintenance and the right cleaning routine, you can keep your home’s silicone sealant looking fresh and mould-free. A clean environment isn’t just about aesthetics; it’s also a way to maintain a healthier, more welcoming home.
Frequently Asked Questions
1. Can I Use Household Products to Remove Mould from Silicone Sealant?
Yes, household items like vinegar, baking soda, and bleach can effectively remove mould. Vinegar and baking soda are good for natural cleaning, while bleach is stronger for stubborn stains.
2. How Often Should I Clean My Silicone Sealant to Prevent Mould?
Weekly cleaning is recommended, especially in damp areas. For high-moisture spaces, wiping down daily helps prevent mould.
3. Is Black Mould on Silicone Sealant Dangerous?
Yes, black mould can cause respiratory issues, especially for those with sensitivities. Prompt removal and prevention keep your home healthier.

by Kanimozhi BV | Nov 13, 2024 | Garden, DIY Ideas, Exterior
Need tips on how to get rid of grass between paving stones? Keeping a patio or pathway clear of grass growing between paving stones not only enhances the area’s appearance but also reduces maintenance.
Persistent grass can shift pavers, create uneven surfaces, and contribute to a less tidy look. Here’s a comprehensive guide on effective methods to remove and prevent grass between paving stones.
Why Does Grass Grow Between Paving Stones?
Grass often thrives in the spaces between paving stones due to several factors:
- Moisture Accumulation: Moisture trapped in gaps provides an ideal environment for growth.
- Soil and Organic Debris: Soil and decomposed organic matter in these crevices can act as a nutrient base.
- Sunlight and Air Exposure: Paving stones on pathways and patios often receive ample sunlight and air, encouraging grass and weeds to grow.
Controlling this growth not only keeps your patio visually appealing but also extends the longevity of your paving stones by preventing root intrusion.

Various Methods on How To Get Rid of Grass Between Paving Stones
What Are the Best Methods to Remove Grass Between Paving Stones?
Removing grass effectively requires the right approach for your specific setup. Here are four methods to get rid of grass between paving stones, including pros and cons and cost estimates for each.
Manual removal is a straightforward way to tackle grass and weeds. Using tools like a weeding knife, joint scraper, or even a narrow screwdriver helps target roots directly for effective extraction.
- Pros: Cost-effective, eco-friendly, and allows precise removal.
- Cons: Time-consuming and physically demanding.
- Estimated Cost: £10–£20 for basic tools.
- Moisten the area to soften soil, making it easier to remove grass from the roots.
- Use the weeding tool to dig and pull out the grass, ensuring you remove as much of the root as possible.
- For persistent roots, scrape along each joint to remove any remaining fragments.

Method 2: Boiling Water Solution
Using boiling water is a simple, eco-friendly way to kill grass. The heat destroys plant cells, effectively killing the grass and its roots.
- Pros: Eco-friendly, very affordable, and free from chemicals.
- Cons: Short-term solution, may need regular application.
- Estimated Cost: Free if you have access to boiling water.
Steps For Boiling Water Solution
- Carefully pour boiling water directly over the grass between the stones.
- Allow the water to seep down to reach the roots.
- Repeat as necessary, especially for persistent growth.
Method 3: Vinegar and Salt Mixture
A homemade vinegar-salt solution is a natural yet effective way to kill grass and weeds between paving stones. Be cautious, though, as it can harm other nearby plants.
- Pros: Affordable, eco-friendly, and quick to prepare.
- Cons: May harm surrounding plants; effectiveness can vary with regrowth.
- Estimated Cost: Around £5–£10.
Steps To Apply Vinegar and Salt Mixture
- Mix one part white vinegar with one part salt in a spray bottle, adding a few drops of dish soap to enhance effectiveness.
- Spray the solution directly on the grass and roots, avoiding contact with other plants.
- Let the solution sit for a day or two and monitor results.
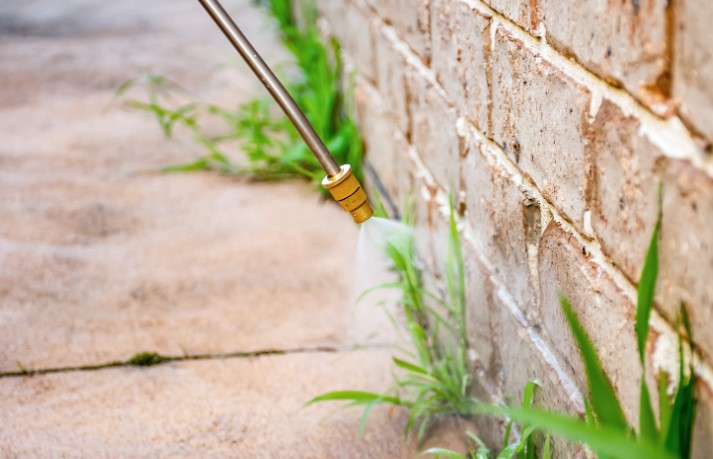
Method 4: Chemical Weed Killers for Paving Stones
Chemical herbicides are powerful solutions as there are strongest weed killers, especially for tough or recurring growth. While effective, this option has environmental considerations.
- Pros: Long-lasting and powerful; useful for extensive or established growth.
- Cons: Potential environmental impact; health risks if not handled carefully.
- Estimated Cost: £10–£30, depending on product and size.
Steps To Apply Chemical Weed Killer For Paving Stones
- Choose a herbicide designed for patio and pathway use.
- Apply carefully to avoid overspray on desirable plants.
- Follow the manufacturer’s safety guidelines closely for best results.
What Tools Are Best for Maintaining Grass-Free Paving Stones?
Equipping yourself with the right tools can simplify paving stone maintenance.
Essential Tools for Patio Maintenance
- Pressure Washer: Removes built-up dirt, moss, and grass.
- Weeding Knife: Helps get into narrow crevices.
- Joint Scraper: Ideal for scraping persistent grass or moss from joints.
- Stiff Broom: Sweeps away soil and organic debris that could promote grass growth.
Using a Pressure Washer for Thorough Cleaning
Pressure washing is an effective way to remove built-up dirt, grass, and other debris.
Tips for effective pressure washing:
- Choose a low to moderate setting to avoid damaging pavers.
- Sweep away loose debris before washing to avoid clogging the pressure washer.
- Move the nozzle evenly over the surface for consistent cleaning.
How Can You Prevent Grass from Growing Between Paving Stones?
Prevention is the best way to minimize maintenance and keep your pavers looking pristine.
Top Prevention Mechanisms for Long-Lasting Results
- Installing a Weed Barrier Under Paving Stones: Placing a weed membrane under pavers blocks grass growth from the roots up. This is most effective for new patios but can be installed under lifted stones in existing patios.
- Filling Gaps with Polymeric Sand or Gravel: Polymeric sand hardens in place after being moistened, creating a strong barrier against weed and grass growth.
Best Solution for Preventing Grass Growth
The best long-term solution combines weed barrier installation with polymeric sand to fill gaps. This approach prevents grass from taking root and stabilizes the stones. For an added layer of protection, consider sealing pavers, which can reduce moisture absorption and further inhibit weed growth.

Summary: Each method offers unique benefits and drawbacks. Manual removal and boiling water are great for quick fixes, while chemical weed killers provide more lasting solutions for persistent growth. For those looking for balance, the vinegar and salt solution offers effectiveness without chemicals.
Conclusion
Keeping paving stones free of grass not only improves aesthetics but also enhances the lifespan of your patio or pathway. Combining manual or chemical removal methods with preventive measures like a weed barrier and polymeric sand filling mentioned in this guide on how to get rid of grass between paving stones, can offer long-term solutions.
With regular maintenance and eco-friendly approaches, you can keep your outdoor spaces clean and welcoming.
Frequently Asked Questions (FAQs)
1. How often should I remove grass between paving stones?
It’s best to remove grass and weeds seasonally or as they appear. Regular maintenance every few months helps prevent regrowth and keeps the area clean.
2. Can I use household bleach to kill grass between pavers?
While bleach can kill grass, it’s generally not recommended due to potential environmental impact and toxicity. Vinegar is a safer alternative.
3. Will polymeric sand completely prevent grass from growing?
Polymeric sand is highly effective at blocking grass, though it may need reapplication in high-traffic areas every couple of years.
4. Is it safe to use a pressure washer on all types of paving stones?
Yes, but it’s advisable to use a moderate pressure setting to avoid damage, especially on softer stone or older pavers.
