

If you are wondering how to remove wallpaper without a steamer, you have come to the right place. As a Lead Technical Researcher in home diagnostics, I’ve found that stripping walls is essentially a chemical challenge: breaking the bond of the adhesive without damaging the substrate.
Whether you are prepping for a total room makeover, choosing the right wallpaper for your living room, or dealing with a modern UK build, this guide will show you how to strip walls effectively using household science and precision tools.
Quick Comparison: DIY Methods vs. Professional Stripping
Placing a data table in the top 30% of your content helps Google identify your page as a high-value resource for users.
| Aspect | DIY Manual Method | Hiring a Professional | Steam Stripper Rental |
| Cost | Low (£10-£20) | High (£150-£300) | Medium (£30-£50) |
| Surface Safety | High (Safe for old plaster) | Varies | Low (Can “blow” old plaster) |
| Equipment | Household items | Professional Grade | Heavy Machinery |
| Effort Level | Moderate | Minimal | Moderate |
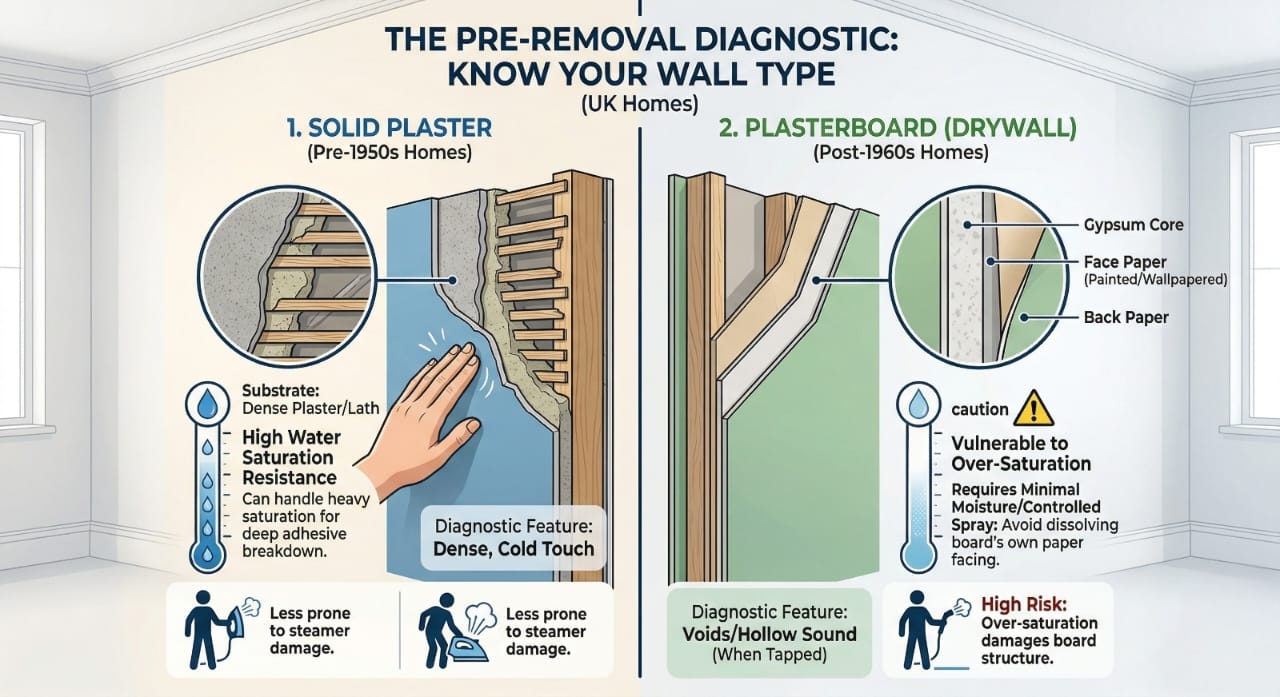
The Pre-Removal Diagnostic
In the UK, your approach depends on your wall type.
- Solid Plaster: Common in pre-1950s homes; can handle heavy saturation.
- Plasterboard (Drywall): Common in modern homes; requires a “minimal moisture” approach to avoid damaging the paper facing of the board.
The “Specialist” Recipe Card
Skip the expensive chemical strippers found in DIY sheds. This balanced DIY solution breaks surface tension and dissolves traditional UK wheat pastes.
🛠️ The Ultimate Wallpaper Stripping Solution
- Base: 5 Litres of Very Hot Water (Hot water vibrates molecules faster, breaking the adhesive bond quicker than cold water).
- Solvent: 500ml White Vinegar (The acetic acid breaks down the starch in organic wallpaper pastes).
- Surfactant: 2 Tablespoons of Liquid Dish Soap (Crucial for breaking the “surface tension” of water so it doesn’t just bead off the paper).
- Optional Power-Up: 1 Capful of Fabric Softener (Contains chemicals designed to penetrate deep into fibers—perfect for heavy embossed papers).
- Application: Mix in a Garden Pump Sprayer. It provides a “mist” that stays on the wall longer than a heavy “dribble” from a sponge.
Step-by-Step Guide: How to Remove Wallpaper Without a Steamer?
Step 1: The “Scoring” Phase (Don’t Skip This!)
Most modern UK wallpapers are “washable” or vinyl-coated. They are designed to repel water. If you don’t break this seal, your solution will never reach the glue.
- The Tool: Use a wallpaper scoring tool (like a Paper Tiger).
- The Technique: Move in small, light circular motions. You aren’t trying to “carve” the wall; you are creating thousands of microscopic “entry points” for your liquid solution.
- Technical Tip: If you can’t find a scoring tool, a serrated kitchen knife used very lightly at an angle can work, but be wary of gouging the plaster.
Step 2: Strategic Saturation
Apply your solution starting from the top of the wall.
- The 15-Minute Rule: Biology and chemistry take time. After spraying, wait 15 minutes. If the paper still feels dry or “crispy,” spray it again.
- Visual Cue: The paper is ready when it starts to bubble away from the wall or changes to a darker, “wet” shade.
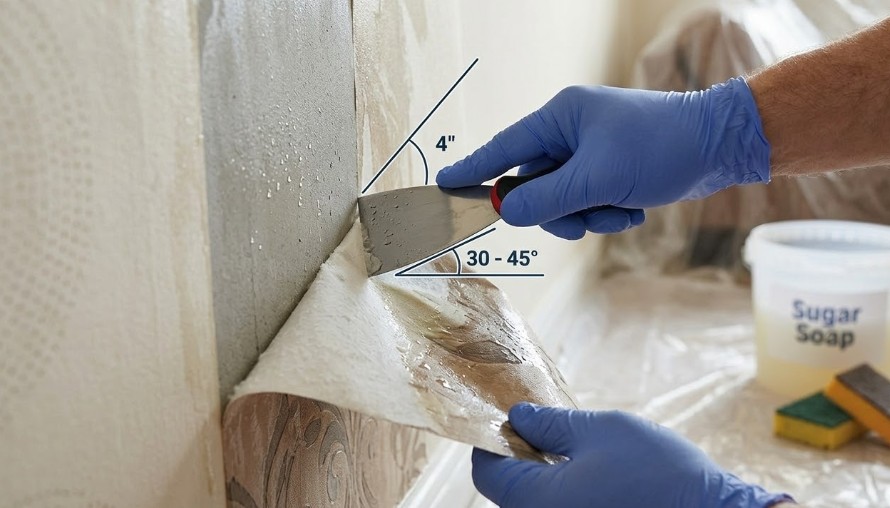
Step 3: Precision Scraping
- The Angle: Hold your stripping knife at a $30^\circ$ to $45^\circ$ angle. A steeper angle will dig into the wall; a flatter angle will just slide over the paper.
- The Direction: Work from the seams inward. Once you get a large piece moving, try to pull it with your hands while using the scraper to “guide” the glue release
Advanced Troubleshooting: Multi-Layer & Painted Paper
If you find that the paper isn’t budging, you likely have one of two “nightmare” scenarios:
- Painted Wallpaper: Someone has painted over the wallpaper with emulsion or (worse) gloss. Water cannot penetrate paint. You must score the wall much more aggressively to break the paint film.
- Woodchip Wallpaper: Common in UK rentals. This often requires two rounds of soaking—one for the top layer and one for the wood-pulp chips. If you are struggling with this specific type, see our complete guide on how to remove woodchip wallpaper.
How to Handle Stubborn Glue Residue?
A common mistake is thinking the job is done once the paper is gone. If the wall feels “slimy” or “gritty,” adhesive is still present.
The 3-Step “De-Glooing” Process
- Sugar Soap Scrub: Mix Sugar Soap with hot water. Using a heavy-duty abrasive sponge, scrub the wall in circular motions to turn the glue into a milky slurry.
- The “Plough” Technique: While the wall is wet, use your scraper to “plough” the softened glue off the surface.
- The Vinegar Rinse: Wipe the wall one last time with a clean cloth soaked in a 1:4 vinegar-to-water mix. This neutralizes any alkaline residue, ensuring your wall is chemically ‘neutral’ for your new primer. If you are planning to re-paper immediately after cleaning, it is vital to understand how long wallpaper takes to dry before starting the next phase”
Final Checklist for Your Project:
- Score the wall thoroughly.
- Mix the vinegar/soap solution.
- Wait a full 15 minutes after soaking.
- Scrub the adhesive residue with Sugar Soap.
With the right tools and a little patience, you now have a professional-grade strategy for how to remove wallpaper without a steamer.
Frequently Asked Questions About How to Remove Wallpaper Without a Steamer
1. Can I remove wallpaper with just water?
Yes, but it takes much longer. Adding vinegar and soap reduces the “surface tension” of the water, allowing it to soak into the glue 50% faster.
2. How do I dispose of the old wallpaper?
In the UK, stripped wallpaper goes in your general waste bin. It cannot be recycled due to the adhesive and plastic content.
Kanimozhi BV
Kani is a Lead Technical Researcher and interior specialist dedicated to the science of home maintenance. With a focus on structural diagnostics, they provide expert guidance on wall restoration, moisture-control painting, and long-term bedroom preservation. Kani bridges the gap between professional trade techniques and accessible DIY projects, ensuring every interior renovation is built on a foundation of technical excellence. From identifying hairline masonry cracks to achieving the perfect architectural finish, their work empowers homeowners to maintain a flawless, high-performance home.
Home Diagnostics and Technical Standards Specialist at Hello Mag. She provides high-level Expertise in appliance mechanics and scientific pest management, ensuring every guide follows strict safety protocols and manufacturer standards. As a leading Authority on technical home specs, Kanimozhi audits complex data to provide homeowners with the most accurate, verified, and reliable diagnostic solutions available.
0 Comments