
by Kanimozhi BV | Aug 15, 2025 | Garden, Exterior
Clover can be a bit of a nuisance in any garden, especially when you’ve spent time and effort trying to maintain a lush, green lawn.
I used to think it added some charm – until it started taking over my entire yard. If you’re in the UK and wondering how to get rid of clover in lawn uk, I’ve got you covered.
Here’s what I learned through my own experience, and the top 3 methods that worked best for me.
Why Is Clover Growing in My Lawn?
What Causes Clover to Spread in UK Lawns?
Before I could tackle the issue, I had to understand why clover was thriving in the first place. In most UK lawns, clover (especially white clover) tends to appear when:
In short, clover loves stressed lawns. It actually fixes nitrogen in the soil, which helps it thrive even when grass struggles.
Is Clover Really a Weed or Can It Be Useful?
I’ve read arguments in favour of keeping clover – it’s low maintenance, attracts bees, and stays green during drought.
But honestly, when it starts crowding out your grass, it becomes a weed in my book. My goal was to maintain a uniform, healthy lawn, and that meant clover had to go.
How Can I Identify Clover in My Garden?
Types of Clover Found in UK Lawns
The most common one I dealt with was white clover (Trifolium repens). It’s easy to spot with its small white flowers and three rounded leaves.
Sometimes, red clover can appear too, which grows taller and has pinkish-purple flowers.
Signs Your Lawn Has a Clover Infestation
- You’ll see patches of small white flowers
- Leaves grow in clusters of three or even four, if you’re lucky!
- Grass looks thin and is overtaken by creeping stems

What Are the Top 3 Ways to Remove Clover from My Lawn?
Here are the three methods I used – all of which worked in different ways depending on how bad the infestation was.
1. Manual Removal Techniques
How I Pulled Out Clover Without Chemicals?
When the clover patches were small, I just rolled up my sleeves and pulled them out by hand. I made sure to take out the roots to keep away from regrowth.
- Garden fork or hand weeder
- Gloves
- Watering can (moist soil makes pulling easier)
Tip: Try doing this after rain or watering the area to soften the ground.
2. Natural Remedies That Actually Work
Vinegar, Boiling Water & DIY Sprays
This method was eco-friendly and easy. I mixed vinegar with a few drops of washing-up liquid and sprayed directly onto the clover. Within days, the leaves began to shrivel.
Boiling water is another quick fix, but be careful – it’ll kill any grass it touches too.
Adjusting Soil Conditions
Clover thrives in nitrogen-poor soil, so I used a high-nitrogen lawn fertiliser to give the grass a boost and make the lawn less friendly to clover.
3. Chemical Lawn Treatments in the UK
Best Clover Weed Killers Available
When things got out of control, I turned to selective weed killers. These are designed to kill broadleaf weeds like clover without harming your grass.
Some options available in UK garden centres:
- EverGreen Complete 4 in 1
- Resolva Lawn Weedkiller
- Weedol Lawn Weedkiller
Safety Tips and Application Guide
- Always follow the label
- Apply in dry weather with no rain forecast for 24 hours
- Make sure that pets & kids are away from the lawn until dry
Can I Prevent Clover from Coming Back?
How I Strengthen My Lawn to Resist Clover?
After removing the clover, I focused on long-term lawn care:
- Regular mowing (but not too short)
- Feeding the lawn every 6–8 weeks
- Aerating the soil in spring and autumn

Overseeding, Fertilising, and Watering Tips
I started overseeding bare patches with grass seed to crowd out new weeds. Then I applied slow-release fertiliser to encourage thick, healthy grass.
Consistency really is key – the more you maintain your lawn, the less chance clover has to come back.
Clover Control Comparison Table
Here’s a quick breakdown of the pros and cons I experienced with each method:
| Method |
Effectiveness |
Cost |
Effort Level |
Eco-Friendly |
| Manual Removal |
Medium |
Low |
High |
Yes |
| Natural Remedies |
Medium |
Low-Med |
Medium |
Yes |
| Chemical Control |
High |
Medium |
Low |
No |
Final Thoughts: How I Got My Lawn Back from Clover
Getting rid of clover in my lawn took a bit of trial and error, but once I understood why it was growing, everything started to make sense.
The combination of manual effort, natural tricks, and chemical support finally gave me back the lush green lawn I wanted.
If you’re struggling with the same issue here in the UK, just remember – you’ve got options. Pick the method that suits your lawn and your lifestyle, and be consistent. You’ll be clover-free in no time.
Frequently Asked Questions On How to Get Rid of Clover in Lawn UK
1. Can I use vinegar to kill clover?
Yes! I’ve had reasonable outcomes with vinegar mixed with dish soap. Just apply carefully – it can damage surrounding grass.
2. Will fertiliser alone stop clover growth?
Not immediately, but over time, a well-fed lawn becomes thick and healthy enough to crowd out clover.
3. How long does it take to see results?
Manual removal is instant. Natural and chemical methods can take a few days to two weeks depending on severity.
4. Is clover harmful to pets?
Not usually – clover itself is safe. But if you’re using weed killers, keep pets off the lawn until it’s dry and absorbed.
Home Diagnostics and Technical Standards Specialist at Hello Mag. She provides high-level Expertise in appliance mechanics and scientific pest management, ensuring every guide follows strict safety protocols and manufacturer standards. As a leading Authority on technical home specs, Kanimozhi audits complex data to provide homeowners with the most accurate, verified, and reliable diagnostic solutions available.

by Kanimozhi BV | Aug 13, 2025 | Kitchen, Home & Living, Interior
What Is a Dark Kitchen and How Does It Work in the UK?
If you’re like me, always curious about innovative ways to run a food business, you’ve probably heard the term dark kitchen. But what is a dark kitchen exactly?
In simple terms, a dark kitchen — also known as a ghost kitchen, cloud kitchen, or virtual kitchen — is a food preparation facility that only fulfills delivery orders.
There’s no dine-in area, no front-of-house, and in many cases, not even a visible brand to walk into. These kitchens are designed specifically to meet the growing demand for online food delivery in the UK.

What’s the Difference Between a Dark Kitchen and a Ghost Kitchen?
Honestly? Nothing — they’re just different names for the same concept. All these terms refer to food businesses that operate behind the scenes, selling meals exclusively through apps like Deliveroo, Just Eat, and Uber Eats.
Why Are Dark Kitchens Booming in the UK?
The surge in food delivery apps and changing consumer habits post-pandemic have made virtual kitchens extremely popular.
With lower overheads and flexible setups, they’re especially attractive to solo entrepreneurs like me.
Can I Start a Dark Kitchen From Home in the UK Legally?

What UK Laws Apply to Home-Based Food Businesses?
Yes, you absolutely can start a dark kitchen from home — but you must follow strict UK regulations. Before I started, I had to learn the ins and outs of food hygiene, insurance, and business registration.
Do I Need to Register My Home Kitchen with the Council?
Yes. I had to register my kitchen with the local authority at least 28 days before opening. It’s free to do via Gov.uk and is a legal requirement under the Food Standards Agency (FSA).
What Are the Hygiene and Safety Requirements?
You’ll need to:
- Comply with food hygiene standards set by your local council
- Store ingredients separately from personal food
- Ensure cleanliness of surfaces, tools, and equipment
- Take a Level 2 Food Hygiene Certificate (I got mine online in one day)
💡 Tip: The better your hygiene score, the more customers will trust you on platforms like Uber Eats.
Step-by-Step: How I Started My Own Dark Kitchen From Home?
This is the exact process I followed to set up my dark kitchen in my London flat:
1. Register with the Local Authority
Went through the council’s website, filled in the food business registration form, and scheduled an inspection.
2. Ensure My Kitchen Met Safety Standards
Invested in proper food-safe storage, digital thermometers, and sanitising procedures.
Kept it simple: loaded fries, mac and cheese, wings. All items travel well and are profitable.
Set up accounts with Just Eat and Uber Eats. Uploaded photos, added pricing, and launched during peak times.
5. Created Branding & Packaging
I used eco-friendly, branded packaging to stand out. Customers loved the unboxing experience!
What Is Dark Kitchen Business Model Explained?

How Do Home-Based Dark Kitchens Make Money?
The key to profitability lies in low operational costs and high delivery volumes. There’s no rent for a storefront or front-of-house staff.
How Is Cost Compared? – Dark Kitchen vs Traditional Restaurant
| Expense Type |
Dark Kitchen (Home) |
Traditional Restaurant |
| Rent |
£0 (home kitchen) |
£1,500+ / month |
| Staff Wages |
Minimal (solo) |
£3,000+ / month |
| Setup Costs |
£2,000–£5,000 |
£20,000+ |
| Delivery Platform Fees |
~30% per order |
Varies |
How Is the Revenue Streams?
- Delivery orders
- Multiple “virtual brands” from one kitchen
- Catering or pre-packaged meals
What Permits and Licenses Do I Need in the UK?
Here’s what I had to sort out before accepting a single order:
- Food Hygiene Certificate: Level 2 minimum
- Kitchen Inspection: By local environmental health officer
- Business Insurance: Public liability, product liability
- Labelling Compliance: List allergens and storage instructions
Equipment You’ll Need to Run a Dark Kitchen From Home
You don’t need a commercial kitchen, but these are essentials:
Basic Equipment Checklist:
- Stainless steel work surfaces
- Commercial-grade cookware
- Delivery-safe packaging
- Digital thermometer
- Separate fridge space for business use
- Point-of-sale app (Square, for example)
- Delivery platform dashboards
- Accounting tool (QuickBooks)
How Much Does It Cost to Start a Home-Based Dark Kitchen?
Here’s my actual startup budget for my home-based setup:
| Item |
Estimated Cost |
| Food Hygiene Certificate |
£30 |
| Basic Equipment |
£1,000 |
| Packaging |
£300 |
| Branding & Menu Design |
£200 |
| Marketing (ads, promo codes) |
£500 |
| Insurance |
£150/year |
| Total |
~£2,180 |
What are the Tips to Reduce Startup Costs?
- Buy second-hand equipment
- Use Canva for DIY branding
- Start with one delivery platform before expanding

What Worked for Me?
- Created a strong Instagram presence
- Offered 20% off first orders on Uber Eats
- Encouraged reviews with free add-ons
What are Quick Local Marketing Wins?
- Get listed on Google Maps
- Offer delivery discounts via flyers in your postcode
- Partner with local influencers
What are the Pros and Cons of Dark Kitchen?
What are the Pros of Running a Dark Kitchen From Home?
- Low startup costs
- No dine-in stress
- Can run multiple brands from one kitchen
What are the Cons of Running a Dark Kitchen From Home?
- Limited scalability at home
- High competition on delivery apps
- Platform fees can eat into profits
Final Thoughts: Is Starting a Dark Kitchen From Home Right for Me?
Starting a dark kitchen from home in the UK was one of the best decisions I made. It gave me the freedom to build a food brand with low risk, test new menu ideas, and grow organically.
If you’re passionate about food and want to explore an alternative to traditional restaurants, this model could be perfect for you.
Related Article: Average Cost Of An IKEA Kitchen UK: How Much Is for Installation?
What are the FAQs About Starting a Home-Based Dark Kitchen in the UK?
1. How Much Profit Can I Make?
It depends on your margins. I make around £3–£6 profit per order after costs and platform fees.
2. Can I Run Multiple Brands from the Same Kitchen?
Yes! I run two — one for wings, another for vegan bowls. Just set up separate profiles on delivery apps.
3. Is a Ghost Kitchen the Same as a Virtual Brand?
Not exactly. A ghost kitchen is the physical space, while a virtual brand is the concept or menu that exists online.
Home Diagnostics and Technical Standards Specialist at Hello Mag. She provides high-level Expertise in appliance mechanics and scientific pest management, ensuring every guide follows strict safety protocols and manufacturer standards. As a leading Authority on technical home specs, Kanimozhi audits complex data to provide homeowners with the most accurate, verified, and reliable diagnostic solutions available.

by Kanimozhi BV | Aug 12, 2025 | Window, Interior
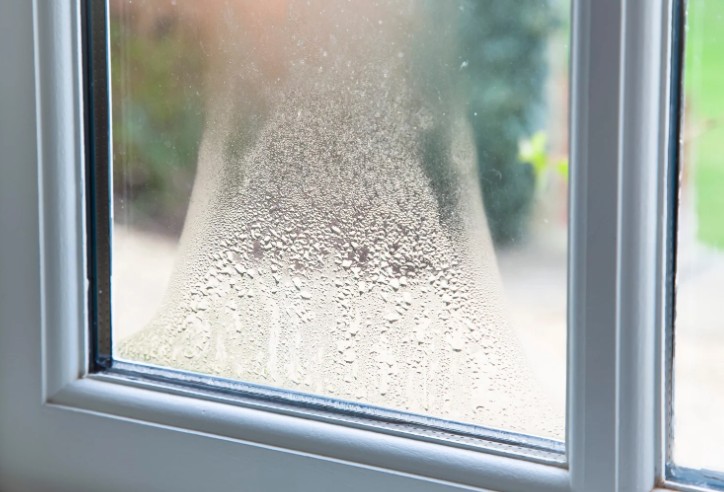
Understanding Condensation on Windows
Condensation is what I’ve had to meet with in nearly every UK home I’ve lived in. It appears as small water droplets on glass, often in the mornings or during cold weather.
Scientifically, it happens when warm, moist air inside meets a colder window surface, causing water vapour to turn into liquid.
In the UK’s damp, cool climate, condensation on windows is extremely common, especially in winter. While a little moisture might seem harmless, over time it can lead to black mould, wood rot, and damage to window seals.
Learning how to stop condensation on windows isn’t just about aesthetics — it’s about protecting your health and home.
1. Indoor humidity
A usual day activities such as cooking, showering, and drying clothes indoors release water vapour. Without enough ventilation, this moisture lingers and at the same time it condenses on surfaces that are colder.
2. Poor ventilation
Modern homes are often sealed tightly to improve energy efficiency. Unfortunately, this traps moisture inside.
3. Temperature differences
When indoor air is warm but your windows are cold (especially single glazing or poorly insulated double glazing), condensation is more likely to form.
4. Damaged window seals
If your double glazing has failed, moisture can form between the panes, leading to misty glass that can’t be wiped away.

What are the Different Types of Condensation on Windows?
Condensation inside windows
Appears on the room-facing surface of the glass. This is caused by high indoor humidity and low ventilation.
Condensation on the outside of windows
Occurs when the outer pane is cooler than the morning air. Usually harmless and tells you that your double glazing is insulating fine.
Condensation between double glazed windows
This is a sign of a blown window — the seal has failed, letting moisture inside the sealed unit.
When I’ve woken up to water-covered bedroom windows, I’ve relied on a few simple tricks:
- Hairdryer method – For emergency use on small areas and to remove moisture from between window panes, it can help dry moisture, but it’s temporary.
- Window vacuum – Quickly removes pooled water before it causes mould or frame damage.
- Daily wipe-down – A microfibre cloth absorbs water without smearing.
These methods give instant results, but they don’t solve the underlying humidity problem.

How to Prevent Condensation on Windows?
To keep condensation from returning, I’ve learned to focus on reducing humidity and improving airflow:
- Install trickle vents – These small vents on window frames allow fresh air to circulate without big heat loss.
- Improve extractor fan performance – Upgrade bathroom and kitchen fans to more powerful, humidity-sensitive models.
- Maintain steady indoor temperatures – Avoid sudden drops in heating which make windows cold enough for moisture to settle.
How to Stop Condensation on Double Glazed Windows in Winter?
Even good double glazing can mist up in winter because the inner pane still cools enough to trigger condensation when humidity is high.
Keeping the heating steady, ventilating rooms briefly each day, and using a dehumidifier can help. Make sure curtains or blinds aren’t blocking airflow around the window, as this can trap moist air against the glass.
How to Get Rid of Condensation in Between Double Glazed Windows?
If you have misting inside the window space, the original airtight seal has failed and lost its job. No amount of surface cleaning will work here.
You have two main options:
- Dry out a blown window using micro-drilled holes along with the silica gel (temporary)
- Replace the sealed unit (permanent)
How to Dry Out a Blown Window?
I’ve tried this on an old kitchen window to buy time before replacement:
- Drill a small hole in the spacer bar or edge of the glass unit.
- Use a dehumidifier positioned right next to the hole to draw moisture out.
- Insert silica gel beads to absorb any remaining water.
- Seal the hole with weatherproof sealant.
It worked for around 18 months before misting returned.

How to Fix Condensation in Double Glazing?
Can condensation in double glazing be fixed?
Yes — but usually only temporarily. Once the seal has failed, it can’t be restored to factory condition.
DIY methods On How to Fix Condensation in Double Glazing?
Micro-drilling and drying, replacing seals, or adding moisture-absorbing materials.
When to reseal windows – How to Reseal Windows?
If the gap is small and accessible, resealing can slow moisture ingress.
When replacement is the only option?
If misting returns quickly after a fix, replacing the glass unit is the only long-term answer.
Natural Remedies – Does Vinegar Stop Condensation on Windows?
How vinegar helps reduce surface condensation?
Vinegar modifies the surface tension of glass, making it harder for water droplets to cling.
Limitations – it won’t fix blown seals
This method only helps with surface condensation and has no effect on trapped moisture inside double glazing.

How to Stop Condensation on Windows Overnight? – Seasonal Condensation Control
Why cold weather increases condensation risk?
Low outdoor temperatures make the inner glass pane cold, so moisture condenses more readily.
Bedroom-specific solutions:
Keep trickle vents open, use a small gap in the window, and avoid drying laundry in the bedroom.
Night ventilation tips without losing heat
Use latest window night locks or short morning airing sessions.
Special Cases – Skylight and Roof Windows
Why skylight windows get condensation easily? – Clean Skylight Windows From Inside
Warm, moist air rises to the roof space, where it meets cold skylight glass. Regular cleaning keeps surfaces free of dust and grime that hold moisture.
Tips for prevention in hard-to-reach glass
Ensure loft ventilation is adequate and surrounding insulation is intact to keep the glass warmer.

Final Thoughts – Clear Windows All Year Round
Dealing with condensation on windows means first identifying its type and cause.
Quick fixes like wiping down or using a hairdryer are fine for emergencies, but long-term prevention requires ventilation, humidity control, and sometimes professional repair.
From how to stop condensation on windows overnight to how to dry out a blown window, the methods here will help you protect your windows and your home from the damaging effects of moisture.
FAQ – Common Questions About How to Stop Condensation on Windows
1. How long does it take to get rid of condensation?
Surface moisture can be wiped away instantly, but full prevention takes ongoing effort.
2. Is vinegar safe for all window types?
Yes, it is safe to use vinegar for glass, but keep it away from wooden frames.
3. Will new double glazing stop condensation completely?
It reduces it greatly, but surface condensation can still occur with high indoor humidity.
4. Should I use a hairdryer every day?
No — it’s fine in emergencies but prolonged use can damage seals.
Home Diagnostics and Technical Standards Specialist at Hello Mag. She provides high-level Expertise in appliance mechanics and scientific pest management, ensuring every guide follows strict safety protocols and manufacturer standards. As a leading Authority on technical home specs, Kanimozhi audits complex data to provide homeowners with the most accurate, verified, and reliable diagnostic solutions available.

by Kanimozhi BV | Aug 11, 2025 | Window, Interior
The Day I Discovered My Blown Window
I first noticed it on a chilly November morning. The sun was shining through my living room window, but instead of a clear view, I saw cloudy streaks trapped inside the glass. This wasn’t normal surface condensation — this was inside the double glazing.
If you’ve ever seen this, you probably have a blown window. Then there comes the question how to dry out a blown window.
It means the airtight seal around your double-glazed unit has failed, letting moisture in. In the UK, where damp conditions are common, blown windows aren’t rare.
Instead of rushing to replace the whole unit, I wanted to see if I could dry out the blown window and remove the moisture between the panels. Here’s exactly how to dry out a blown window — and what I learned along the way.
What Is a Blown Window?
Meaning of “blown” in double glazing terms
A “blown window” simply means the sealed unit in your double glazing has failed. The airtight seal around the two panes of glass has broken, allowing air — and with it, moisture — to get in.
Why moisture gets between the glass panels?
Moisture enters through tiny gaps in the perimeter seal. Once inside, it condenses because the space between the panes is cooler than the surrounding air. Over time, the condensation builds up and causes a foggy appearance.
Signs your double glazing seal has failed
- Mist or fog trapped between the glass layers
- Water droplets inside the pane
- Distorted reflections
- Draughts or noticeable temperature changes near the window
Can You Really Dry Out a Blown Window?
When it’s possible to remove condensation without replacing the unit?
If the glass itself is intact and the frame is in good condition, you can sometimes dry out the window by allowing the trapped moisture to escape and then resealing it.
When replacement is the only realistic option?
If the glass is cracked, the frame is rotting, or the seal damage is extensive, drying it out is a temporary fix at best.
Risks of a DIY drying job
- Drilling incorrectly can crack the glass.
- Moisture may return if resealing isn’t perfect.
- May void any remaining warranty on the unit.
- Electric drill with a fine glass drill bit (3mm–4mm)
- Safety glasses and gloves
- Low-tack masking tape (to protect the surface)
- Silica gel beads or a moisture absorber
- Small funnel or syringe (for inserting silica gel)
- Clear weatherproof sealant
Optional items
- Dehumidifier for faster drying
- Anti-fog glass treatment for temporary clarity
Step-by-Step Guide – How To Dry Out a Blown Window?
Step 1 – Inspecting the seal and glass
Before touching any tools, I carefully examined the glass edges to find the point where the seal had failed. I also checked the frame to ensure it was solid.
Step 2 – Drilling micro-holes in the spacer bar or frame
I used masking tape on the drill point to prevent slipping. Then, using a fine drill bit, I made a small ventilation hole in the spacer bar or corner of the frame — never in the middle of the glass pane.
Step 3 – Removing moisture from between the glass panels
With the hole in place, I positioned a dehumidifier right next to the window for 24–48 hours. This gradually drew moisture out through the hole.
Step 4 – Using silica gel or moisture-absorbing materials
I inserted silica gel beads into the spacer cavity using a small funnel. These beads absorb any remaining moisture and help keep the space dry.
Step 5 – Resealing the glass to prevent further condensation
Once completely dry, I sealed the hole with clear weatherproof sealant to restore the airtight barrier.

Alternative Methods I’ve Tried for Removing Moisture
Dehumidifier against the glass
Placing a dehumidifier directly in front of the blown window can reduce moisture over several days, but it’s slower without ventilation holes.
Warm air drying
A hairdryer on low heat can temporarily clear condensation for a day or two, but it doesn’t remove the moisture permanently.
Specialist window repair kits
In the UK, some kits come with micro-drill bits, silica gel, and vent plugs designed for DIY defogging.
How Much Does It Cost to Dry Out a Blown Window in the UK?
| Method |
DIY Cost (Approx) |
Professional Cost (UK) |
Lifespan of Fix |
| Drill & dry with silica gel |
£15–£30 |
£60–£100 |
6–18 months |
| Professional vent plug system |
£20–£50 |
£80–£150 |
1–3 years |
| Full glass unit replacement |
£50–£120 per unit |
£120–£250 |
10–20 years |

How to Prevent Blown Windows in the Future?
Maintenance tips to keep seals intact
- Avoid pressure washing windows directly at the seals.
- Keep drain holes in the frame clear so water doesn’t pool.
- Inspect seals annually for early signs of wear.
Reducing humidity inside your home
- Use extractor fans when cooking or showering.
- Ventilate regularly, especially in winter.
- Keep indoor humidity around 40–50%.
Choosing quality double glazing
Invest in windows with warm-edge spacer bars and high-quality seals for longer lifespan.
Final Thoughts
Knowing how to dry out a blown windowing and doing it can give you back a clear view without the cost of full replacement, but it’s usually a temporary fix. In my case, it bought me another year before I replaced the unit.
If you’re confident with tools, the drill-and-dry method with silica gel works well. Just remember — sealing the unit properly is the difference between a fix that lasts months and one that lasts years.
FAQ – How to Dry Out a Blown Window?
1. How long does it take to dry out a blown window?
With the drill-and-dry method, expect 1–3 days depending on moisture levels.
2. Will the moisture come back?
If you don’t fix the seal properly, yes. Even a perfect DIY job may only last 1–2 years before misting returns.
3. Is drilling the glass safe?
Yes, if you use the correct drill bit, go slowly, and drill only in the spacer bar or frame area.
4. Can I use a hairdryer or heat gun?
Only as a short-term fix — it won’t solve the root problem.
Home Diagnostics and Technical Standards Specialist at Hello Mag. She provides high-level Expertise in appliance mechanics and scientific pest management, ensuring every guide follows strict safety protocols and manufacturer standards. As a leading Authority on technical home specs, Kanimozhi audits complex data to provide homeowners with the most accurate, verified, and reliable diagnostic solutions available.

by Kanimozhi BV | Aug 8, 2025 | Garden, Exterior
Nothing’s more frustrating than watching your lush green lawn turn into a soggy, unusable swamp after a heavy rainfall.
I’ve dealt with it myself, and I know the damage it can do—not just to your lawn, but to your plants, pathways, and even your home’s foundation.
That’s why I’ve put together this complete guide on how to drain a waterlogged lawn, specifically tailored for UK homeowners.
Whether you’re dealing with clay soil or compacted turf, I’ll walk you through the best methods to fix and prevent lawn drainage problems.
How Do I Know If My Lawn Is Waterlogged?
Common signs of a soggy lawn
- Pools of standing water
- Mud squelching underfoot
- Yellowing or dying grass
- Moss buildup
How to test for compacted or clay soil?
Grab a garden fork and attempt to penetrate the soil. If it feels tough, sticky, or dense, you’re probably dealing with compacted clay soil that doesn’t drain well.
What damage can excess water do to your lawn?
Excess moisture can suffocate roots, invite disease, and ruin grass. It also encourages weeds and moss to take over.
Here’s a quick checklist of what I used to improve my waterlogged lawn:
- Garden fork or aerator
- Topdressing mix (sand + compost or loam)
- Gravel and perforated drainage pipe
- Rake and shovel
- Grass seed for reseeding patches
🛠 Pro Tip: Invest in garden spiking shoes or a hollow tine aerator for regular maintenance.

How to Drain a Waterlogged Lawn? – Step-by-Step Guide
After struggling with a soaked, muddy lawn for weeks, I realised that proper drainage isn’t just a quick fix—it’s a multi-step process.
If your lawn looks like a swamp after every rainfall, here’s exactly what I did to restore proper drainage and bring it back to life.
Step 1: Evaluate How Serious the Water Issue Is and Where It’s Coming From
I started by walking across the lawn after rain to see where water was pooling. Most of it gathered in low-lying spots, especially near compacted areas.
I also paid close attention to how long the water lingered—more than 24 hours was my red flag.
If you have clay soil in lawn, water tends to sit longer because it doesn’t drain well. To understand the behaviour of clay soil and how it impacts drainage, I found this guide very helpful:
Step 2: Aerate the Soil to Break Up Compaction
After spotting the waterlogged spots, I pierced the lawn with a garden fork, creating holes roughly 10–15 cm deep and spaced about 10 cm apart. This opened up the soil and helped water soak through instead of sitting on the surface.
In larger areas, a hollow-tine aerator is even more effective. If you’re working with clay soil like I was, regular aeration is essential. Here’s a great article that helped me understand how to manage and improve drainage in clay soil.

Step 3: Apply a Topdressing Mix
After aerating, I spread a mix of sharp sand, compost, and topsoil over the lawn. This is known as topdressing, and it helped loosen up the clay and improve drainage.
- Sharp sand improved the soil structure and let water pass through
- Compost added nutrients to help the grass recover
I used a stiff broom and rake to work the mix into the holes I’d made during aeration.
Step 4: Install a Drainage Solution (If Needed)
In one section of my garden, aeration and topdressing alone weren’t enough. I had to install a French drain. It’s a gravel-lined trench with a perforated pipe that helps divert surplus water away from the lawn.
If your lawn holds water regularly despite aeration, a soakaway system may also be needed. This involves digging a pit filled with rubble or a drainage crate that slowly disperses water underground.
Here’s a simple breakdown:
| Drainage Type |
Best Use |
DIY Friendly? |
| French Drain |
Redirecting water from low spots |
Yes |
| Soakaway System |
Deep drainage in heavy clay soil |
With planning |
| Simple Trench |
Channeling surface runoff |
Yes |
Step 5: Level and Reseed the Lawn
After fixing the drainage, I noticed some areas were sunken or bare. I added topsoil to level out the uneven parts, then reseeded those areas with grass seed.
I watered lightly each day and within a few weeks, the lawn had filled in nicely.
Here’s a quick bullet list of essential tools:
- Garden fork or aerator
- Sand and compost mix
- Perforated drainage pipe
- Gravel and trenching tools
- Lawn seed and rake
Should I Consider a Garden Drainage System?
If simple aeration doesn’t help, it may be time for a more permanent solution.
| Drainage Option |
Best For |
Difficulty |
DIY Friendly |
| French Drain |
Redirecting water from large areas |
Moderate |
Yes |
| Soakaway System |
Absorbing excess water in one location |
High |
With some expertise |
| Trench Drain |
Surface water near driveways or patios |
Low |
Yes |
When is a French drain the best option?
Use it if your lawn floods after heavy rain and water collects in a specific direction or slope.
What is a soakaway and how does it work?
A soakaway is a pit filled with gravel that gathers excess water and allows it to gradually drain into the surrounding soil.
DIY vs professional installation
You can DIY a French drain, but for large-scale or sloped lawns, it’s worth consulting a landscaper for proper water redirection.

Can I Prevent Future Waterlogging?
Yes, and here’s how I stay ahead of soggy lawn issues:
Regular aeration and topdressing tips
I aerate twice a year—spring and autumn—and topdress after each session to keep the soil structure healthy.
Improving soil structure over time
Over time, adding organic matter like compost and loam improves water absorption and reduces surface runoff.
Creating a long-term garden drainage plan
Make sure your lawn has a gentle slope and all drainage pipes are clear. Consider landscaping solutions like raised beds or gravel paths to redirect water.
Prevention Checklist:
- Aerate regularly
- Apply topdressing
- Clear gutters and drains
- Add soil amendments
- Monitor after heavy rain

Conclusion
Fixing a waterlogged lawn can feel overwhelming, but with the proper approach and some patience, it’s definitely manageable.
I found that combining aeration, topdressing, and proper drainage systems not only saved my lawn but made it greener than ever.
If you’re in the UK and facing soggy patches or standing water, follow this guide and give your garden the chance to thrive again.
Frequently Asked Questions On How to Drain a Waterlogged Lawn
1. How long does it take for a waterlogged lawn to dry?
Typically 1–3 days after rain, depending on soil type and drainage quality.
2. Will lawn grass recover after water damage?
Yes, with proper aeration, fertilising, and reseeding, most lawns bounce back in 2–4 weeks.
3. Can I still mow a wet lawn?
Avoid it. Mowing a soggy lawn can compact the soil further and damage the grass.
Home Diagnostics and Technical Standards Specialist at Hello Mag. She provides high-level Expertise in appliance mechanics and scientific pest management, ensuring every guide follows strict safety protocols and manufacturer standards. As a leading Authority on technical home specs, Kanimozhi audits complex data to provide homeowners with the most accurate, verified, and reliable diagnostic solutions available.
