
by Kanimozhi BV | Jul 23, 2025 | Garden, Exterior
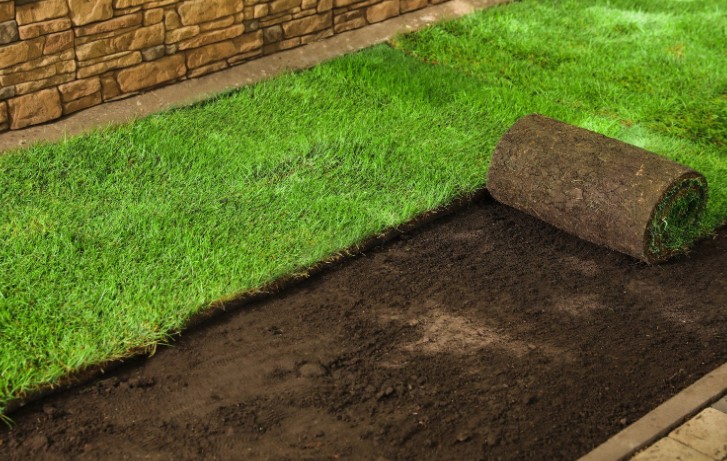
When I first looked at my patchy, tired lawn, I was tempted to take a shortcut. The idea of rolling out fresh turf over the old grass seemed quick, easy, and far less messy.
But before I made a decision, I asked myself — do I need to remove old grass before laying new turf?
As it turns out, taking that extra step made all the difference. In this post, I’ll walk you through what I learned, what happened when I tried to skip it once, and why I’ll never do that again.
Why I Asked Myself This Question?
I’ll be honest — the main reason I hesitated to remove the old grass was the effort involved.
Digging up turf is hard, sweaty work. I thought: If the new turf covers it anyway, why not just roll it on top and move on?
That was my thinking… until I actually tried it.
What I Learned from Doing It the Wrong Way Once?
A few years ago, I laid turf straight onto my existing grass in a small back section.
It looked fantastic for about two weeks — and then it started to yellow, dry out, and lift in patches. No matter how much I watered it, the roots weren’t established.
What Happens If I Don’t Remove the Old Grass?
If you’re thinking of skipping this step, here’s what’s likely to happen:
Turf Struggles to Root Through the Old Layer
New turf needs direct contact with loose, nutrient-rich soil to root. If there’s a layer of dead or living grass underneath, the roots can’t penetrate properly — they’ll sit on top, shallow and weak.
Drainage and Airflow Get Blocked
Old turf can act like a sponge. Instead of draining properly, water can sit under the new turf, leading to rot, mould, or moss in lawn— especially in the damp UK climate.
Weeds and Disease Can Linger
If your existing lawn has weeds or fungal issues, laying turf over it won’t fix anything. You’ll just trap problems underneath your fresh lawn.

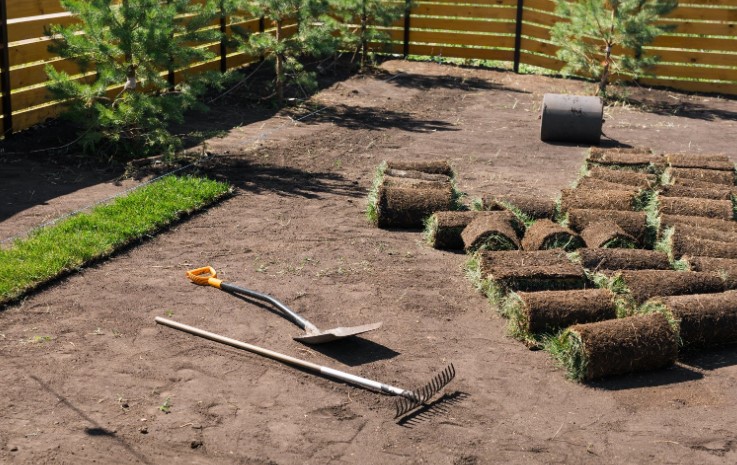
How I Removed My Old Grass Before Turfing?
When I finally committed to doing it properly, I started by clearing the old grass down to the soil. It took effort — but the result was worth it.
Turf Cutter vs Manual Digging
I hired a turf cutter for the huge areas. It was a game-changer — far quicker and cleaner than using a spade alone. For tight corners and edges, I still needed my trusty shovel.
Dealing with Thick or Weedy Lawns
My backyard was infested with creeping buttercup & dandelions. Before turfing, I manually removed these weeds and applied a natural weed suppressant a week prior to cutting the grass.
How Deep I Went?
I cut roughly 25–35mm deep, just below the root level. This cleared the grass while keeping enough topsoil in place for levelling.
What’s the Right Way to Prepare the Soil?
Once the grass was gone, I moved on to prepping the base — a critical step for any successful turf installation.
Do I Need to Add Topsoil or Compost?
In most cases, yes. I added 4–6 inches of fresh topsoil, mixed with a bit of organic compost. This ensured good drainage.
How I Levelled and Firmed the Ground?
Using a landscape rake, I levelled the surface and filled in any dips. Then, I firmed the soil by walking across it with small steps and a light garden roller.
When to Water the Soil Before Turfing?
I sparsely watered the prepared area the day before laying the turf. The soil was moist but not soggy — perfect for helping turf roots take hold.

Can You Lay New Turf Over Existing Grass? (And Why I Don’t Recommend It)
As I mentioned earlier, I tried this once. It looked good for a short time — but within a month, my “shortcut” started to show its flaws.
What Happened When I Tried It?
The old grass started to decompose, creating soft patches. Turf in certain areas lifted easily, and the colour turned uneven. Worst of all, I had to rip everything up and start again.
Why Lifting the Old Lawn Was Totally Worth It?
After doing it properly, my new lawn rooted deeply, grew evenly, and stayed green far longer. The extra effort upfront gave me peace of mind and a lawn that I could actually enjoy.
Get to know more on can you lay turf on top of grass with our super guide.

| Task |
Tool/Material |
| Grass removal |
Turf cutter, spade |
| Soil enrichment |
Compost, topsoil |
| Levelling |
Landscape rake, roller |
| Turf laying |
Sharp knife, hosepipe |
| Maintenance |
Sprinkler, lawn feed, rake |
Turf Removal vs Topsoil Shortcut: A Quick Comparison
| Factor |
Removing Old Grass |
Laying Over with Soil |
| Root success |
✅ High |
❌ Low |
| Drainage |
✅ Improved |
❌ Often poor |
| Longevity |
✅ Lasts longer |
❌ Risk of failure |
| Time & labour |
❌ Higher |
✅ Lower upfront |
| Weed prevention |
✅ Easier to control |
❌ Old weeds survive |
| My choice |
✔️ Remove the grass |
✘ Never again |
Conclusion: Was It Worth Removing My Old Grass?
Looking back, do i need to remove old grass before laying new turf?, removing my old lawn was the best decision I could’ve made for my garden.
Sure, it took extra time and a bit more effort. But the results speak for themselves: strong root growth, no patchiness, and a lawn that’s stood the test of time — through rain, barbecues, and my dog digging holes.
So if you’re asking yourself, “Do I need to remove old grass before laying new turf?” — my answer is simple:
Yes. Do it once, do it right.
FAQs: What You Might Still Be Wondering on Do I need to remove old grass before laying new turf
1. Do I have to remove weeds before turfing?
Yes — weeds can regrow through your turf. I recommend removing the weeds entirely before laying new grass.
2. Can I rotovate the grass into the soil instead?
Not really. Once rotavating the soil, you’ll end up with a spongy layer that stops turf roots from reaching the real soil.
3. Is it always necessary to remove old grass?
If you want your new turf to last more than a few months — yes it is essential to remove old grass. Especially in the UK’s wet climate.
4. How long after removing grass should I lay new turf?
You can lay turf immediately after prep — just make sure the ground is levelled, moist, and free of large clumps.

by Kanimozhi BV | Jul 22, 2025 | Garden, Exterior
When your lawn’s looking tired, patchy, or just beyond repair, it’s natural to look for the quickest fix. You may be wondering, can you lay turf on top of grass, or even “can I just put some topsoil over grass and reseed?”
These are common questions among UK homeowners hoping to refresh their garden without tearing everything up.
Let’s explore the truth behind these shortcuts — and how to lay turf the right way for long-term results.
Is It Possible to Lay Turf Over Existing Grass?
Technically, yes, you can lay turf over grass. But that doesn’t mean you should.
Laying new turf directly over old grass might seem like a time-saver, but it often leads to poor root growth, turf rot, and an uneven lawn.
The layer of grass underneath prevents proper bonding between the new turf and the soil, which can lead to:
- Shallow roots
- Patchy growth
- Drainage problems
- Disease or pest issues
Pro tip: For a lush, healthy lawn that lasts, removing the old grass is strongly recommended.

Can You Lay Topsoil Over Grass and Then Turf?
This is another popular shortcut, especially if you’re trying to level your garden at the same time. So, can you lay topsoil over grass and then turf? You can, but success depends on how it’s done.
How Much Topsoil Do You Need?
To smother old grass effectively, you’ll need at least 2 to 3 inches of fresh topsoil. This allows new turf roots to grow into a healthy medium without being blocked by the old lawn below.
Will This Work Long-Term?
Only in very specific cases:
- The old grass is mostly dead
- You’re covering a small area
- You’re using high-quality topsoil
However, the grass underneath may still decay, causing air pockets and uneven surfaces.
Can I Put Topsoil Over Grass and Reseed?
Yes, you can — and this method works better than turfing over grass in many cases.
How to Do It Properly
- Mow the existing grass short
- Scarify or aerate the area
- Spread 1–2 inches of topsoil
- Reseed and water regularly
This allows new seed to root in the topsoil while keeping the old grass suppressed.
Ideal for thinning lawns that need a refresh — not complete renovation.
Can You Put Soil on Top of Grass to Level a Lawn?
Yes! This is called topdressing, and it’s a common technique to smooth out dips and uneven patches.
When to Topdress?
- After aerating the lawn
- During spring or autumn
- When trying to improve drainage or seed coverage
What Soil Should You Use?
Use a sandy loam mix — it drains well and encourages healthy growth.
How to Topdress Effectively?
- Spread in thin layers (no more than 1 inch at a time)
- Use a rake or lawn leveller
- Water thoroughly after application
What’s the Best Way to Lay Turf for Lasting Results?
If you’re not cutting corners, here’s how to get it right:
Step-by-Step Turfing Guide
- Remove old grass using a turf cutter or spade
- Add 4–6 inches of quality topsoil
- Level the ground and firm it down
- Water the soil 24 hours before laying turf
- Lay turf in staggered joints, like brickwork
- Press down gently with a roller or feet
- Water daily for the first 2 weeks
Common Mistakes to Avoid
- Skipping soil preparation
- Laying turf on compacted or dry ground
- Walking on fresh turf too soon
Can You Lay Turf in Any Season?
You can, but timing matters for best results.
When Is the Best Seasons for Turfing in the UK?
The best season for turfing is typically on the following:
- Spring (March–May)
- Autumn (September–October)
These seasons offer cool temperatures and regular rainfall, which help the turf root faster.
When To Lay Turf in Summer or Winter?
- Summer: Turf may dry out quickly, needing frequent watering.
- Winter: Roots grow slowly; turf might sit dormant and become waterlogged.
🌱 Whenever you choose to lay turf, make sure the soil is not frozen, waterlogged, or bone-dry.
Turfing vs Reseeding: What’s Right for Your Lawn?
| Factor |
Turfing |
Reseeding |
| Speed of results |
Instant green lawn |
4–8 weeks |
| Cost |
Higher |
Lower |
| Labour |
Moderate |
Low |
| Best for |
Dead or bare lawns |
Thinning or patchy areas |
| Long-term success |
High if laid properly |
High with maintenance |
Lawn Prep Checklist Before You Lay Turf or Reseed
Here’s a quick list to keep you on track:
- Old grass removed or smothered
- Ground levelled and topsoil added
- Chosen the right time of year
- Water source available for aftercare
- Tools ready: rake, roller, hosepipe
Conclusion: Should You Lay Turf Over Grass or Start Fresh?
So, can you lay turf on top of grass? Technically yes — but it’s not the right approach if you want healthy, lasting results.
The best practice is to:
- Remove the old lawn
- Prep your soil properly
- Lay turf in ideal weather conditions
Or, if your lawn just needs a refresh, putting topsoil over grass and reseeding can be a great alternative.
Whichever method you choose, a little effort in preparation goes a long way toward creating the lush, green lawn you’ll love.
FAQs: Can You Lay Turf or Soil Over Grass?
1. Can you lay turf on top of grass and still get good results?
It’s possible, but rarely successful long-term. Removing the old grass gives the best outcome.
2. Can you lay turf over grass with soil added on top?
Yes — but only if you add 2–3 inches of topsoil and the grass underneath is dead or dying.
3. Can I put topsoil over grass and reseed instead of turfing?
Yes! It’s a budget-friendly option that works well for lightly damaged or thinning lawns.
4. Can you put soil on top of grass to level your lawn?
Yes — this is called topdressing. It helps smooth out dips and improve soil structure.

by Kanimozhi BV | Jul 18, 2025 | Appliances
What Energy Store Does a Wind Turbine Use? A Simple Guide to Kinetic Energy
What Is the Missing Word in the Sentence?
“A wind turbine transfers energy from __________ energy store?”
This question is commonly found in KS3 and GCSE science assessments. It’s designed to test your understanding of how energy is transferred in real-world systems.
A Wind Turbine Transfers Energy From __________ Energy Store. What One Word Completes The Sentence?
Kinetic
A wind turbine transfers energy from the kinetic energy store of moving air. As wind travels across the blades, its motion is captured and converted into electrical energy.
This transformation of energy is a practical example of energy transfer that you might study in school or come across in science quizzes.

What Is Kinetic Energy?
Kinetic energy is the energy where an object possesses because of its movement. The faster something moves, the more kinetic energy it has.
In physics, it’s one of the main types of energy stores and is essential in understanding how machines like wind turbines work.
What are the Examples of kinetic energy?
- A moving bicycle
- A football rolling across the ground
- A person running
- Wind flowing across a field
The key thing to remember is: no movement, no kinetic energy.
How Does a Wind Turbine Use Kinetic Energy?
Wind turbines are devices that convert the kinetic energy in moving air into electrical energy. This process involves a continuation of energy transfers.
Step-by-step explanation:
- Wind moves through the air – The moving air contains the energy called kinetic energy.
- Turbine blades spin – The kinetic energy is transferred to the rotating blades.
- Generator is powered – The spinning motion drives a generator, which produces electrical energy.
Each stage in this process involves the conversion of kinetic energy into a usable form. The final output — electricity — powers homes, schools, and businesses.
What Are Energy Stores in Physics?
In UK science education, energy is categorized into different types of energy stores. Understanding these helps us to explain how energy is transferred and transformed in various systems.
Table: Overview of Common Energy Stores
| Energy Store |
Description |
Example |
| Kinetic |
Energy due to motion |
A moving car |
| Thermal |
Energy due to temperature |
Boiling water |
| Chemical |
Stored in fuel, food, or batteries |
Petrol, sugar |
| Gravitational |
Energy stored due to height |
A ball at the top of a hill |
| Elastic |
Energy stored in stretched or compressed objects |
A stretched spring |
| Magnetic |
Energy stored between magnets |
Bar magnets |
| Electrostatic |
Energy between electric charges |
A balloon sticking to a wall |
| Nuclear |
Energy stored in atomic nuclei |
Nuclear power plant |
In the case of wind turbines, kinetic energy is the starting point, which is eventually transformed into electrical energy.

Why Is Kinetic Energy Important in Renewable Energy?
Kinetic energy plays an important role in how we create clean, renewable energy. Technologies that rely on movement in nature — like wind, water, and tides — all depend on kinetic energy to function.
What are the Systems that rely on kinetic energy?
- Wind turbines
- Hydroelectric dams
- Tidal energy generators
These systems are part of the solution to reducing carbon emissions and protecting the environment. By using the motion in nature, we avoid burning fossil fuels and make use of energy that is both clean and abundant.
What Are Common Exam Questions About Energy Transfers?
If you’re preparing for a KS3 or GCSE science exam, you’re likely to encounter questions about energy stores and transfers. Understanding kinetic energy is especially important when answering exam-style questions.
Sample questions:
- What energy store is involved in a moving object?
- A wind turbine transfers energy from __________ energy store.
- Describe the energy transfer that occurs in a wind turbine.
Answering tips:
- If the object is moving — always consider kinetic energy
- Consider at where the energy begins and where it ends
- Describe the full path of energy: from wind to electricity

How Can You Remember the Energy Transfer Process?
A useful way to remember the energy transfers in a wind turbine is to keep the process simple and logical. Here’s a revision-friendly list:
- Wind contains kinetic energy
- Turbine blades rotate & remains the kinetic energy moving
- Generator transforms that energy into electrical energy
This pattern — from natural motion to useful electricity — is a great example of how science works in real life.
Summary Table: Energy Transfer in a Wind Turbine
| Process |
Energy Type |
Description |
| Wind blowing |
Kinetic |
Energy due to movement of air |
| Blades spinning |
Kinetic |
Rotational movement stores energy |
| Generator operating |
Electrical |
Energy converted into usable electricity |
This simple process shows how we move energy from nature into our power systems.
Conclusion: Why It Matters?
The answer to the original question —
“A wind turbine transfers energy from __________ energy store? What one word completes the sentence?” — is clearly kinetic.
Understanding this is about more than just getting a question right on a science test. It helps us see how modern technologies use natural forces to power the world.
Every time a wind turbine spins, it’s taking the energy from moving air — from the kinetic energy store — and turning it into something we can use.
By learning how these systems work, we gain insight into physics, environmental science, and the technology shaping our future.
Related Article: An Electric Drill Has Energy in Its __________ Energy Store When It Is Rotating.

by Kanimozhi BV | Jul 17, 2025 | Exterior, Home & Living
Living in a quiet neighbourhood, I’ve always appreciated the peace of weekends. But when the banging and drilling started early on a Sunday morning, I found myself asking, “Can my neighbour do building work on a Sunday?”
That question led me down a rabbit hole of UK laws, council regulations, and a surprising number of grey areas. If you’re dealing with the same issue, let me help you navigate it clearly.
Why Is Sunday Building Work a Common Concern in the UK?
The rise of weekend DIY and renovation projects
Weekends are when most of us finally get a chance to tackle home improvements. I’ve done my fair share of shelf hanging and painting during my time off.
However, what I consider light DIY might be disruptive to someone else trying to enjoy a lie-in.
How residential noise affects mental well-being?
Noise on Sundays doesn’t just cause irritation—it can seriously affect your mood, sleep, and general well-being.
That’s why many councils take residential area noise rules seriously, especially on weekends.

What Time Can You Start Construction Work in a Residential Area UK?
Understanding when building work can start is crucial for keeping things legal and neighbourly.
Standard UK construction noise guidelines
Most UK councils follow similar time windows:
- Monday to Friday: 8:00 AM – 6:00 PM
- Saturday: 8:00 AM – 1:00 PM
- Sunday and Bank Holidays: No construction or only limited work allowed (varies by council)
Differences between weekdays, Saturdays, and Sundays
Here’s a quick table comparing typical rules:
| Day |
Permitted Hours |
Comments |
| Monday–Friday |
8:00 AM – 6:00 PM |
Most construction allowed |
| Saturday |
8:00 AM – 1:00 PM |
Restricted hours |
| Sunday |
Often prohibited or restricted |
Check local authority regulations |
| Bank Holidays |
Usually prohibited |
Treated like Sundays |
What time can builders start work in my neighbourhood?
I found that it varies slightly from one council to another. For example:
- Camden Council: No work on Sundays or bank holidays
- Manchester City Council: Quiet tasks may be allowed after 10:00 AM
- Birmingham City Council: No noisy construction allowed on Sundays
Is It Legal for Builders to Work on Sundays?
Can my neighbour drill on a Sunday?
Drilling is usually considered a noisy activity. While technically your neighbour can use a drill on a Sunday, doing so during early morning or late evening can breach statutory nuisance laws.
Sunday rules for builders vs. DIY homeowners
Builders are held to stricter standards. If my neighbour hired a contractor, the rules apply more stringently than if they were doing a little DIY.
Can My Neighbour Do Building Work on a Sunday
Yes, but keep it minimal. Light painting, cleaning gutters, or minor repairs are acceptable. Avoid:
- Power tools
- Loud hammering
- Moving heavy furniture

What Are the UK Laws on Sunday Building Work?
Key legal frameworks around noise and disturbance
The Environmental Protection Act 1990 is the go-to legislation. It defines statutory nuisance, which includes excessive noise at unreasonable times—especially from construction.
When building work becomes a legal issue?
If building work causes regular disturbance, especially outside permitted hours, the council may:
- Send a warning letter
- Serve an abatement notice
- Issue fines or even prosecute
Local authority enforcement and permitted hours
Each local authority sets its own construction noise hours. It’s best to check their website or call directly.
What Can I Do About Noisy Building Work from My Neighbour?
Should I talk to my neighbour first?
Yes! I always recommend a polite conversation before escalating. Most people don’t realise they’re causing disruption.
Filing a noise complaint with the council
If talking doesn’t help:
- Record the dates and times of disturbances
- Note the type of work and tools used
- Take audio/video evidence if safe and legal to do so
What evidence should I keep?
Here’s a quick list of useful records:
- Noise diary (date, time, description)
- Photos or videos of the work
- Council correspondence
- Witness statements, if possible

Are There Council-Specific Rules on Construction Noise?
Finding your local council’s regulations
Most UK councils have a “noise and nuisance” section on their websites. You can search “[Your Council] + construction noise rules”.
Permitted hours for construction – weekday vs. weekend
Here’s a second table showing typical local policies:
| Council |
Weekday Hours |
Saturday Hours |
Sunday Rules |
| Camden |
8 AM – 6 PM |
8 AM – 1 PM |
No noisy work allowed |
| Manchester |
8 AM – 6 PM |
8 AM – 2 PM |
Quiet work only after 10 AM |
| Birmingham |
8 AM – 6 PM |
8 AM – 1 PM |
Generally prohibited |
| Leeds |
8 AM – 6 PM |
8 AM – 1 PM |
No noisy work allowed |
Examples from UK councils
In my area, the council doesn’t allow any noisy construction on Sundays without special permission. It’s worth calling your local authority if you’re unsure.
Is DIY Treated Differently Than Professional Building Work?
How councils view DIY noise?
DIY noise is usually treated with a little more leniency—but it can still count as a statutory nuisance if it’s frequent, loud, or done at unsocial hours.
When does DIY cross the line?
You’re likely crossing the line if:
- Work continues late at night
- Tools used include drills, hammers, or saws
- You’re doing projects for more than 2-3 weekends in a row
Your rights and responsibilities as a DIYer
As someone doing their own home improvements, I make sure to:
- Let neighbours know in advance
- Keep noise within social hours
- Take breaks to limit constant sound
Sunday Building Work: What’s Reasonable and What’s Not?
Using common sense to avoid neighbour complaints
If I have to do something noisy, I wait until after 10:00 AM and keep it under an hour. That’s usually considered fair.
Respecting quiet hours in a shared space
- No early-morning hammering
- Avoid power tools during family meal times (12–2 PM, 6–8 PM)
- Keep volume down if you’re working near open windows
Weekend etiquette for DIYers and tradesmen
Being respectful goes a long way. In most cases, neighbours are forgiving if you:
- Inform them in advance
- Apologise if they raise concerns
- Limit noise to reasonable times

Summary Table: Sunday Construction Laws by UK Council
| Council Name |
Allowed on Sunday? |
Contact for Complaint |
| Camden |
No |
Camden Noise Team |
| Manchester |
Limited (after 10AM) |
Manchester City Council |
| Birmingham |
No |
Birmingham Environmental Services |
| Leeds |
No |
Leeds Anti-Social Behaviour Team |
Final Thoughts: Should I Tolerate It or Take Action?
Sometimes, I remind myself that neighbours deserve to improve their homes too—but not at the expense of others’ peace.
Occasional vs. persistent noise – knowing the difference
If your neighbour drills once in a while, it’s probably fine. If they’re doing it every Sunday for months? Time to act.
- Talk first
- File a complaint if needed
- Consider community mediation before going legal
Creating peace in the neighbourhood
In the end, everyone wants a comfortable home. A little courtesy and communication go a long way.
Related Article: How Long Does It Take to Build a Conservatory?
FAQs
1. Can I use a lawnmower or strimmer on a Sunday?
Yes you can use a lawnmower, but try to do so between 10:00 AM and 6:00 PM. Avoid early morning or late evening mowing.
2. Can a landlord carry out noisy repairs on weekends?
Landlords are subject to the same noise regulations. If their work causes a nuisance, you can report it.
3. Can I request a building work permit for Sundays?
Some councils may issue out-of-hours permits for emergency or time-sensitive work. Contact your local authority.
4. What happens if a builder ignores the council’s construction noise rules?
They could face fines, enforcement notices, or even be shut down for non-compliance.
5. Can I take legal action against a noisy neighbour?
Yes. After documenting the issue and reporting it to the council, you can pursue a civil case if the problem persists.

by Kanimozhi BV | Jul 17, 2025 | Water Heater, Appliances
Have you ever noticed your radiator hot at top cold at bottom?
I’ve run into this issue more than once in my own home, and it’s more than just a minor annoyance—it’s a sign that something’s not quite right with your central heating system.
In this blog, I’ll walk you through what causes it, how I diagnose it, and the steps I take to fix it properly.
Why is My Radiator Hot at the Top but Cold at the Bottom?
What does it mean when your radiator isn’t heating evenly?
When a radiator heats unevenly—hot at the top, cold at the bottom—it typically means the hot water isn’t circulating properly through the whole radiator.
The top heats up as hot water enters, but something prevents it from fully reaching the bottom.
How does a radiator normally heat up?
In a healthy system, hot water from your boiler flows evenly from the top inlet to the bottom of the radiator. This creates a consistent surface temperature across the unit.
If you feel cold spots—especially at the bottom—it’s time to investigate.
What causes the cold bottom of a radiator?
Sludge buildup from dirty water
Over time, metal particles, rust, and dirt accumulate inside radiators, forming sludge.
This thick, muddy substance settles down and restricts the flow of hot water.
Poor water circulation in the central heating system
If your central heating pump is underperforming or incorrectly balanced, water may not be pushed through all parts of the system equally.
This can leave some radiators with poor flow—especially at the bottom.
Radiator balancing or flow issues
If one radiator in your home gets hot quickly and others lag behind, your system might be out of balance.
The water prefers the path of least resistance, leaving some radiators under-supplied.

How Do I Know If Sludge Is the Problem?
Signs that indicate sludge buildup in your radiator
From my experience, these are the telltale signs:
- Radiator is hot at the top but stone-cold at the bottom
- Brown or black water comes out when bleeding the radiator
- Other radiators in the home heat unevenly
- Boiler makes gurgling or banging noises
How to check your radiator for blockages?
I preferably feel the radiator surface from top to down. If the top heats quickly but the bottom stays cold even after running the heating for a while, sludge is likely the culprit.
Comparison Table: Trapped Air vs. Sludge in Radiators
| Symptom |
Trapped Air |
Sludge Buildup |
| Radiator hot at bottom cold at top |
Very common |
Rare |
| Radiator hot at top, cold at bottom |
Unlikely |
Most common |
| Gurgling or bubbling sounds |
Audible |
Usually silent |
| Water during bleeding is brown/black |
Typically clear |
Often dark and murky |
| Affects single radiator only |
Often |
Sometimes |
| Slows overall heating system performance |
Not usually |
Yes, across multiple radiators |
Whenever the air gets into the radiator, it rises up. Since water can’t circulate where air is present, the top of the radiator stays cold, even if the bottom warms up.
This is the opposite of the issue we’re discussing—but it’s worth checking just in case.
What does a radiator with air feel like?
It feels like warm at the bottom and cold at the top, which is the opposite of a sludge issue.
When should I bleed the radiator?
If your radiator is cold at the top and warm at the bottom, that’s a classic sign to bleed it. You’ll also hear gurgling sounds or notice inconsistent heating across the system.
How Do I Fix a Radiator That’s Hot at the Top and Cold at the Bottom?
Step-by-step: How I bleed a radiator properly?
If I suspect trapped air, I follow these steps:
- Turn off the heating and let it cool completely
- Use a radiator key to open the bleed valve
- Hold a cloth or tray under the valve
- Turn the key slowly—listen for a hissing sound (that’s air escaping)
- If water starts to trickle out in a time, then close the valve
- Turn the heating back on and check the radiator again
Note: Bleeding only helps if air is the issue. For sludge, you’ll need a different fix.
Power flushing your heating system – is it worth it?
If sludge is confirmed, I recommend a power flush. This involves pushing a chemical solution through the system to clean out sludge and debris. It is good done by a qualified heating engineer.
When do I need a heating engineer?
You should call a professional if:
- Multiple radiators show similar symptoms
- Bleeding doesn’t help
- Your boiler makes loud or unusual noises
- You suspect low water flow or a faulty pump
Tools and Items I Use for Radiator Maintenance
Here’s what I always keep on hand:
- Radiator bleed key
- Old towels or rags
- Tray or bowl (to catch water)
- Adjustable spanner
- Central heating inhibitor (for prevention)
Choosing the right radiator key
Most UK radiators use a standard square radiator key. You can buy them cheaply online or at DIY stores.
Best times of year for maintenance
| Season |
Why It’s Ideal |
| Spring |
Fix issues after winter’s heavy usage |
| Summer |
Allows time for power flushing before heating season |
| Early Autumn |
Prepares your system before cold weather hits |
How Do I Prevent This Problem in the Future?
Setting up a radiator maintenance schedule
I make it a habit to:
- Bleed my radiators twice a year
- Check for cold spots monthly during winter
- Book a full system check every 3–5 years
Using inhibitors to reduce sludge
A central heating inhibitor prevents rust and sludge buildup. I top it up after bleeding or draining my system.
Monitoring boiler pressure and heating circulation
Keep an eye on the boiler pressure gauge. If it’s too low, it can affect circulation and reduce radiator efficiency.

Final Thoughts: Keeping Your Radiators in Top Condition
Don’t avoid it next time if you notice your radiator is hot at the top but cold at the bottom. In my experience, it’s usually sludge or poor circulation—and both can be fixed with the right approach.
A bit of regular maintenance, bleeding, and perhaps a system flush will go a long way in keeping your heating system efficient and your home warm.
Related Article: Electric Boiler Cost Per Month: How Much Is It for Running
Frequently Asked Questions (FAQs) On Radiator Hot at Top Cold at Bottom
1. Does radiator size affect uneven heating?
Absolutely. Oversized radiators can dominate water flow, while undersized ones may never get enough. It’s important your system is properly balanced.
2. Will installing thermostatic radiator valves (TRVs) help?
TRVs help regulate room temperature but don’t solve internal blockages. They do, however, contribute to better system balance.
3. How often should I flush my radiators to prevent cold spots?
I recommend every 5–6 years, especially in older systems or homes with hard water.
4. Is a single cold radiator a sign of a bigger heating problem?
Sometimes. If you’ve ruled out air and sludge, it might point to a circulation issue, pump failure, or incorrect balancing.
5. Can I use chemical inhibitors myself, or do I need a professional?
You can add them yourself if you’re confident, but always follow the manufacturer’s guide. Incorrect use could affect your boiler warranty.
