
by Kanimozhi BV | Dec 2, 2025 | DIY Ideas, Home & Living
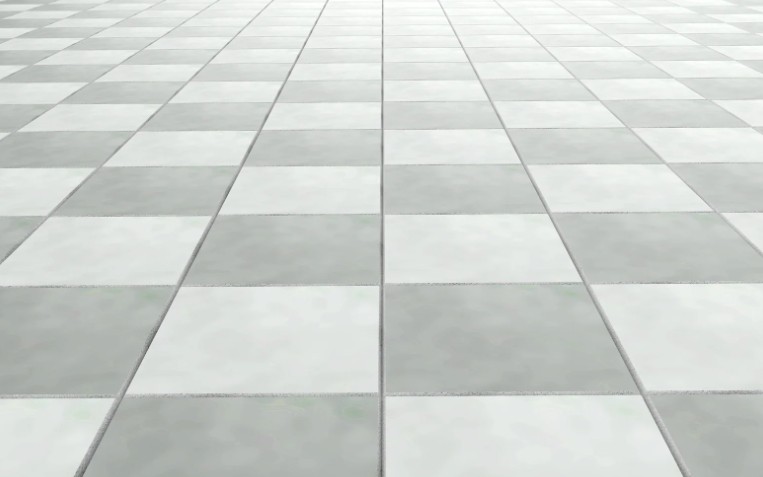
Why Grouting Floor Tiles Properly Matters?
When I first started tiling, I underestimated the importance on how to grout floor tiles properly. I thought it was just about filling gaps.
But grout does far more than that — it seals the joints, keeps moisture out, prevents tile edges from chipping, and even enhances the overall appearance of the tiled surface.
If grouting is done poorly or skipped altogether, tiles can shift, cracks may appear, and moisture can seep through the subfloor. In areas like bathrooms or kitchens, this could lead to mould growth or water damage. So learning how to grout floor tiles correctly isn’t just a finishing touch — it’s essential for durability and hygiene.
When Should You Grout? – The Right Time to Start
Timing matters. I always wait until the tile adhesive has fully cured — usually 24 hours, though it depends on the brand. Grouting too soon can displace tiles or trap moisture.
Before I begin, I double-check that:
- The tiles are firmly set and clean
- All tile spacers are removed
- There’s no dust, adhesive residue, or debris in the joints
Clean joints allow the grout to bond better and make the process far smoother.
I keep all my tools ready before I start grouting — it avoids interruptions mid-process. Here’s a quick checklist of what I use:
- Grout (powdered or premixed)
- Rubber grout float
- Mixing bucket & margin trowel
- Sponge and clean cloth
- Clean water
- Optional: rubber gloves, grout sealer
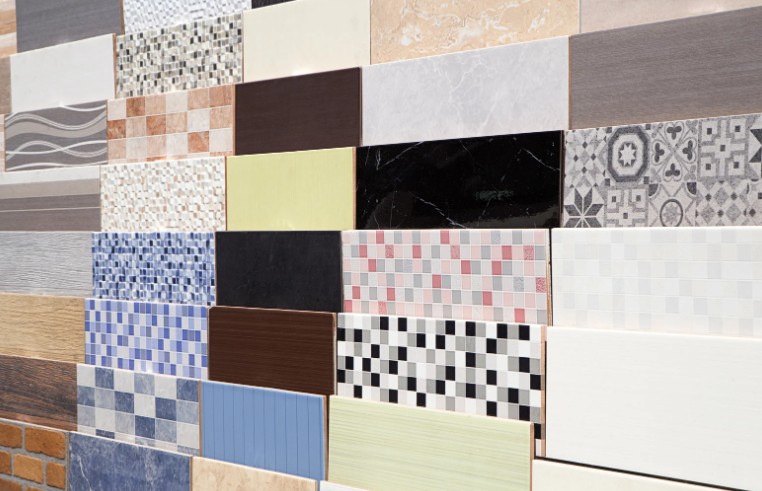
Choosing the Right Grout Type
Here’s a breakdown of common grout types I’ve worked with:
| Grout Type |
Best For |
Notes |
| Sanded Grout |
Wider joints (3mm or more) |
Adds strength, good for floors |
| Unsanded Grout |
Narrow joints (<3mm) |
Smoother texture, easy to spread |
| Epoxy Grout |
High-moisture areas |
Waterproof and stain-resistant, but trickier to apply |
| Premixed Grout |
Small DIY jobs |
Convenient but more costly |
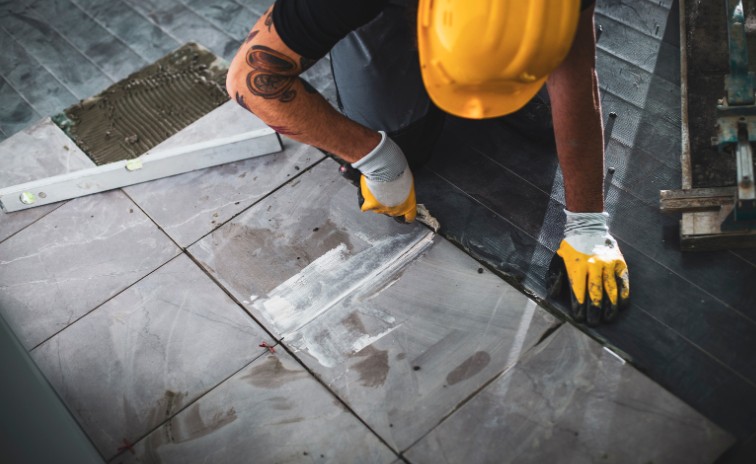
Step-by-Step: How I Grout Floor Tiles?
Let me walk you through the exact steps I follow when grouting floor tiles — this is a tried-and-tested method that works every time.
Step 1: Mix the Grout to the Right Consistency
If I’m using powdered grout, I mix it in a clean bucket by gradually adding water. The goal is a smooth, peanut butter-like texture — not too runny, not too dry.
I let it sit for a few minutes, then remix. This helps reduce air bubbles and improves spreadability.
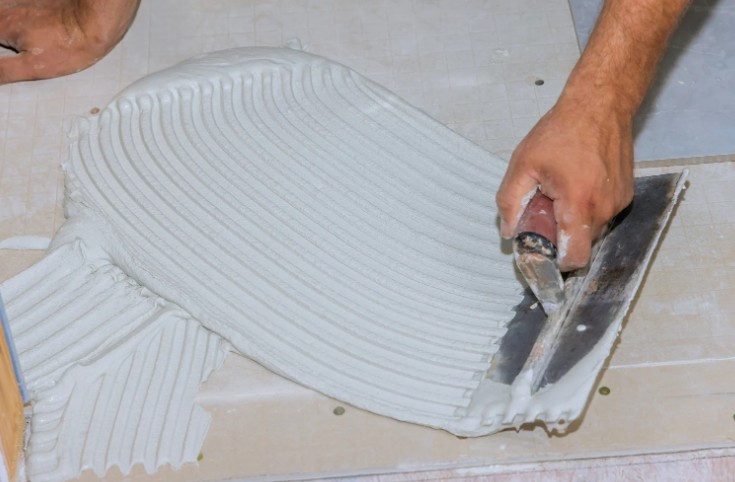
Step 2: Apply Grout Using a Float
I scoop the grout onto the tiles with a rubber grout float, holding it at a 45° angle. I press it firmly into the joints, dragging diagonally across the tiles to fully fill the gaps.
I always work in small sections (about 1m² at a time) so the grout doesn’t begin to harden before I’m ready to clean it.
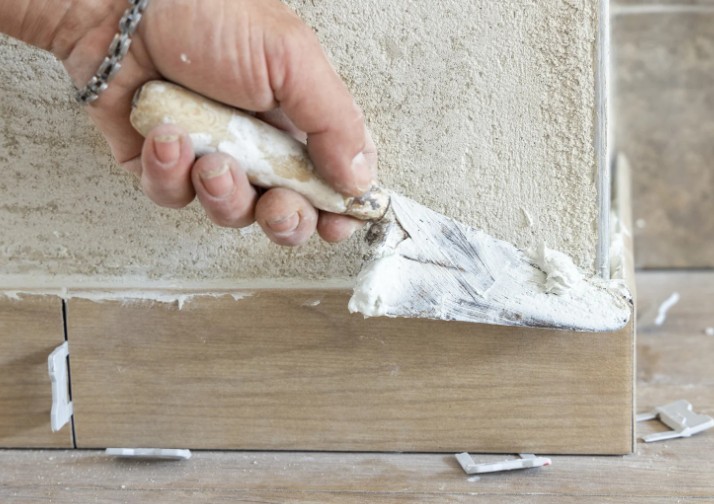
Step 3: Remove Excess Grout
Using the float at a sharper angle (closer to 90°), I scrape off the excess grout from the tile surface. It’s important to leave the grout in the joints but clear the rest to avoid a thick haze.
Step 4: Clean the Tiles with a Damp Sponge
After letting the grout sit for about 10 to 15 minutes, I wipe the tiles with a damp (not wet) sponge. I rinse frequently and use smooth, diagonal strokes to avoid pulling grout out of the joints.
This step may need to be repeated as the grout continues to cure — I often do a light second wipe after another 30 minutes.
Step 5: Buff and Finish
Once the grout has fully dried (usually 24 hours), I buff the tiles with a dry cloth to remove any remaining haze. For areas like bathrooms or kitchens, I often apply a grout sealer to protect against moisture and staining.
What to Watch Out For — Common Mistakes and How to Avoid Them?
Over the years, I’ve made a few errors and learned the hard way. Here are some grouting mistakes I now avoid at all costs:
- Mixing grout with too much water: Weakens the final result.
- Working too slowly: Grout can dry before you clean it.
- Poor joint filling: Leaving voids can lead to cracking.
- Over-washing tiles: Using too much water during cleaning can pull grout out or create uneven surfaces.
- Not sealing in wet zones: Especially in bathrooms, sealing is a must.

Aftercare — How to Make Your Grout Last
Once the grout is in place, I don’t just forget about it. Proper aftercare makes a big difference.
- Avoid walking on the floor for at least 24 hours
- Seal grout lines in moisture-prone areas for extra durability
- Clean regularly using pH-neutral cleaners — harsh chemicals can erode grout over time
Conclusion — My Final Thoughts and Best Practice Advice
Grouting is more than just the last step — it’s the final seal of protection and polish for your floor tiles. When done right, it keeps moisture out, holds tiles firm, and completes the look.
Take your time to:
- Mix the grout properly
- Fill joints completely
- Clean methodically and patiently
Don’t rush. Treat grouting floor tiles as a craft, not a chore. When I grout with care, I know I’m not just finishing the job — I’m protecting it for years to come.
Related Article: How Long Does Grout Take to Dry?
FAQs — Common Questions I Get Asked On How to Grout Floor Tiles
1. How soon can I walk on newly grouted floor tiles?
I always wait at least 24 hours before walking on the floor — and if I can, I leave it for 48. This gives the grout time to cure and harden properly.
2. What type of grout should I use for floor tiles?
For floors, I usually go with sanded grout unless the joints are very narrow. It’s more durable and less likely to shrink or crack.
3. Can I use the same grout for wall and floor tiles?
Technically yes, but I prefer using stronger, sanded grout for floors and unsanded for walls, especially with delicate tiles or narrow joints.
4. What if the grout starts cracking or crumbling?
If I spot cracks, I remove the damaged grout and reapply. Usually, the issue is from poor joint filling, incorrect mixing, or subfloor movement.
Home Diagnostics and Technical Standards Specialist at Hello Mag. She provides high-level Expertise in appliance mechanics and scientific pest management, ensuring every guide follows strict safety protocols and manufacturer standards. As a leading Authority on technical home specs, Kanimozhi audits complex data to provide homeowners with the most accurate, verified, and reliable diagnostic solutions available.
by Kanimozhi BV | Nov 27, 2025 | Home & Living
Why It Matters to Know How Long Does Grout Take to Dry?
When I first started tiling, I underestimated how important the drying time of grout really is. I assumed once it looked dry, it was ready — I learned the hard way that’s not true. Rushing the process can result in cracks, uneven colouring, or worse, water seeping into the gaps.
It’s essential to understand that drying time and curing time are two different things:
- Drying means the surface is dry to the touch.
- Curing is when the grout has fully hardened and bonded.
For a long-lasting, waterproof finish, especially in bathrooms and kitchens, I always wait until the grout is fully cured, not just dry.
What are the Typical Drying and Curing Times for Common Types of Grout?
The type of grout you’re using makes a big difference in how long you need to wait. Here’s a quick breakdown:
| Grout Type |
Average Drying Time |
Full Curing Time |
Use Area |
| Cement-based (sanded) |
24–72 hours |
72+ hours |
Floors, walls |
| Cement-based (unsanded) |
24–48 hours |
72 hours |
Walls, small joints |
| Epoxy grout |
24 hours |
24–48 hours |
Bathrooms, kitchens |
| Fast-drying grout |
4–6 hours (touch-dry) |
24 hours |
Small projects |
I always read the product label or instructions — different brands can have unique requirements, especially with newer epoxy blends.
What Affects Grout Drying Time: Factors You Should Know
It’s not just the grout type that matters — conditions at the time of installation play a big role. Here’s what I always watch out for:
1. Ambient Temperature and Humidity
Living in the UK, I’ve come to expect longer drying times, especially during autumn and winter. Cold temperatures slow down the evaporation process, while high humidity keeps moisture in the grout longer.
- Ideal drying conditions are around 21°C (70°F) with low humidity.
- In winter or rainy spells, I sometimes use a space heater and dehumidifier to maintain stable drying conditions.
2. Tile Type and Grout Joint Thickness
Questioning how long does grout take to dry on tile? Some tile materials, like porcelain or glazed ceramic, don’t absorb moisture from the grout, so drying relies entirely on ambient conditions.
Natural stone tiles, however, are porous and help wick moisture away, which can reduce drying time.
Also:
- Wider grout lines = more grout material = longer drying time
- Thinner lines tend to dry faster but still need full curing
3. Indoor vs Outdoor Projects
I’ve done a few patio and garden tiling jobs, and they always demand more time — not just because of exposure to the elements, but because the air temperature drops quickly outdoors, especially overnight.
If rain is in the forecast within 48 hours, I either reschedule or cover the area with waterproof sheeting after grouting.
4. Airflow and Ventilation
A closed-off room with no airflow can slow down drying dramatically. I always try to:
- Open windows (if it’s dry outside)
- Use fans or gentle ventilation
- Avoid high humidity or steam-producing appliances nearby
When Can I Use or Walk on My Newly Grouted Surface?
This is the most common question I get from friends who DIY — and I always tell them: just because it looks dry doesn’t mean it’s ready.
When Is It Touch-Dry?
In most cases, grout becomes dry to the touch in 24 hours, but that doesn’t mean it’s ready for foot traffic or moisture. I use my fingertip to gently press a hidden section — if it’s firm and cool, it’s likely dry, but I still wait the full period recommended.
Can I Walk On It the Next Day?
For cementitious grout, I never walk on it before 48 hours, and if it’s a high-traffic area, I stretch that to 72 hours. I also avoid dragging furniture or placing rugs too soon.
When Is It Ready for Water (e.g., Showers)?
If I’m working on a shower wall or bathroom floor, I allow 72 hours minimum before introducing water. For epoxy grout, this could be less (24–48 hours), but I always prefer to err on the safe side. I’ve seen mildew grow in grout that was exposed to moisture too early — not fun to fix!

What are the Tips to Help Grout Dry Properly? – And Maybe a Bit Faster
Over time, I’ve built a little checklist to speed up drying without compromising quality:
- Follow grout mixing instructions: Too much water in the mix prolongs drying and weakens the grout.
- Increase airflow: Use fans or open windows, but avoid direct blowing onto grout as that may cause uneven drying.
- Keep the temperature stable: Avoid grouting during cold nights or in rooms with no heating.
- Avoid over-washing the surface: Wiping the tiles too early can pull moisture from the grout and extend drying time.
- Don’t seal too soon: Sealing while the grout is still curing can trap moisture and lead to discoloration or soft spots.
Conclusion
So, how long does grout take to dry? On average:
- Cement-based grout: 24 to 72 hours for drying, up to 7 days for full cure.
- Epoxy grout: 24–48 hours for both drying and curing.
But this isn’t one-size-fits-all. It depends on the type of grout, your environment, and how the job was done.
I always read the instructions, respect the waiting times, and plan for delays — especially in the UK climate. In the end, a little patience goes a long way in ensuring a strong, beautiful, and long-lasting tiled surface.
Related Article: How Long Does Caulk Take to Dry?
Frequently Asked Questions About Grout Drying Time
1. Can I Walk on Tiles After 24 Hours?
Possibly, if you’re using quick-set or epoxy grout. But for cement grout, I personally wait at least 48 hours. I once walked on tiles after 18 hours — and ended up re-grouting the whole floor.
2. How Soon Can I Use a Shower After Grouting?
For cement grout, wait at least 72 hours. For epoxy, you might be okay after 24–48 hours — but double-check the manufacturer’s advice.
3. Does UK Weather Affect Drying Time?
Yes, massively. Our cooler, wetter climate can add 24–48 hours to drying time, especially in older, less insulated homes. I always plan grout jobs for drier weeks and monitor indoor humidity when working.
Home Diagnostics and Technical Standards Specialist at Hello Mag. She provides high-level Expertise in appliance mechanics and scientific pest management, ensuring every guide follows strict safety protocols and manufacturer standards. As a leading Authority on technical home specs, Kanimozhi audits complex data to provide homeowners with the most accurate, verified, and reliable diagnostic solutions available.
by Kanimozhi BV | Nov 26, 2025 | Wall, Home & Living, Interior
Why You Might Want to Cover Wall Tiles Instead of Removing Them?
There was a time I believed the only way to refresh my tiled kitchen splashback or that worn‑out bathroom wall was to rip everything off and start again.
But after facing the mess, dust, and cost of traditional tile removal, I quickly looked for smarter ways to upgrade my walls — without demolition.
Thankfully, doing and knowing how to cover wall tiles without removing them is not only possible, but also surprisingly easy, cost‑effective, and transformative.
Whether you’re dealing with dated patterns, cracks, or just fancy a new look, there are plenty of modern solutions that breathe new life into tired tiles — and I’ll walk you through them.
What Are Your Options for Covering Tiles (Without Removing Them)?

Over the years, I’ve tried and researched several practical methods to cover wall tiles while keeping my walls intact. Here’s what I discovered:
Painting Over Tiles
Probably the easiest and most affordable option. Tile paint has come a long way and is now available in durable, waterproof finishes that stick well to properly prepped tiles. It’s perfect for a quick refresh, especially in low‑splash zones.
Adhesive Films / Peel‑and‑Stick Tiles
These are ideal if you want a decorative finish without committing to anything permanent. They come in various patterns and sizes, and many are waterproof.
I used them once in a rented flat to cover ugly bathroom tiles — they looked great and peeled off cleanly when I moved out.
Decorative PVC or Waterproof Wall Panels
For a more robust and lasting makeover, I turned to PVC panels. They’re grout-free, waterproof, and ideal for bathrooms and kitchens. Plus, they go straight over tiles and give a sleek, modern finish.
Resurfacing Compounds or Micro‑cement
This is a more advanced technique but offers a seamless and modern look. I used this in a small en‑suite to give a concrete‑like appearance over old white tiles. The result was stunning — but it took some time and effort.
How to Choose the Right Method for Your Space?
Before diving in, it’s important to think about what you need. Here’s what I considered each time:
- Room type – Bathrooms need waterproof materials; kitchens may need splash-resistant finishes.
- Durability – Paint is quick but may wear over time. Panels and micro-cement are more long-lasting.
- Budget – Tile stickers and paint are cheaper. Panels and resurfacing are more costly but durable.
- Aesthetic goals – Do you want a bold new look or just a clean update?
- Tile condition – Uneven or damaged tiles might need extra prep.
Step‑by‑Step: How to Cover Wall Tiles Without Removing Them?
Here’s my detailed guide, based on my own DIY experiences using different methods.
Preparation is Key
No matter which method I chose, one thing remained constant — proper prep. Here’s how I got started every time:
- Gave the tiles a deep clean using sugar soap and hot water
- Removed all grease, soap residue, and mould
- Sanded glossy tiles lightly to help adhesion
- Repaired or replaced any loose tiles or cracked grout
If I Use Tile Paint?
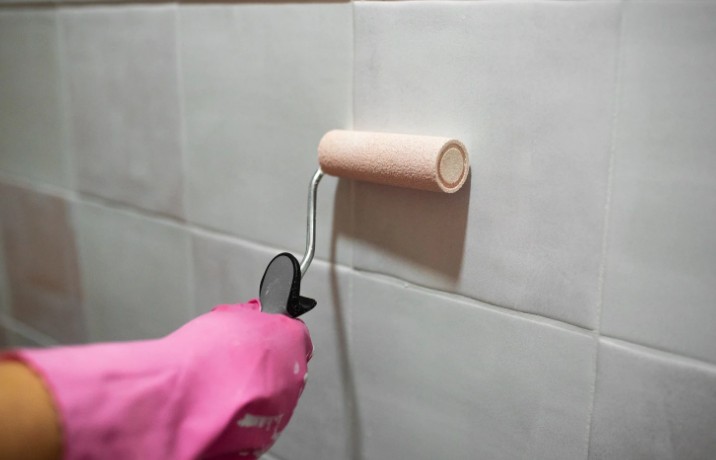
I applied a tile primer and let it dry fully.
Then, I painted using a foam roller in long, even strokes. I needed at least two coats.
For bathrooms, I sealed the paint with a clear, waterproof topcoat.
If I Use Peel‑and‑Stick Tiles or Films?
Measured each area carefully — especially around sockets and switches
Cut the film to size using a utility knife
Peeled the backing and applied the film slowly, smoothing bubbles as I went
If I Use PVC Panels?
I measured the wall and trimmed panels with a fine-tooth saw.
I applied solvent‑free adhesive on the back and pressed them onto the tile wall.
Corners and edges were sealed with silicone for a waterproof finish.
If I Use Resurfacing Compounds / Micro‑cement?
I mixed the compound carefully and applied the base coat over the tiles.
Then I added multiple thin layers, smoothing with a trowel.
Once dry, I sealed it with a protective topcoat to prevent staining.
What Method Worked Best for Me? (Pros & Cons Table)
Here’s a quick comparison of the methods I’ve tried:
| Method |
Pros |
Cons |
| Tile Paint |
Cheap, quick, lots of colour choices |
Can chip or fade over time; needs sealing |
| Peel‑and‑Stick Tiles |
Easy to apply, no tools, great for rentals |
Not as durable in bathrooms; may peel |
| PVC Wall Panels |
Waterproof, durable, sleek finish |
Requires accurate cutting and sealing |
| Micro‑cement / Resurfacing |
Seamless and modern finish, covers all flaws |
Needs skill, longer drying time, higher cost |

Conclusion — Why I Recommend Covering Tiles Without Removing Them?
Honestly, learning how to cover wall tiles without removing them has saved me hundreds of pounds, hours of labour, and loads of mess.
Whether it’s for a rented flat, a temporary fix, or a full makeover on a budget, these methods gave my walls a fresh new look without a single tile coming off.
My favourite approach? For a long‑lasting solution, I’d go with PVC panels or micro‑cement. But for quick fixes or rentals, tile paint and stickers worked wonders.
If you’re like me and want a smarter way to renovate — without dust, rubble, or regret — this is it.
FAQs I Often Asked Myself On How to Cover Wall Tiles Without Removing Them
1. Can I cover cracked tiles?
Yes, but you should fill cracks and repair loose tiles first. Adhesives and overlays need a stable base.
2. Will this work in a bathroom?
Absolutely — just make sure your solution is waterproof and sealed. I used wall panels around my shower and they held up beautifully.
3. How long will the results last?
Paint can last a few years, stickers may need replacing sooner, but PVC panels and resurfaced finishes can last over 5+ years with care.
4. Is this reversible?
Peel‑and‑stick tiles are, yes. Paint and wall panels are more permanent.
Home Diagnostics and Technical Standards Specialist at Hello Mag. She provides high-level Expertise in appliance mechanics and scientific pest management, ensuring every guide follows strict safety protocols and manufacturer standards. As a leading Authority on technical home specs, Kanimozhi audits complex data to provide homeowners with the most accurate, verified, and reliable diagnostic solutions available.

by Kanimozhi BV | Nov 25, 2025 | Garden, DIY Ideas, Exterior
When I first looked at my bumpy, uneven garden, I knew I had two choices: either call in expensive machinery or roll up my sleeves and do it myself. I chose the latter — and I haven’t looked back since.
If you’re like me, looking for a way on how to level a garden without a digger, you’re in the right place. Whether you’re planning to lay new turf, build a patio, or simply want a more usable and attractive outdoor space, this guide walks you through the process.
No need for heavy machinery — just a few tools, a bit of effort, and a DIY spirit.
How to Level a Garden Without a Digger? – Step-by-Step Guide
Levelling a garden manually may sound intimidating, but it’s a completely manageable project if broken down into clear, achievable steps. When I decided to take on the task myself, I found it was all about having the right plan, tools, and attitude. Here’s how I did it — and how you can too.
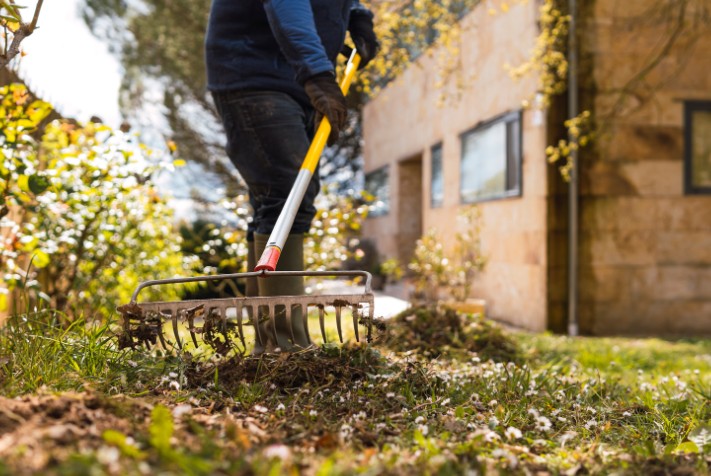
Step 1: Clear the Area
Before anything else, I started by preparing the surface:
- I removed any turf, weeds, dead plants, stones, and other debris.
- You can use a spade to lift the turf and a garden fork to uproot any deep-rooted weeds.
- If you’re planning to reuse the turf, stack it grass-side down in a corner and keep it moist.
Tip: Don’t skip this step — leftover roots and rocks will make it harder to get a smooth finish later on.
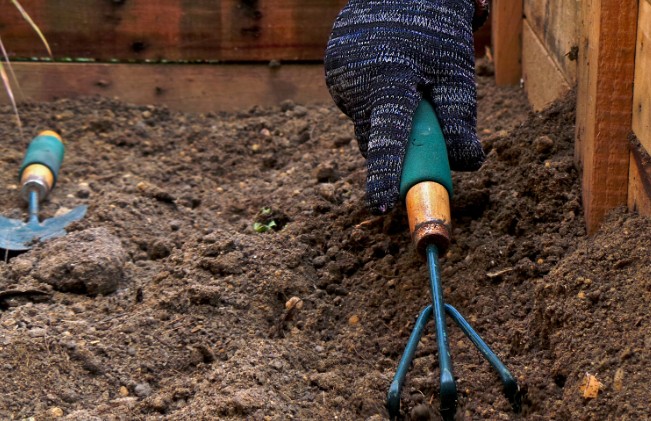
Step 2: Loosen the Soil
Once the area was cleared, I needed to break up the existing soil:
- I used a garden fork to loosen compacted ground, especially where there were high spots I planned to redistribute.
- For large areas, a manual rotavator can save time (and your back).
- The goal here is to create a workable, fluffy soil structure that can be easily moved and levelled.
This also helped improve drainage and aeration in the soil — a bonus for any plants or turf you’ll add later.
Step 3: Set Your Reference Level
This is where the real planning comes into play. I needed to know what “level” actually meant in my garden.
- I drove wooden stakes into the corners of the garden and ran string lines between them.
- I used a spirit level to check that the string was perfectly horizontal.
- Then I measured the distance between the string and the ground at various points to see where the land was uneven.
Pro Tip: If you don’t have a long spirit level, place a small one on a straight timber board to cover longer spans.
This gave me a clear visual map of the highs and lows in my garden.
Step 4: Redistribute the Soil
Now the real work begins.
- I used a shovel to move soil from the higher areas to the lower ones.
- Then I spread the soil out using a levelling rake, which has wider and flatter teeth than a standard rake.
- I worked in sections, always referring back to my string lines to stay on track.
If you’re dealing with deep dips, you’ll probably need to add topsoil. I mixed mine with compost to improve fertility and structure.

Step 5: Compact the Soil
A crucial step — and one many people skip.
- I lightly watered the soil to help it settle.
- Then, I compacted the surface manually using a tamper (a heavy, flat-bottomed tool). In areas where I didn’t have one, I simply placed a wooden board down and walked across it carefully to press the soil in.
- If you skip compacting, your garden may sink unevenly over time, especially after rain.
Alternative Tool: If you have one, a manual lawn roller is great for this — just make sure the soil isn’t too wet or too dry.
Step 6: Let the Ground Settle
This is the step that taught me patience.
- After compacting, I let the ground sit undisturbed for at least 5–7 days.
- I lightly watered the area once or twice to simulate rainfall, helping the soil compact naturally and expose any new low spots.
Once settled, I made small adjustments by topping up any sunken areas with a fine layer of topsoil and gently raking it level.
Step 7: Final Levelling and Raking
Now, with most of the heavy work done:
- I gave the whole area a final rake, working in opposite directions to break up clumps and get a fine, even texture.
- I double-checked the level against the string lines.
- If I was laying turf, I ensured the surface was flat but slightly compacted to support root growth.
At this point, the garden was flat, firm, and ready for whatever came next — grass, plants, patio stones, or a seating area.
Quick Recap Checklist
Here’s a summarised checklist you can follow:
- Remove turf, weeds, and debris
- Break up and loosen compacted soil
- Set string lines and reference levels
- Shift soil to flatten highs and fill lows
- Add topsoil and compost as needed
- Compact the ground manually
- Let the soil settle
- Make final rakes and tweak
Conclusion
Leveling a garden without a digger might sound like a challenge, but with the right tools and a little determination, it’s completely doable — I did it, and you can too.
Here’s what worked for me:
- Start small and stay patient.
- Use manual garden levelling techniques.
- Compact and reassess at each step.
- Don’t rush — let the soil settle naturally.
Whether you’re planning a new lawn, a patio, or just want to enjoy a smooth, safe outdoor space — take the time to level your garden right. Trust me, the satisfaction is worth every bit of effort.
FAQ: Common Questions About How To Level a garden Without a Digger
1. Can I really level a garden without machinery?
Yes — I did it myself using only basic hand tools. It takes time and elbow grease but saves a lot of money.
2. How long does it take?
For a small garden, I completed mine over two weekends. Larger gardens may take longer, especially if you’re working alone.
3. Do I need to remove all the turf?
If your garden is heavily uneven, yes. Removing the turf gives you a clean base to level accurately.
4. Can I reuse soil I dig out?
Absolutely! I reused most of my existing soil by mixing it with fresh topsoil and compost to improve structure.
5. What if the garden slopes?
It’s okay to maintain a slight slope for drainage, just ensure it’s even and deliberate — usually a 1:80 gradient away from the house is ideal.
6. Do I need planning permission?
Not usually, unless you’re significantly changing the elevation near property boundaries. For peace of mind, check with your local council.
Home Diagnostics and Technical Standards Specialist at Hello Mag. She provides high-level Expertise in appliance mechanics and scientific pest management, ensuring every guide follows strict safety protocols and manufacturer standards. As a leading Authority on technical home specs, Kanimozhi audits complex data to provide homeowners with the most accurate, verified, and reliable diagnostic solutions available.

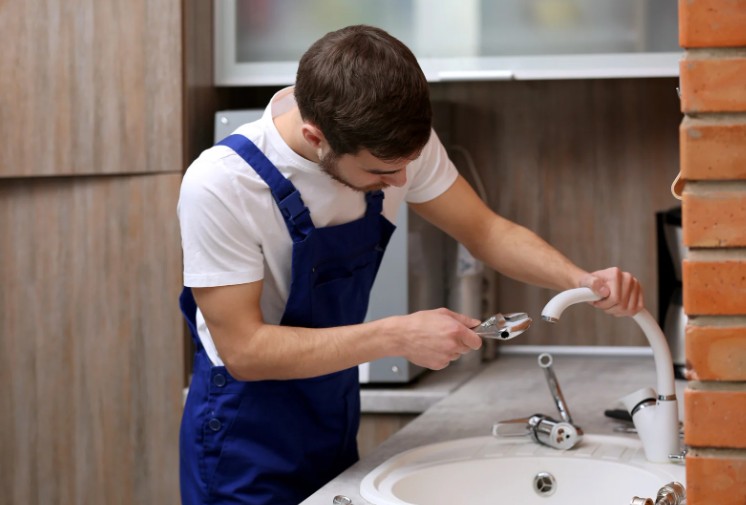
by Kanimozhi BV | Nov 15, 2025 | Bathroom, Interior
When someone asks me how much to fit a bathroom labour only, I always say: it depends — but I can give you a solid idea.
Over the years, I’ve fitted bathrooms across the UK in all kinds of homes, from small flats to large detached properties.
If you’re sourcing your own fixtures and materials, knowing what to budget for labour alone is key — and that’s exactly what I’ll cover here.
In this guide, I’ll break down exactly how much to fit a bathroom labour-only, what I typically charge, and how long the job usually takes. I’ll also explain what affects the price and why regional rates can vary quite a bit.
What Does Labour-Only Bathroom Fitting Include?
When I quote for labour only, it means I’m bringing my skills, tools, and time — but not supplying any materials or fixtures.
You’ll handle the shopping list: tiles, taps, toilets, showers, baths — the lot. My job is to install everything professionally and safely.

What I include in my labour cost?
- Removing the old bathroom (including fixtures and tiles)
- Installing the new suite, including toilet, basin, bath, and/or shower
- All plumbing connections
- Tiling walls and floors, if required
- Minor electrical fittings, such as lighting or extractor fans (if I’m certified or working with a qualified electrician)
What I don’t include?
- Purchasing or supplying materials
- Major structural changes or extensions
- Specialist items like underfloor heating or wet-room tanking (unless agreed in advance)
This approach works well for people who want more control over the style and budget — and often, it’s more affordable than hiring a supply-and-fit company.
How Much Do I Charge to Fit a Bathroom (Labour Only)?
This is the big question, and the honest answer is: it depends on the size of the job, the layout, and where you live.
But based on my experience fitting bathrooms across different parts of the UK, I can give you a reliable guide.
In most standard situations, a full labour-only bathroom fit will cost between £1,800 and £3,000. That includes everything from removal to finishing touches — all based on my day rate and how long the job takes.
Here’s a more detailed breakdown based on the typical tasks involved:
Labour-Only Bathroom Fitting Costs (My Average Charges)
| Task |
Typical Labour Cost (UK) |
What I Usually Charge |
| Full bathroom refit |
£1,800 – £3,000 |
£2,200 |
| Toilet installation |
£150 – £250 |
£180 |
| Basin installation |
£120 – £200 |
£150 |
| Bath installation |
£250 – £400 |
£300 |
| Shower installation |
£300 – £500 |
£400 |
| Wall and floor tiling |
£30–£50 per m² |
£40 per m² |
These figures are based on my own rates, and they may vary depending on your location, bathroom complexity, and whether you need any additional prep work done (like moving pipes or repairing walls).
Do Labour Costs Vary by Region in the UK?
Yes, absolutely — and it’s something I always explain to customers.
For example, when I quote in London or the South East, I often have to charge 20–30% more than in other areas.
That’s not just down to higher demand — it’s also due to travel time, congestion, parking restrictions, and the general cost of living.
When I’ve worked in the Midlands or the North, my day rate is often slightly lower, because there’s less overhead involved and the market is a bit more competitive.
Rural areas can also be cheaper — though access can sometimes slow the job down, which is a factor in the final cost.
What Impacts the Cost of Bathroom Fitting Labour?
There are a few key things that can push the price up or down when I’m quoting for a bathroom install:
- Size of the bathroom — Larger spaces need more tiling and more labour hours.
- Existing plumbing condition — If the pipework is old or non-compliant, I may need to spend more time fixing it before I can install anything.
- Number of fixtures — Installing a simple toilet and basin takes far less time than a full suite with bath, shower, bidet, and double vanity.
- Amount of tiling — Tiling is time-consuming, especially if you want intricate layouts or full wall coverage.
- Electrical work — If rewiring or lighting is needed, and I’m working alongside a qualified electrician, that adds another layer to the timeline and cost.
In some jobs, I’ve come in expecting a simple 5-day install, only to find issues behind the walls or under the floor. That’s why I always suggest having a small contingency in your budget — just in case.
How Long Does It Take Me to Fit a Bathroom (Labour Only)?
On average, a complete bathroom installation takes between 7 and 10 working days. Here’s how I typically schedule it:
- Day 1–2: Removal of the old bathroom
- Day 3–5: First fix plumbing and pipe adjustments
- Day 6–8: Tiling and wall preparation
- Day 9–10: Second fix (toilet, taps, shower) and finishing
This is a general outline, of course. If you have a large or particularly complex space — or if I run into issues like hidden leaks — I may need an extra couple of days. But I always aim to keep disruption to a minimum.
Should You Hire Labour Only or a Supply-and-Fit Service?
From my experience, going for labour only can save you money and give you more freedom over the design and materials. You’re not locked into one supplier’s products, and you can shop around for the best prices.
That said, if you’re short on time or you’d rather not manage the process yourself, a supply-and-fit service may be easier.
Some of my clients just don’t want the hassle of choosing tiles, coordinating deliveries, or making sure everything fits — and that’s totally fine.
If you’re confident sourcing your own materials and want a good fitter to bring your vision to life, labour-only is a great way to go.

Conclusion
So, how much to fit a bathroom (labour only)? Based on my experience, a full install typically ranges from £1,800 to £3,000, depending on where you are, how complex the work is, and what you’re asking me to fit.
By handling the materials yourself, you can save money and customise your space — but make sure you plan ahead, double-check product dimensions, and leave room for unexpected hiccups.
Whether you’re renovating a guest bathroom or fitting out a brand-new ensuite, hiring a skilled bathroom fitter for labour only can be a smart, flexible, and budget-friendly way to get the job done right.
Related Article: How Much Do B&Q Charge to Fit a Bathroom?
FAQs on How Much to Fit a Bathroom Labour Only
1. Is labour-only cheaper than a full bathroom install with materials?
Yes, usually. You avoid the fitter’s markup on materials, and you can control where and how you spend your money.
2. Can I supply second-hand fixtures for a labour-only install?
You can, but I always check them carefully before agreeing to fit. Damaged or incomplete parts can cause big delays.
3. What’s your daily or hourly rate for bathroom fitting?
Personally, I work on a day rate that usually falls between £200 and £250 per day, depending on location and job scope.
4. Do I need to hire other trades separately (like electricians)?
If the job requires certified electrical work, I either bring in someone I trust or work alongside an electrician you’ve hired.
5. Can you work weekends or evenings?
I sometimes offer weekend work for urgent jobs, though it may come with a higher rate. Evening work is rare due to noise and building regulations.
Home Diagnostics and Technical Standards Specialist at Hello Mag. She provides high-level Expertise in appliance mechanics and scientific pest management, ensuring every guide follows strict safety protocols and manufacturer standards. As a leading Authority on technical home specs, Kanimozhi audits complex data to provide homeowners with the most accurate, verified, and reliable diagnostic solutions available.
