
by Kanimozhi BV | Jan 29, 2026 | Garden, Exterior
Quick Answer:
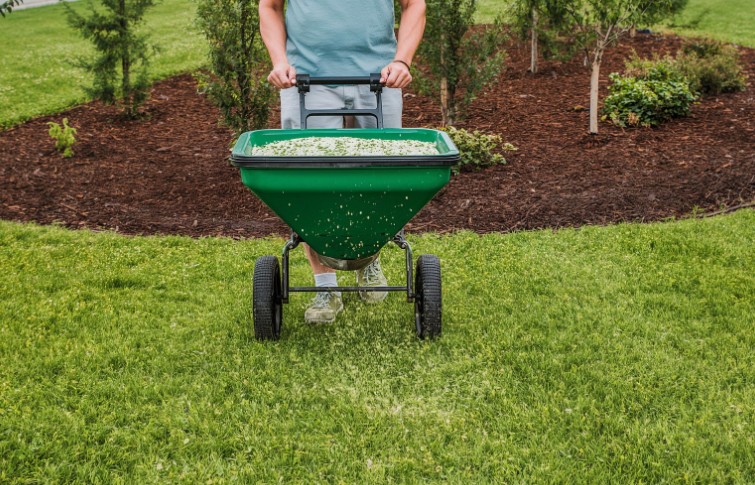
Will Grass Seed Germinate on Top of Soil?
Yes, grass seed will germinate on top of the soil, provided it has firm seed-to-soil contact and consistent moisture. In the UK, seeds left on the surface are highly vulnerable to birds and drying out, so you must press them into the dirt and water daily to ensure success.
- Best Time: April to May or September.
- Key Step: Rake the soil first and walk over the seeds after scattering.
- Success Rate: Significantly higher if seeds stay damp for 10–14 days.
Like many DIY gardeners in the UK, I found myself wondering — can grass seed actually grow if I just sprinkle it on top of the soil?
I didn’t have the time (or the tools) to dig, rake, or level out the garden. So, I went ahead and experimented with surface seeding. What followed was a mix of results, lessons, and surprisingly green patches of lawn.
If you’re curious whether grass seed will germinate without being buried, this post shares my experience, what worked, and what didn’t — especially under UK conditions.
Can grass seed really germinate on top of soil?
Yes — grass seed can germinate on top of soil, but it’s not the most reliable method unless you follow a few key steps.
Grass seeds don’t require deep planting, but they do need a few non-negotiables: moisture, warmth, and solid seed-to-soil contact.
When I first spread the seeds directly onto my lawn without doing much else, I noticed patchy germination. Some seeds sprouted beautifully, while others never took off.
After doing some digging (both in the garden and online), I learned that contact with soil is what really determines whether seeds survive and grow roots.
What are my step-by-step method that actually worked?
To increase my success rate, I refined my process and took a more intentional approach. Here’s what I did:
| Step |
What I Do |
Why It Works |
| 1. Prepare soil |
I rake and loosen the topsoil well |
Ensures better seed-to-soil contact |
| 2. Scatter seed |
I spread grass seed evenly on top |
Prevents patchy growth |
| 3. Press in lightly |
I gently walk or roll over the area |
Helps the seed grip the soil |
| 4. Water gently |
I mist it daily using a spray setting |
Keeps the seed moist without washing it away |
| 5. Stay off |
I avoid walking on it for 2–3 weeks |
Protects delicate sprouting roots |
By following this approach, I didn’t bury the seed — but I made sure it wasn’t just floating on top either. That slight pressing into the soil made all the difference.
What happens if grass seed stays above the soil?
When grass seed is left sitting right on top of compacted soil with no prep, here’s what I observed:
-
Moisture evaporates quickly — seeds dry out within a few hours on sunny or windy days.
-
Birds love easy meals — without any covering, birds had a feast.
-
Rain washed some away — a light rain was fine, but heavy downpours caused seed runoff.
-
Germination was uneven — some areas sprouted, others stayed bare.
In short, surface seeding can work, but the risks are higher — especially if you skip soil prep or watering. Seeds need moisture to swell and sprout. If they’re too exposed, they won’t survive long enough to germinate.
What conditions help grass seed germinate best in the UK?
After trial and error, I realised that the UK’s cool, moist climate can be friendly to surface seeding — but timing and care are crucial.
Moisture
Grass seed must stay moist for at least 7 to 14 days to germinate. I found that a gentle daily misting in the morning helped maintain that balance — not soaked, not dry.
Temperature
Grass seed likes soil temperatures around 10 to 18°C, which in the UK, is most common during spring (April to May) and early autumn (September). I had the best results in late April.
Even though I didn’t bury the seed, lightly pressing it down helped ensure each seed could absorb moisture and root properly. I did this with my feet and a light roller.
Weather
Cloudy days with light rain actually helped the seedbed stay moist naturally. I avoided seeding right before storms, though — too much water just caused pooling and seed wash-off.
What if I just leave the seed on the surface and do nothing?
I did try this once — just tossed seed across my patchy lawn and left it. Here’s what happened:
-
Around 30 to 40 percent of the seed germinated.
-
Birds took a noticeable share.
-
Some seedlings sprouted, but others dried up or never moved.
Basically, it kind of worked — but the result was uneven and looked messy. Some patches were lush, others were bald. Without that initial prep like raking and pressing in, the seeds had a harder time surviving.

What are Pros and cons of leaving grass seed on top of soil?
Pros:
Cons:
-
Lower germination rate
-
Higher seed loss to birds, wind, and rain
-
Patchier results unless soil is well prepped
If you’re overseeding a lawn or filling in thin areas, surface seeding can be convenient. But if you’re starting from scratch, I’d recommend investing more effort for better results.
Final thoughts: What I learned
From my trials, I learned that grass seed doesn’t need to be buried, but it does need help. Simply throwing it on the surface and hoping for the best won’t cut it — at least not in the unpredictable UK weather.
The key things that worked for me were:
-
Preparing the soil by raking it loose
-
Pressing the seed in lightly
-
Watering daily to keep the area moist
That combo gave me far better results than any of my earlier lazy attempts.
Conclusion
So, will grass seed germinate on top of soil? Yes — but only if you give it the right conditions.
Here’s what worked best for me:
-
Don’t bury the seed deeply — but don’t leave it completely exposed either.
-
Rake, press, and water — that’s the simplest, most effective approach.
-
Time it right in spring or autumn for the best UK results.
If you follow these simple steps, you’ll save time, avoid digging, and still end up with a lush, healthy lawn. Good luck — and don’t forget to keep the watering can handy!
What are the FAQs UK gardeners ask me about surface seeding?
1. Will grass seed grow if I don’t bury it at all?
Yes, it can — if you water it regularly and press it lightly into the soil. Just scattering and forgetting it won’t give you consistent results.
2. How long does it take to germinate on top of soil?
I usually see sprouts in 7 to 14 days, depending on temperature and how well I keep it watered.
3. Can I seed before rain and let nature do the work?
Light rain helps, but too much can wash the seed away. I now prefer to seed a day or two before steady, mild drizzle, not storms.
Home Diagnostics and Technical Standards Specialist at Hello Mag. She provides high-level Expertise in appliance mechanics and scientific pest management, ensuring every guide follows strict safety protocols and manufacturer standards. As a leading Authority on technical home specs, Kanimozhi audits complex data to provide homeowners with the most accurate, verified, and reliable diagnostic solutions available.

by Kanimozhi BV | Jan 29, 2026 | Coffee Machine, Appliances
🍋 Can I Clean My Dolce Gusto With Vinegar?
While you can technically use vinegar to clean a Dolce Gusto, it is not recommended by experts or manufacturers. Vinegar’s acetic acid is highly corrosive to the machine’s internal rubber seals (O-rings) and can leave a persistent sour taste that ruins your coffee for weeks.
The Temptation of the “Pantry Fix”
In the UK, we love a clever home hack. Whether it’s cleaning windows with newspaper or using bicarbonate of soda on carpets, white vinegar is often seen as the ultimate “save-all” for household maintenance.
When your coffee machine starts to slow down or that dreaded maintenance light flickers on, the question naturally arises: can I clean my Dolce Gusto with vinegar?
While vinegar is an effective descaler for a basic kettle, your Dolce Gusto is a high-pressure appliance. Using the wrong acid can be a costly mistake.
In this guide, we’ll look at the chemical impact of vinegar and why sticking to the professional steps for cleaning and descale a Dolce Gusto coffee machine is the only way to guarantee a long life for your appliance.
The Science: Vinegar vs. Official Descaling Solutions
The conflict lies in the type of acid being used. White vinegar contains acetic acid (usually at a 5% concentration). While this dissolves limescale, it is also a “volatile” acid that interacts poorly with certain metals and rubbers.
Comparison: Cleaning Agents for Dolce Gusto
| Feature |
White Vinegar |
Lactic Acid (Official) |
| Limescale Removal |
Moderate |
Very High |
| Seal Safety |
Risky (Corrosive) |
Safe |
| Rinse Frequency |
5-8 Tanks |
1-2 Tanks |
| Cost |
Low |
Moderate |
Professional descaling solutions (like those from Krups or De’Longhi) typically use lactic acid. This is formulated specifically to be “food-safe” and “seal-safe,” meaning it dissolves minerals without eating away at the machine’s internal glue or gaskets.
Can Vinegar Damage My Dolce Gusto Machine?
The primary danger of using vinegar isn’t immediate failure, but gradual degradation. Dolce Gusto machines rely on 15 bars of pressure to create that perfect crema. To hold that pressure, the internal O-rings must be flexible and perfectly seated.
- Impact on Rubber: Acetic acid causes rubber to “perish,” becoming brittle and prone to cracking.
- Internal Leaks: Once a seal cracks, water begins to leak into the internal electrical housing.
- Pressure Issues: A damaged seal can lead to your Dolce Gusto machine buzzing, as the pump can no longer maintain the vacuum needed to pull water from the reservoir.

Safe Vinegar Alternatives for Surface Cleaning
While the internal pipes should be a vinegar-free zone, this DIY hero is still useful for the exterior of your machine:
- Drip Tray: Soak the plastic tray in vinegar and warm water for 15 minutes to remove milk residue.
- Exterior Buff: Use a microfibre cloth and a tiny amount of vinegar to remove finger marks from the chrome or plastic casing.
What are the FAQ about Can I clean my Dolce Gusto with vinegar?
1. Will using vinegar void my warranty?
In most cases, yes. If a technician identifies that the internal seals have been corroded by non-approved chemicals like acetic acid, your manufacturer’s warranty will likely be voided.
2. How many times do I need to rinse if I already used vinegar?
If you have already used vinegar, don’t panic. Run at least 6 full tanks of water through the machine (3 hot, 3 cold). If the coffee still smells slightly sour, continue rinsing. The smell is a sign that acid residue is still present.
3. What is the best alternative to white vinegar?
The best alternative is a dedicated descaling liquid containing lactic acid. If you are in a pinch, citric acid powder is safer for the seals than vinegar, but still not as effective as professional solutions.
Home Diagnostics and Technical Standards Specialist at Hello Mag. She provides high-level Expertise in appliance mechanics and scientific pest management, ensuring every guide follows strict safety protocols and manufacturer standards. As a leading Authority on technical home specs, Kanimozhi audits complex data to provide homeowners with the most accurate, verified, and reliable diagnostic solutions available.
by Kanimozhi BV | Jan 28, 2026 | DIY Ideas, Pest Control
Quick Answer: How to Get Rid of Mice in House
- Seal Entry Points: Fill small gaps in walls, floorboards, and around pipes using steel wool and caulking.
- Remove Food Sources: Store all dry goods in airtight glass or metal containers and clean crumbs daily.
- Use Natural Deterrents: Place cotton balls soaked in peppermint oil near suspected entry points.
- Set Humane Traps: Use live-catch traps with peanut butter and release mice at least one mile away.
- Eliminate Nesting: Clear out clutter in lofts, cupboards, and garden sheds to remove hiding spots.
Finding signs of mice in your home — whether it’s droppings in a cupboard, scratching noises in a wall, or chewed food packaging — can be worrying.
Mice are common in UK homes, especially in autumn and winter when they seek warmth and food. The good news is that you can deal with them effectively using practical, safe methods.
This guide gives you clear, step‑by‑step advice on how to get rid of mice in the house, how to spot where they’re active, and how to stop them coming back.
How to Get Rid of Mice in House?
Getting rid of mice involves a structured approach — identify, remove, seal, clean and prevent.
Step 1: Confirm Infestation Before Acting
Make sure the problem is mice and not something else:
- Mouse Droppings look like small black pellets.
- Scratching noises are usually at night along walls or in lofts.
- Chew marks on food packets, wires, foam and wood.
- Greasy marks along walls where mice rub as they travel.
Once you’re confident mice are present, you can tackle the problem effectively.
Step 2: Locate Entry Points and Activity Areas
Mice move along edges and use the same routes repeatedly. Look for:
- Gaps around pipes, ducts and vents
- Cracks in walls or where floor meets wall
- Spaces under doors or loose skirting
- Crumbling plaster or unused external openings
Mark each potential entry so you can seal them later.
Step 3: Place Traps Strategically and Safely
Trapping is one of the most practical ways to reduce numbers quickly. Don’t just scatter traps randomly — position them where you’ve seen droppings or signs of activity.
Effective Trap Types
| Trap Type |
Best For |
Pros |
Cons |
| Snap traps |
Quick elimination |
Fast and effective |
Can be unpleasant to check |
| Humane traps |
Low‑level infestations |
No kill |
Requires daily checking & relocating |
| Electronic traps |
Clean, tech solution |
Quick kill, reusable |
Costlier |
| Glue boards |
Not recommended for DIY |
Easier to set |
Inhumane, discouraged in UK DIY |
Best Bait Options:
Peanut butter, chocolate spread, or oats mixed with a bit of honey. Place baited traps perpendicular to walls, with the bait side closest to the wall — this is where mice travel most.
Step 4: Seal Every Entry Point
Even if you catch one or two mice, others will enter if the access points remain open. After you’ve set traps, make sure you seal every possible opening.
Materials that Work Well
- Steel wool or copper mesh: Mice cannot gnaw through it.
- Wire mesh: Good for vents or larger gaps.
- Expanding foam plus mesh: Fills irregular holes effectively.
- Door sweeps or weather‑strips: For gaps under external doors.
Focus on areas around pipework, under sinks, along skirting boards, and around loft or roof openings.
Step 5: Clean Thoroughly to Remove Food and Scent Trails
Mice leave scent trails that guide others to the same food sources or hiding spots. Cleaning eliminates attractants and reduces their ability to navigate.
Clean these areas:
- Worktops, floors and cupboards
- Behind appliances where crumbs collect
- Pet feeding areas and bowls
- Food storage zones
- Garbage bins and waste areas
Always use gloves and a disinfectant. Never sweep or vacuum dry droppings — dust can become airborne and harmful.

Step 6: Monitor and Reassess
After 7–10 days, check:
- Are traps still catching mice?
- Are droppings still appearing?
- Any new scratching noises?
If the signs have disappeared, you’re likely clear. If activity continues, you may need to adjust trap placement or seek professional support.
Why Mice Enter Your House?
Mice are attracted to your home for three main reasons:
- Food: Unsealed food, pet food left down overnight, crumbs and waste all offer easy meals.
- Shelter: Warm spaces, calm night hours and hidden areas like lofts or cupboards are ideal nesting zones.
- Access: Small gaps in walls, floors, pipes or doors allow mice to slip in with ease.
Even tiny gaps — the width of a pencil — can be enough for mice to enter.
Just like mice, rats also exploit small openings around your property. If you’re dealing with larger rodents too, learn how rats get into your house and how to block their entry points.
What are the Common Signs of Mice in Your House?
Mice are shy and mostly active at night, so you might not see them — but the evidence they leave is usually clear:
Table: Quick Reference – Signs, Hiding Spots & Removal Actions
| Category |
Details |
| Signs of Mice |
Droppings, scratching noises, gnaw marks, grease trails |
| Where They Hide |
Behind appliances, lofts, under floorboards, wall cavities, storage areas |
| How to Remove Them |
Traps, sealing entry points, thorough cleaning, natural deterrents |
| When to Call a Pro |
Persistent activity across rooms, nests or continued signs after removal |
Where Mice Hide in UK Homes?
Mice can squeeze into small spaces and choose hiding spots that are dark and quiet. Check these areas carefully:
- Kitchens: Behind fridges, ovens and in cupboards — especially low units.
- Lofts and attics: Warm and quiet with good nesting material.
- Under floorboards: Gaps around skirting boards and floor edges.
- Wall cavities: Often unseen until you start renovating or fixing.
- Garages and sheds: Around stored items, cardboard boxes and clutter.
Use a torch to inspect dark corners, behind appliances, and around boiler cupboards for signs such as droppings or nesting material.

What are the DIY Ideas to Try at Home?
If you prefer to avoid chemicals or want to support your main strategy, the following DIY methods are worth trying:
- Peppermint oil pads: Place cotton balls with peppermint oil in cupboards and near suspected entry points. Refresh every few days.
- Clove oil or cayenne pepper: Strong smells can make areas less attractive to mice.
- Vinegar spray: Helps to erase scent trails.
- Tidy up outside: Keep compost, wood piles and plant pots away from house walls to reduce shelter for mice.
- Bucket or balance traps: Simple homemade traps can catch mice humanely if checked daily.
My Suggestion
Begin with good trap placement and sealing entry points — these two actions alone often stop infestations quickly.
Use natural deterrents like peppermint oil only as a supplement, not a standalone solution. If signs of mice persist after one to two weeks, call a professional pest controller because hidden nests or complex entry routes can be hard to manage alone — especially in older UK homes.
Conclusion
Doubtful about how to get rid of mice in house and dealing with them can be stressful, but with the right approach, it’s completely manageable.
By identifying signs early, locating hiding spots, applying effective traps, sealing entry routes, and maintaining good hygiene, you can eliminate mice from your home and reduce the risk of them returning.
Stay consistent, keep an eye on problem areas, and don’t hesitate to seek professional help if needed — your home and health are worth it.
What are the FAQs About How to Get Rid of Mice in House?
1. How long does it take to get rid of mice?
Typically 1–2 weeks with consistent trapping, sealing and cleaning.
2. Are ultrasonic repellents effective?
They may help as part of a broader strategy but are not reliable on their own.
3. Can mice make me ill?
Yes — their droppings and urine can carry bacteria. Always use protective gloves when cleaning.
4. Do I need professional help?
If traps aren’t working or you have signs across many rooms, professional pest control is recommended.
5. Is one mouse a problem?
Yes — one often means more. Mice reproduce quickly and leave scent trails that attract others.
Home Diagnostics and Technical Standards Specialist at Hello Mag. She provides high-level Expertise in appliance mechanics and scientific pest management, ensuring every guide follows strict safety protocols and manufacturer standards. As a leading Authority on technical home specs, Kanimozhi audits complex data to provide homeowners with the most accurate, verified, and reliable diagnostic solutions available.

by Kanimozhi BV | Jan 28, 2026 | Pest Control
Quick Answer: You can get sick from mouse droppings in the UK, but the overall risk is low. Serious illnesses like hantavirus and leptospirosis are rare, especially if you clean up droppings safely and maintain proper hygiene. The biggest risk comes from disturbing dried droppings and breathing in particles without protection.
Chances of Getting Sick from Mouse Droppings UK
Can You Get Sick from Mouse Droppings?
Mouse droppings in your home are more than just a nuisance — they carry health risks, especially if you’re exposed during cleaning, renovations, or pest control work.
While the chances of getting seriously ill are low in the UK, it’s important to handle droppings carefully to avoid unnecessary exposure.
If you’re improving or managing your property and uncover signs of an infestation, safe cleanup should always be your priority.
Are Mouse Droppings Dangerous in the UK?
Mouse droppings are considered a health risk in the UK, but they are not usually dangerous if handled correctly. The danger doesn’t come from seeing droppings alone — it comes from how you’re exposed to them.
In UK homes, the most common risks are linked to bacteria rather than severe viral disease. Serious illnesses are rare, but droppings can still contaminate surfaces, food preparation areas, and enclosed spaces such as cupboards, lofts, and garages.
Mouse droppings are more dangerous if:
-
They are dry and disturbed, allowing particles to become airborne
-
They are found in kitchens or food storage areas
-
There is an ongoing or heavy infestation
-
Cleaning is done without protective measures
For most households, mouse droppings are a hygiene issue first and a health risk second. However, ignoring them or cleaning them incorrectly increases the chance of illness, especially during DIY work, renovations, or deep cleaning projects
How Illness Can Happen from Mouse Droppings?
You may be exposed to harmful bacteria or viruses through:
-
Breathing in particles from dried droppings that become airborne during cleaning
-
Touching droppings or contaminated surfaces, then touching your eyes, nose, or mouth
-
Eating food that’s been contaminated by rodent waste
Even small amounts of faeces can pose a risk if not cleaned up properly.

Illnesses Linked to Mouse Droppings
While rare, the following health issues are associated with exposure to rodent droppings in the UK:
| Illness |
Transmission |
Common Symptoms |
| Leptospirosis (Weil’s) |
Contact with rodent urine |
Fever, muscle pain, headaches |
| Salmonella |
Contaminated food or surfaces |
Diarrhoea, stomach cramps, vomiting |
| Hantavirus |
Inhalation of contaminated dust |
Flu-like symptoms, fatigue, breathing issues |
| Lymphocytic choriomeningitis virus (LCMV) |
Droppings and nesting material |
Headache, fever, nausea, rarely meningitis |
These illnesses are more likely to occur in areas with heavy infestations or where droppings are left uncleaned for long periods.
How to Clean Up Mouse Droppings in the UK Safely?
Cleaning mouse droppings safely is essential to reduce your risk of getting sick. The key rule is to avoid creating dust or airborne particles.
Follow this step-by-step method recommended for UK homes:
Step 1: Ventilate the area
Open windows and leave the room for at least 20–30 minutes before cleaning.
Step 2: Wear protective equipment
Use disposable gloves and, ideally, a face mask, especially in enclosed spaces.
Step 3: Disinfect before touching
Spray droppings with a household disinfectant or diluted bleach solution. This prevents particles from becoming airborne.
Step 4: Remove droppings carefully
Use paper towels or disposable cloths to pick up the droppings. Place them in a sealed plastic bag.
Step 5: Clean surrounding surfaces
Disinfect all nearby areas, including floors, shelves, skirting boards, and any surfaces the mice may have contacted.
Step 6: Dispose and wash thoroughly
Seal the waste bag and place it in an outdoor bin. Wash your hands thoroughly with soap and warm water.
Do not sweep or vacuum dry droppings. This is one of the most common mistakes and significantly increases the risk of inhaling contaminated particles.
If droppings are widespread, found in hidden voids, or keep reappearing, professional pest control is strongly recommended to deal with the source of the problem, not just the mess.
How Likely Are You to Get Sick?
In general, the risk of illness is low in UK homes. You’re most at risk if:
-
The infestation is large or long-standing
-
You clean without protective gear
-
You handle droppings while dry or dusty
-
You fail to clean nearby surfaces properly
Most people won’t get sick if proper hygiene is followed, but the risk increases when safety steps are skipped.

Summary: What You Should Know?
If you’re dealing with mouse droppings during a home project, the most important thing is how you respond. Left untouched or cleaned improperly, droppings can present a health hazard.
However, with careful handling, ventilation, and proper disinfection, you can protect yourself and others in your home.
Pest control should always be considered if you see frequent or widespread droppings. Mice reproduce quickly, and the health risks increase with the size and persistence of an infestation.
What are the FAQs About Chances of Getting Sick from Mouse Droppings UK?
1. Can mouse droppings cause illness in the UK?
Yes, although it’s uncommon. Illnesses like leptospirosis, salmonella, and hantavirus are possible but rare, especially in domestic settings. Proper cleaning significantly reduces the risk.
2. What happens if I touch mouse droppings?
If you touch droppings and then your mouth, nose, or eyes, you risk infection. Always wear gloves and disinfect the area before handling.
3. How long do mouse droppings remain dangerous?
Dried droppings can remain hazardous for weeks or even months, especially in poorly ventilated areas. The bacteria or viruses can become airborne when disturbed.
4. Is it safe to vacuum mouse droppings?
No. Vacuuming can release particles into the air, increasing the risk of inhalation. Always disinfect and wipe up droppings first.
5. Do I need professional pest control?
If you notice frequent droppings, gnaw marks, or signs of nesting, it’s a good idea to call pest control. A professional can remove the infestation safely and prevent it from returning.
Home Diagnostics and Technical Standards Specialist at Hello Mag. She provides high-level Expertise in appliance mechanics and scientific pest management, ensuring every guide follows strict safety protocols and manufacturer standards. As a leading Authority on technical home specs, Kanimozhi audits complex data to provide homeowners with the most accurate, verified, and reliable diagnostic solutions available.
![[Solution] Dolce Gusto Machine Buzzing But Water Not Coming Through](https://www.hellomag.co.uk/wp-content/uploads/2026/01/Dolce-Gusto-Machine-Buzzing-But-Water-Not-Coming-Through.jpg)
by Kanimozhi BV | Jan 22, 2026 | Coffee Machine, Appliances
The 60-Second Solution
If your machine is buzzing but dry, you likely have an Air Lock or a Blocked Needle. First, ensure the water tank is firmly seated. If that fails, the most common fix is using the cleaning pin (found behind your water tank) to clear the tiny injection needle.
There is nothing more disappointing than hearing the familiar hum of your coffee maker, only to find your mug remains empty.
If your Dolce Gusto machine buzzing but water not coming through, it’s a sign that the pump is working, but a physical blockage or a pocket of air is stopping the flow.
Before you consider a replacement, most flow issues can be fixed at home in under five minutes. If you’ve recently cleared a blockage, we recommend following up with a full clean using our guide on Dolce Gusto coffee machine cleaning to prevent the issue from returning.
What are the 3 Ways to Fix a Dolce Gusto Machine Buzzing But Water Not Coming Through?
1. Unblock the Injection Needle (The Most Likely Culprit)
Over time, coffee grounds or limescale can clog the tiny needle that pierces the capsule. When this happens, the pump struggles against the pressure, causing a loud buzzing sound.
- Find the Pin: Most machines have a small, flexible wire cleaning pin located behind the water tank or underneath the base.
- The Fix: Remove the capsule holder, lift the locking handle, and gently poke the pin into the needle hole. Move it around to dislodge any debris.
2. Clearing an “Air Lock”
If you recently ran the tank dry, air may have entered the internal pipes. The pump cannot “grab” the water because of the air bubble.
- The “Wiggle” Technique: While the machine is switched on and the lever is in the “Hot” position (buzzing), gently lift and re-seat the water tank several times. This creates a pressure change that often “primes” the pump.
- The Damp Cloth Trick: Remove the tank and place a warm, damp cloth over the water inlet on the machine. Blow gently into the inlet (using a straw if needed) to force water through the system.
3. Check the Tank Valve
Sometimes the rubber seal at the bottom of the water tank gets stuck. Ensure there are no coffee grounds trapped in the valve and that the tank is clicking perfectly into place. If the valve doesn’t open, the pump will buzz but stay dry.

What are the FAQ About Dolce Gusto Machine Buzzing But No Water?
1. Machine is very loud but no water?
The pump is “dry-running.” Turn it off immediately to avoid overheating and try the air-lock fix above.
2. Water leaks from the bottom instead?
This suggests an internal pipe has popped off due to the pressure of a blockage. Professional repair may be needed.
3. Can I still use my machine if it’s buzzing but no water comes through?
No. You should stop the machine immediately. If the pump continues to buzz without water flow, it can overheat and cause permanent internal damage.
4. Why is my Dolce Gusto machine buzzing but water not coming through?
The most common reasons are a blocked injection needle or an air lock in the internal pipes. Both can be fixed by clearing the needle with a cleaning pin or re-priming the water tank.
Top Tip: Never leave a capsule in the machine after use. Dried coffee in the needle is the #1 cause of the “buzzing but no water” error in UK households.
Home Diagnostics and Technical Standards Specialist at Hello Mag. She provides high-level Expertise in appliance mechanics and scientific pest management, ensuring every guide follows strict safety protocols and manufacturer standards. As a leading Authority on technical home specs, Kanimozhi audits complex data to provide homeowners with the most accurate, verified, and reliable diagnostic solutions available.
